Inspect Measure Documentation - How to
This documentation is regularly updated to reflect any changes or improvements in the software.
If you have any questions or need further assistance, please don't hesitate to contact us or submit a ticket through our service desk.
We're here to help! 😇
Introduction
Inspect Measure comes in two versions: one for users with ERP integration, and one for those who work manually. In the rest of this documentation, we’ll refer to them as ERP users and Manual users.
Schemas
How to compare changes between Schema versions in Inspect Measure
Inspect Measure does not yet include this functionality directly. Until it does, you can use the steps below to retrieve and compare Schema versions manually.
This guide explains how to find, download, and compare different versions of Schemas in Inspect Measure. Use this method to verify what has changed between versions or to restore details from an earlier revision.
Step-by-step guide
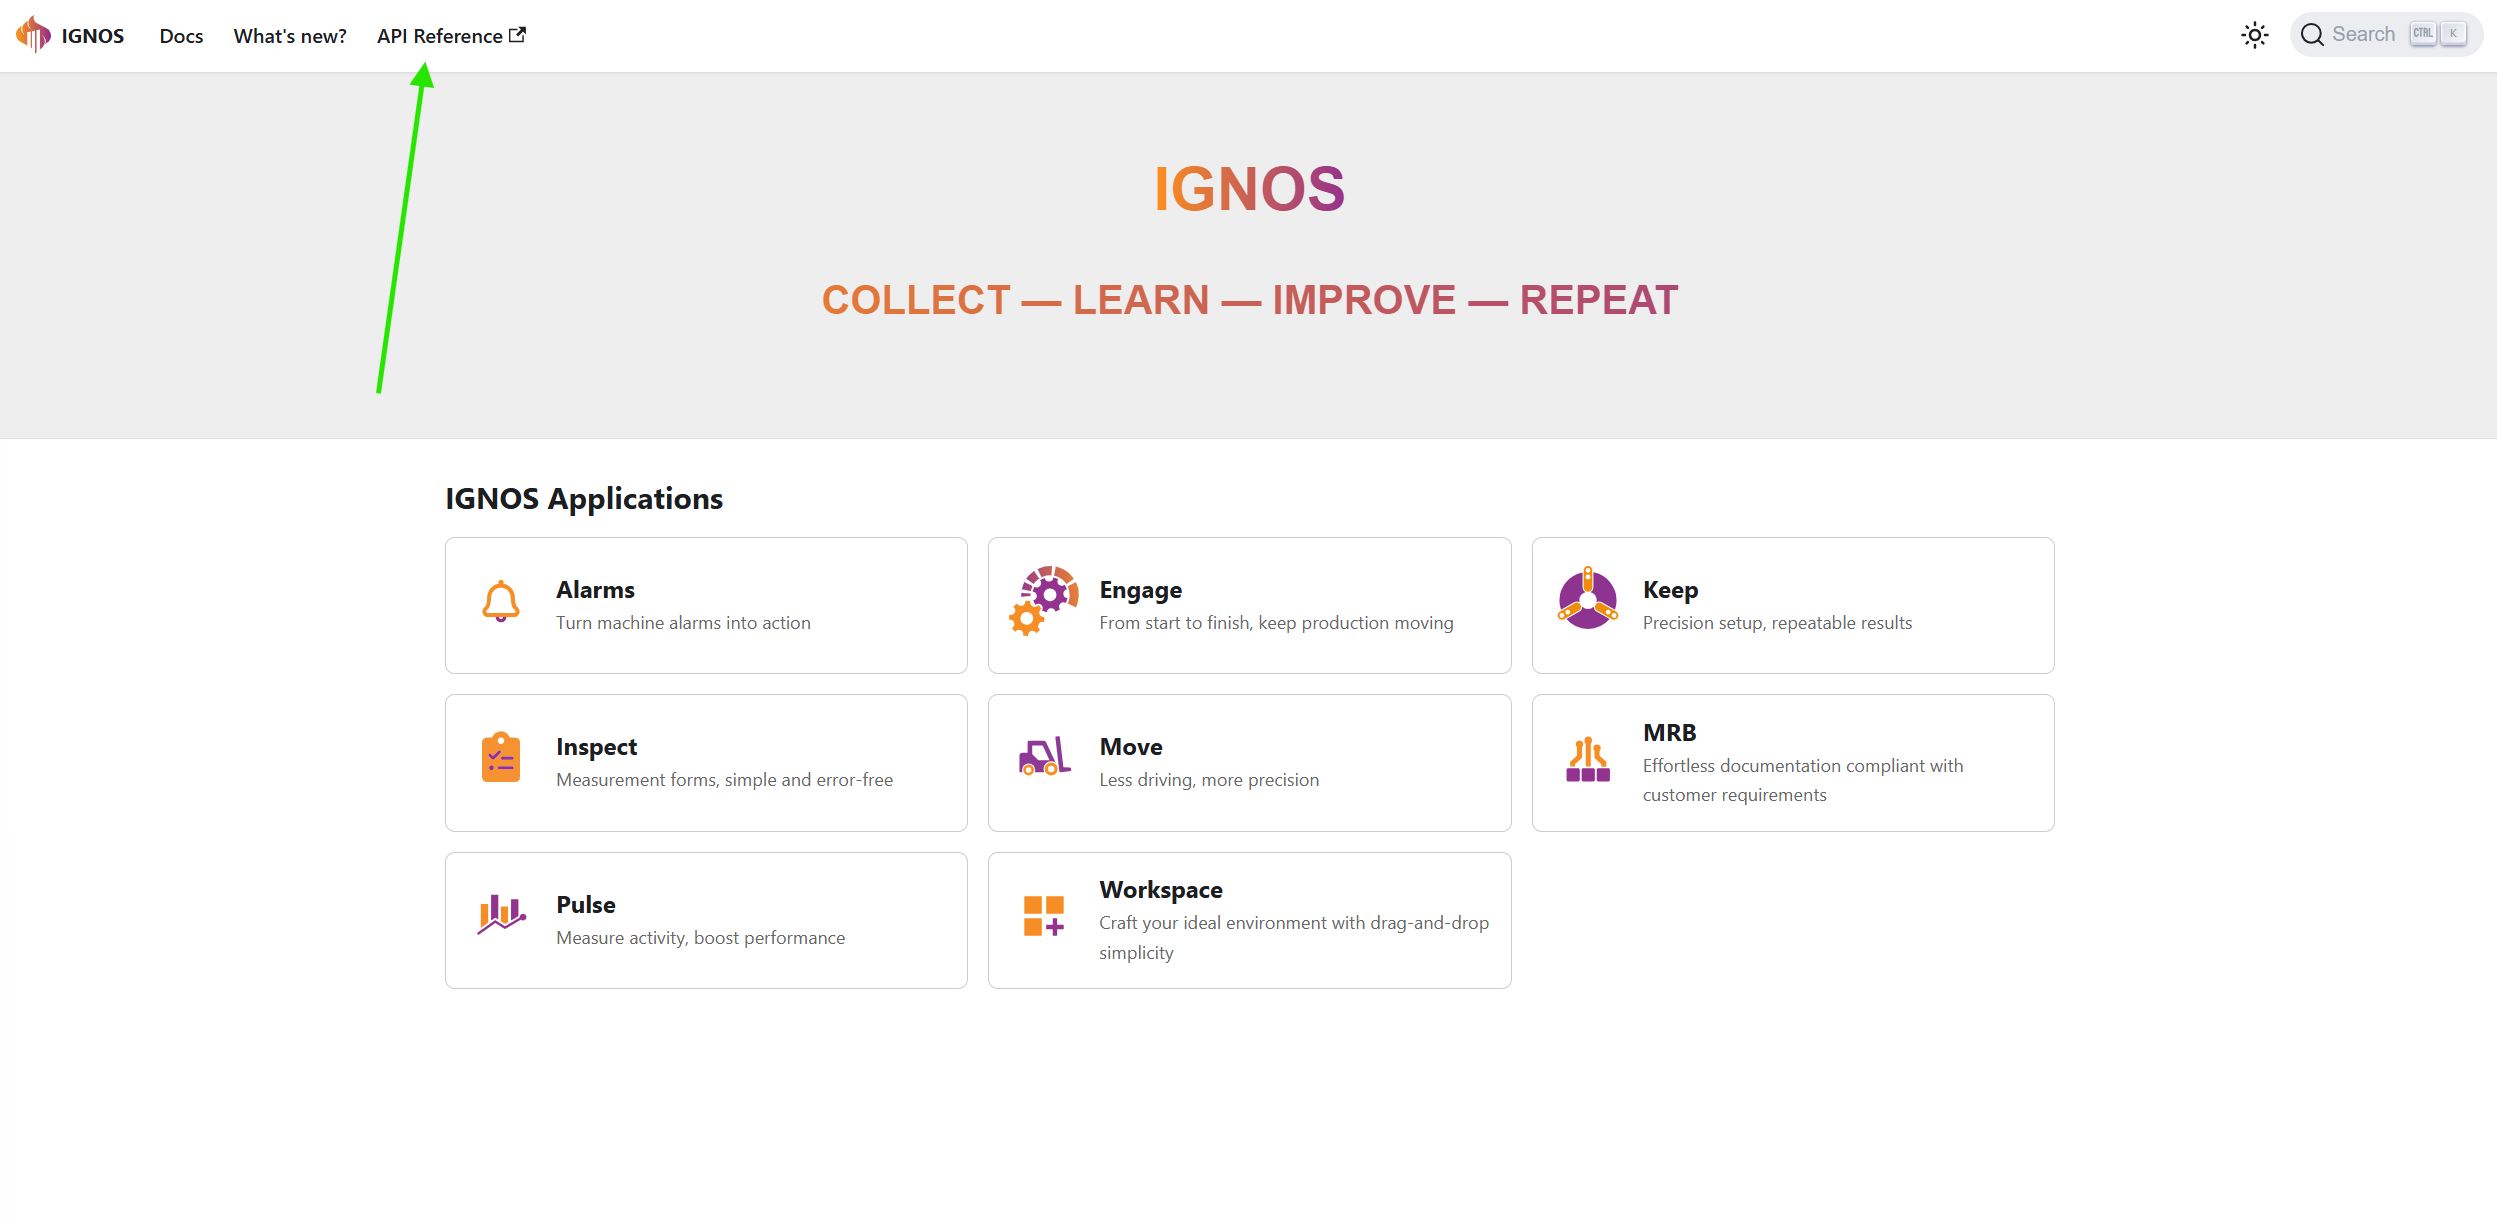
1. Open the Ignos API overview
You can find the Ignos APIs at docs.ignos.io or directly at https://api.ignos.io/index.html
2. Authorize (log in with a valid user)
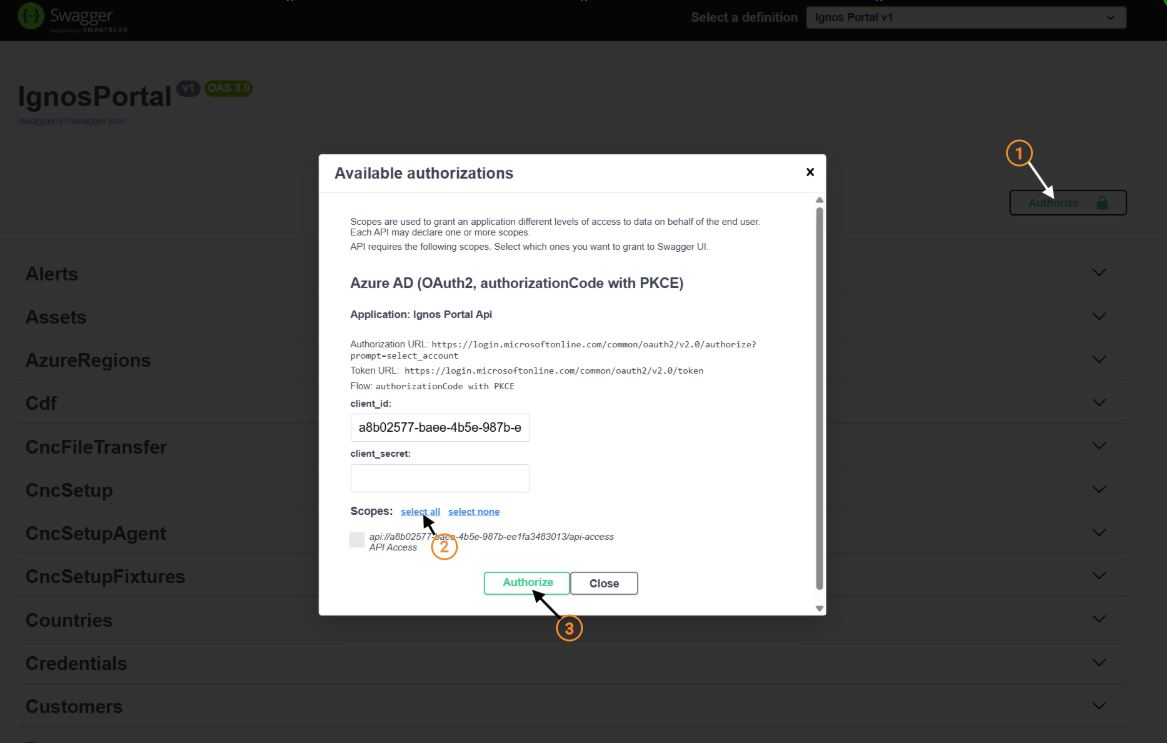
- Click Authorize (the padlock icon)
- Click select all
- Log in using your regular Ignos platform credentials
- Click Close when done
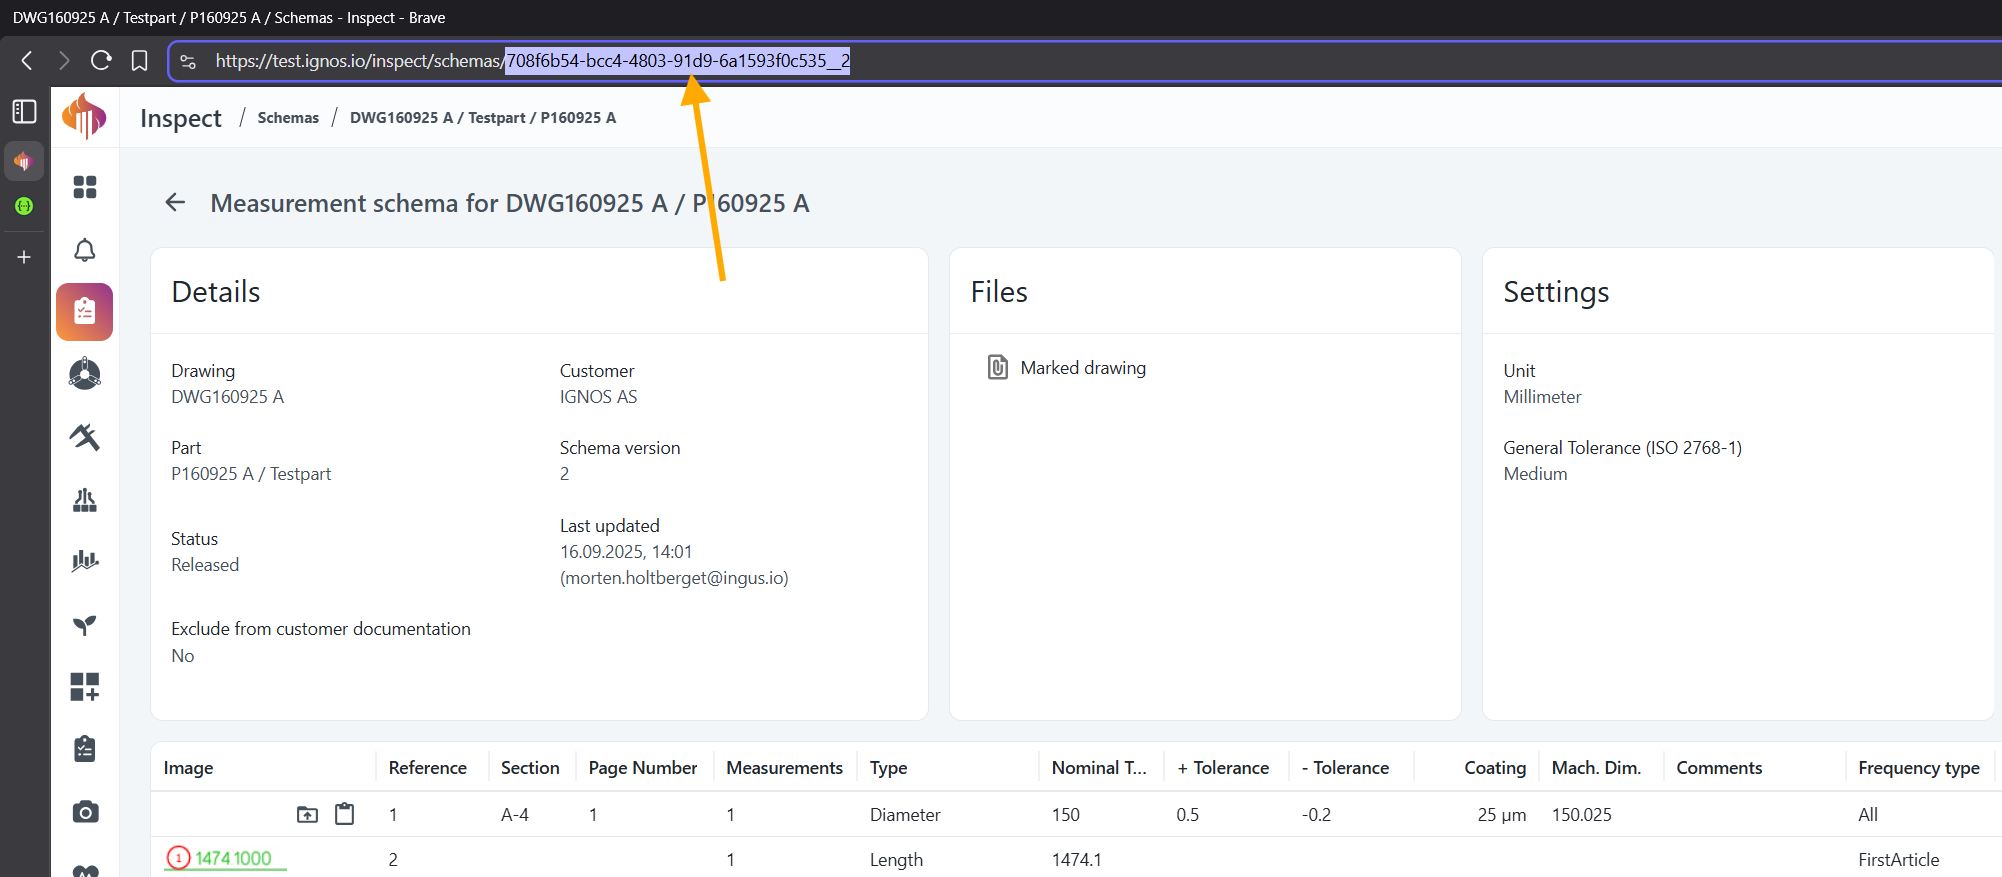
3. Find the ID of the Schema you're working with
- Open the Schemas overview in Inspect Measure and search for the correct Schema
- Click to open it, then copy the ID found at the end of the URL.
4. Download the current version of the Schema
- In the API overview, scroll down to the endpoint:
/measurementforms/schemas/{id}
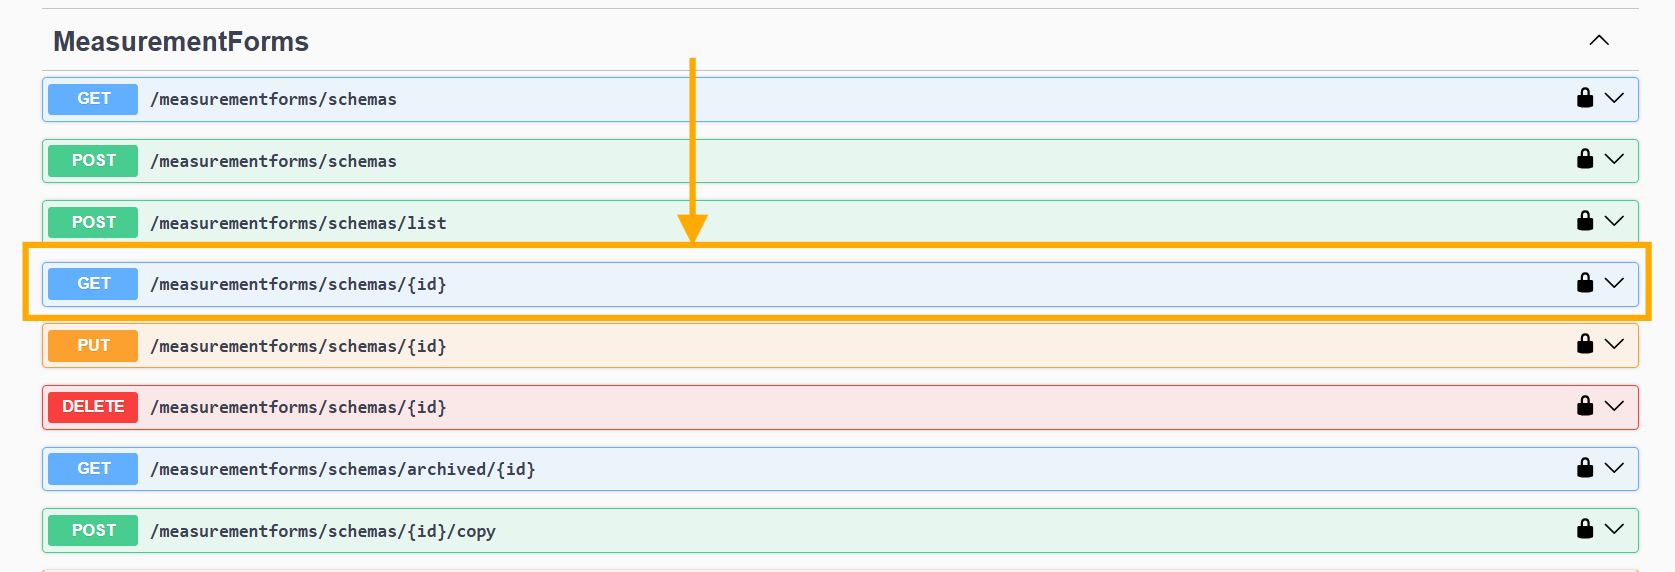
- Click the endpoint, then click Try it out
- Paste the copied ID into the id field and click Execute
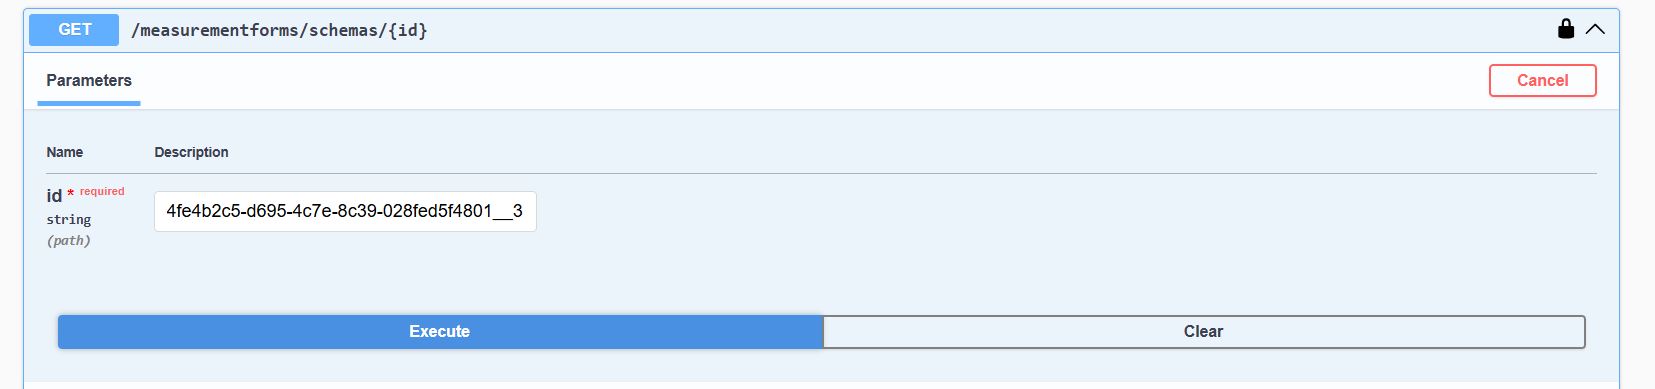
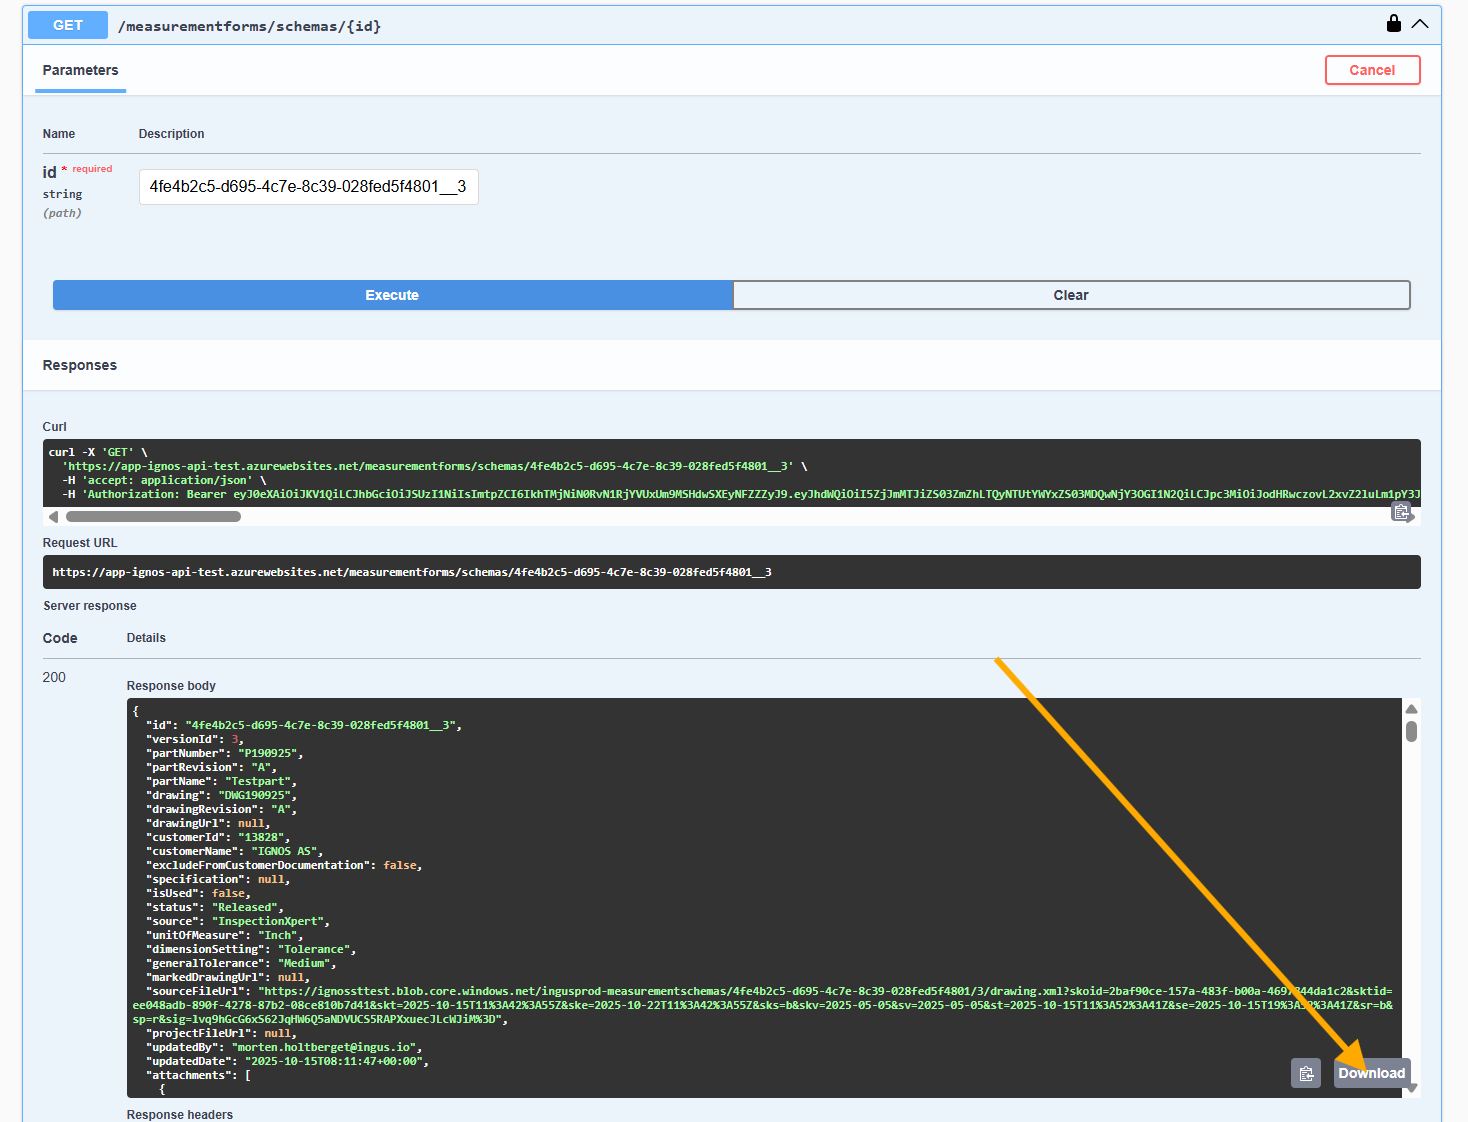
- If everything is correct, you’ll get status code 200 (successful response).
- Click Download to save the JSON file for the current Schema version.
5. Download a previous version of the Schema
- Scroll further down to the endpoint:
/measurementforms/schemas/archived/{id}
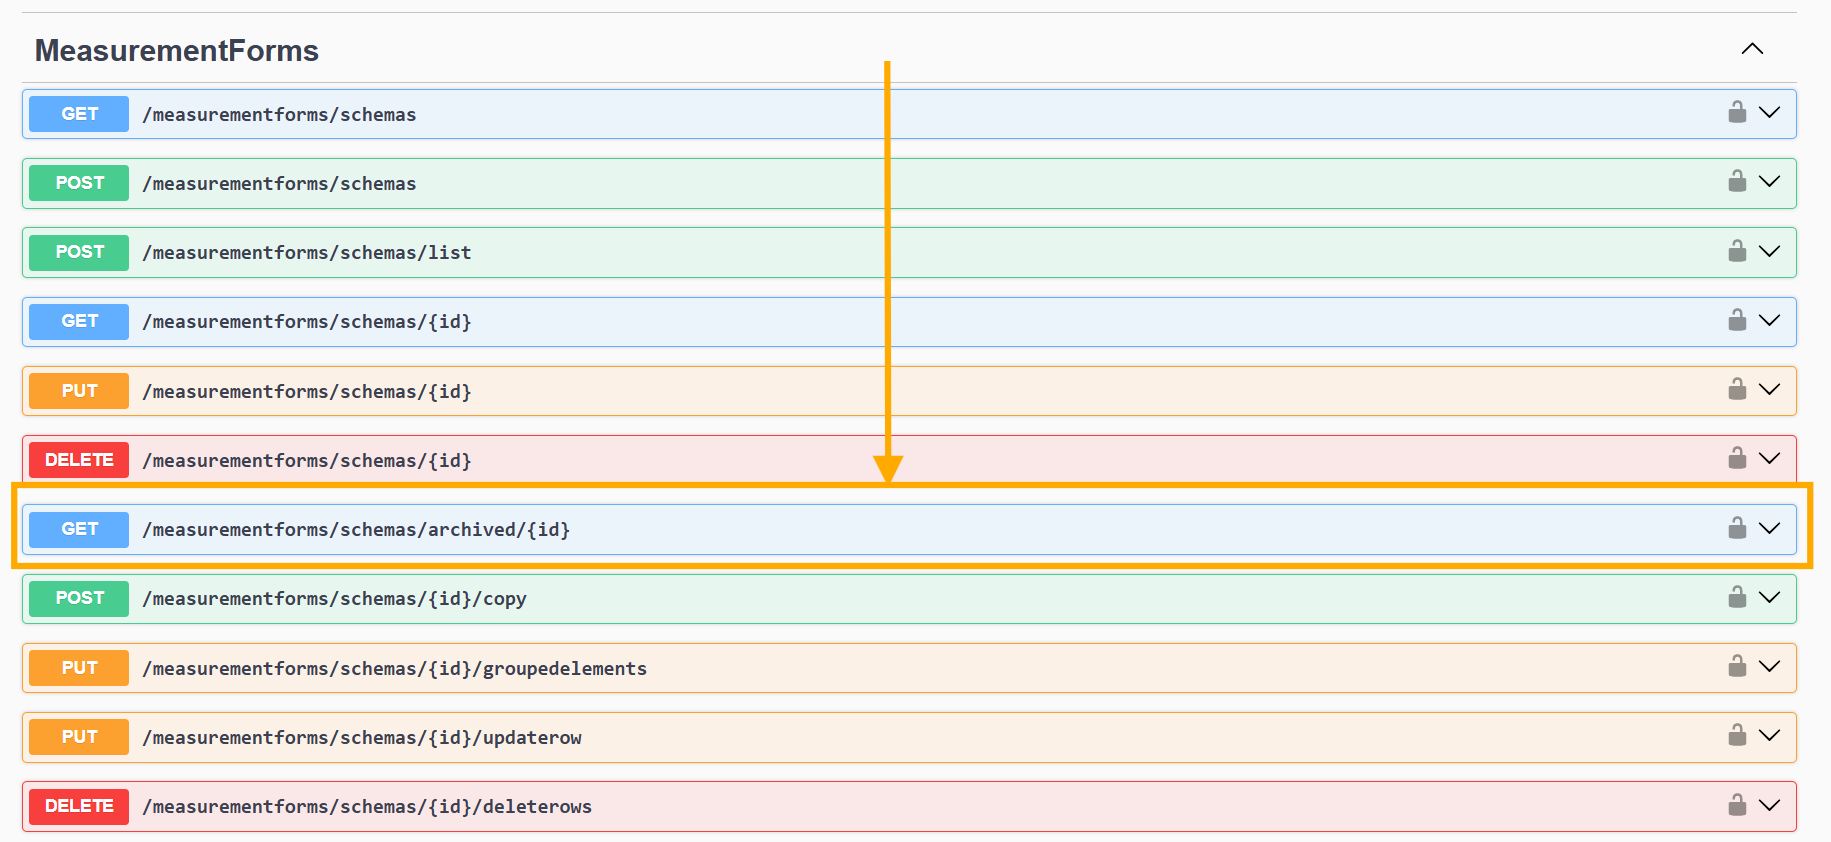
- Click the endpoint, then Try it out again.
- Paste the same ID into the id field, but adjust the last number in the ID to match the version you want.
Example: change...__3to...__1.
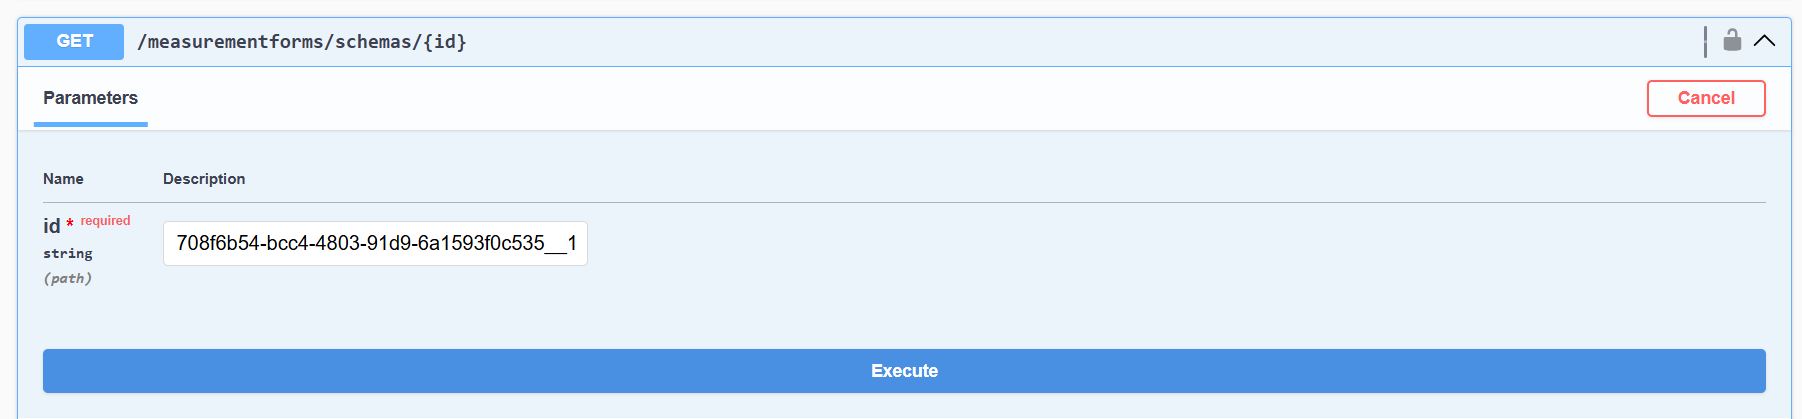
- Click Execute.
- If successful, you’ll again receive status code 200, and can download the JSON file showing the older version of the Schema.
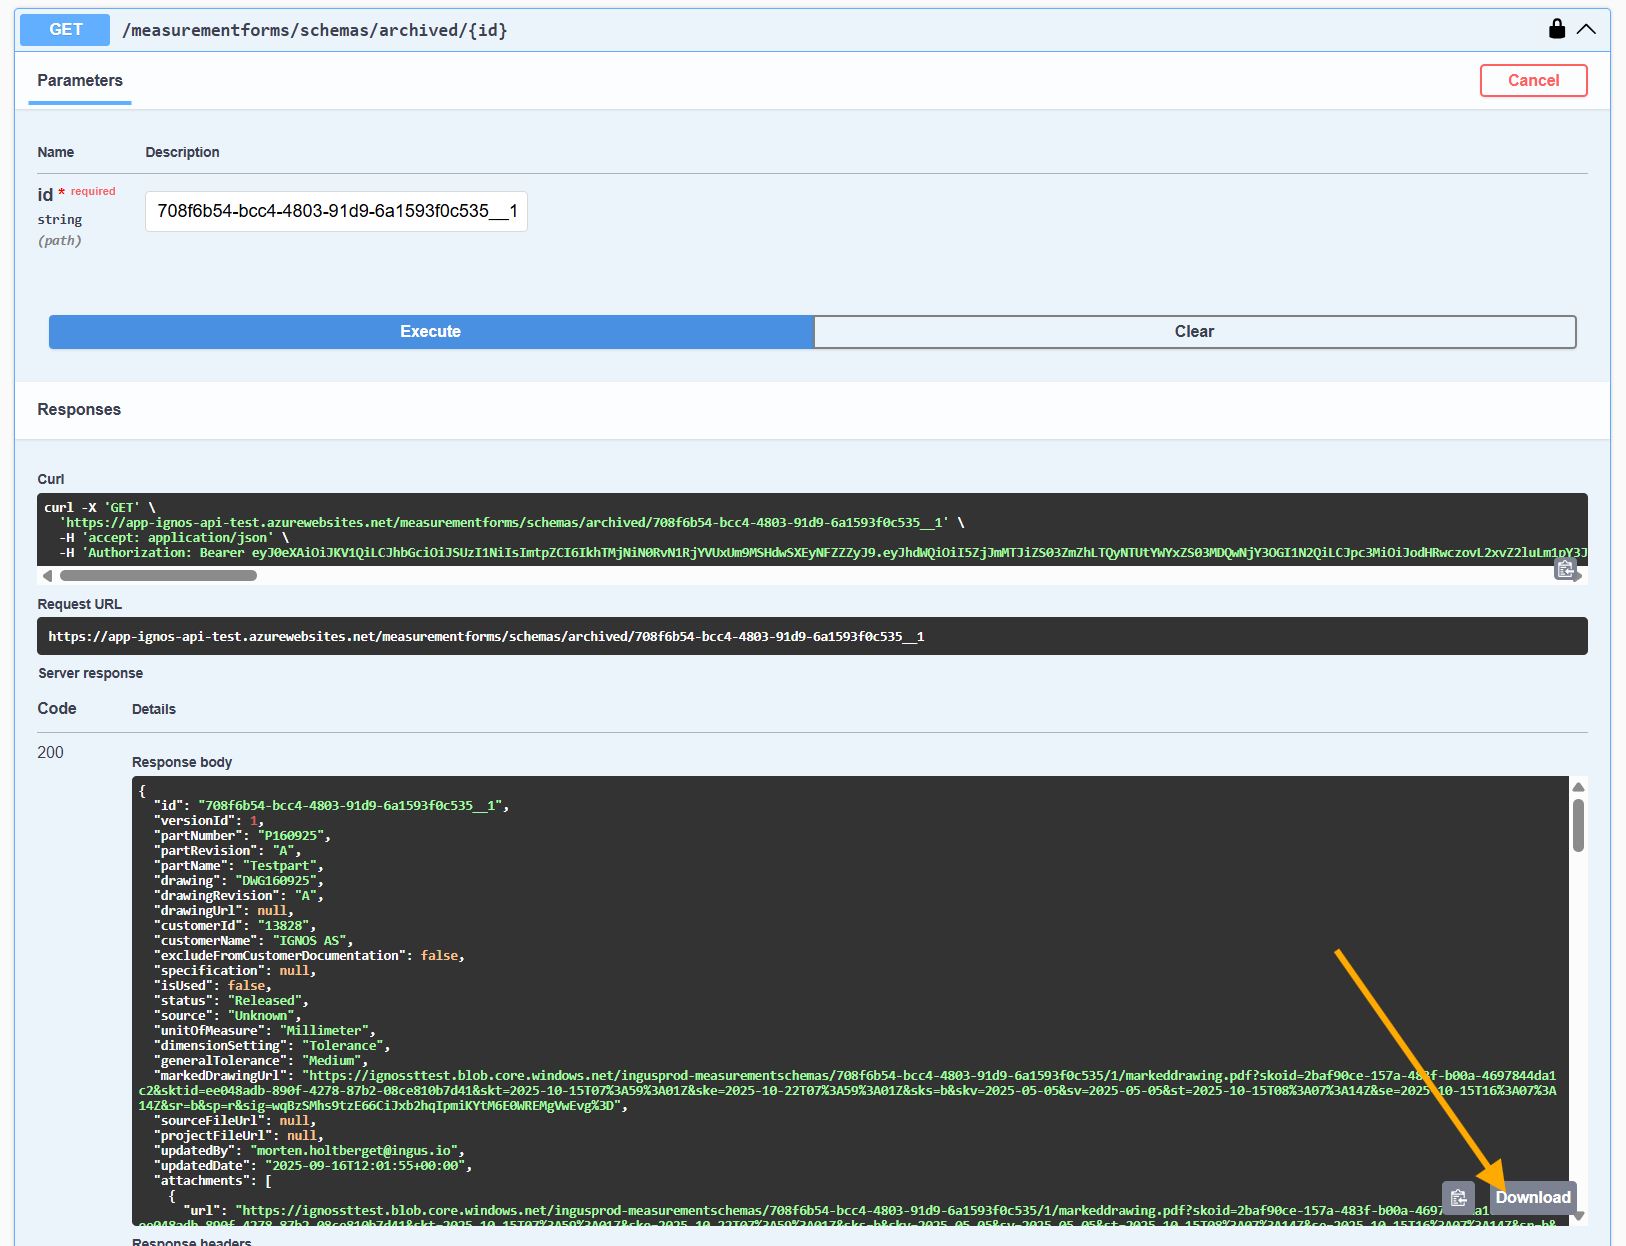
For some customers, certain Schemas in the system have been migrated from the previous Measurement forms solution.
For these templates, version numbering is not consistent, so changing the last digit in the ID will not always work.
Contact Ignos Support if you encounter these cases.
How to recognize a migrated Schema ID:
- It typically contains a much higher version number than others
Example:3dfb0492-321c-4788-8345-a9c639a788cc__292 - A 404 (Not Found) error when trying to fetch an older version is also another sign that the Schema was migrated.
6. Compare versions
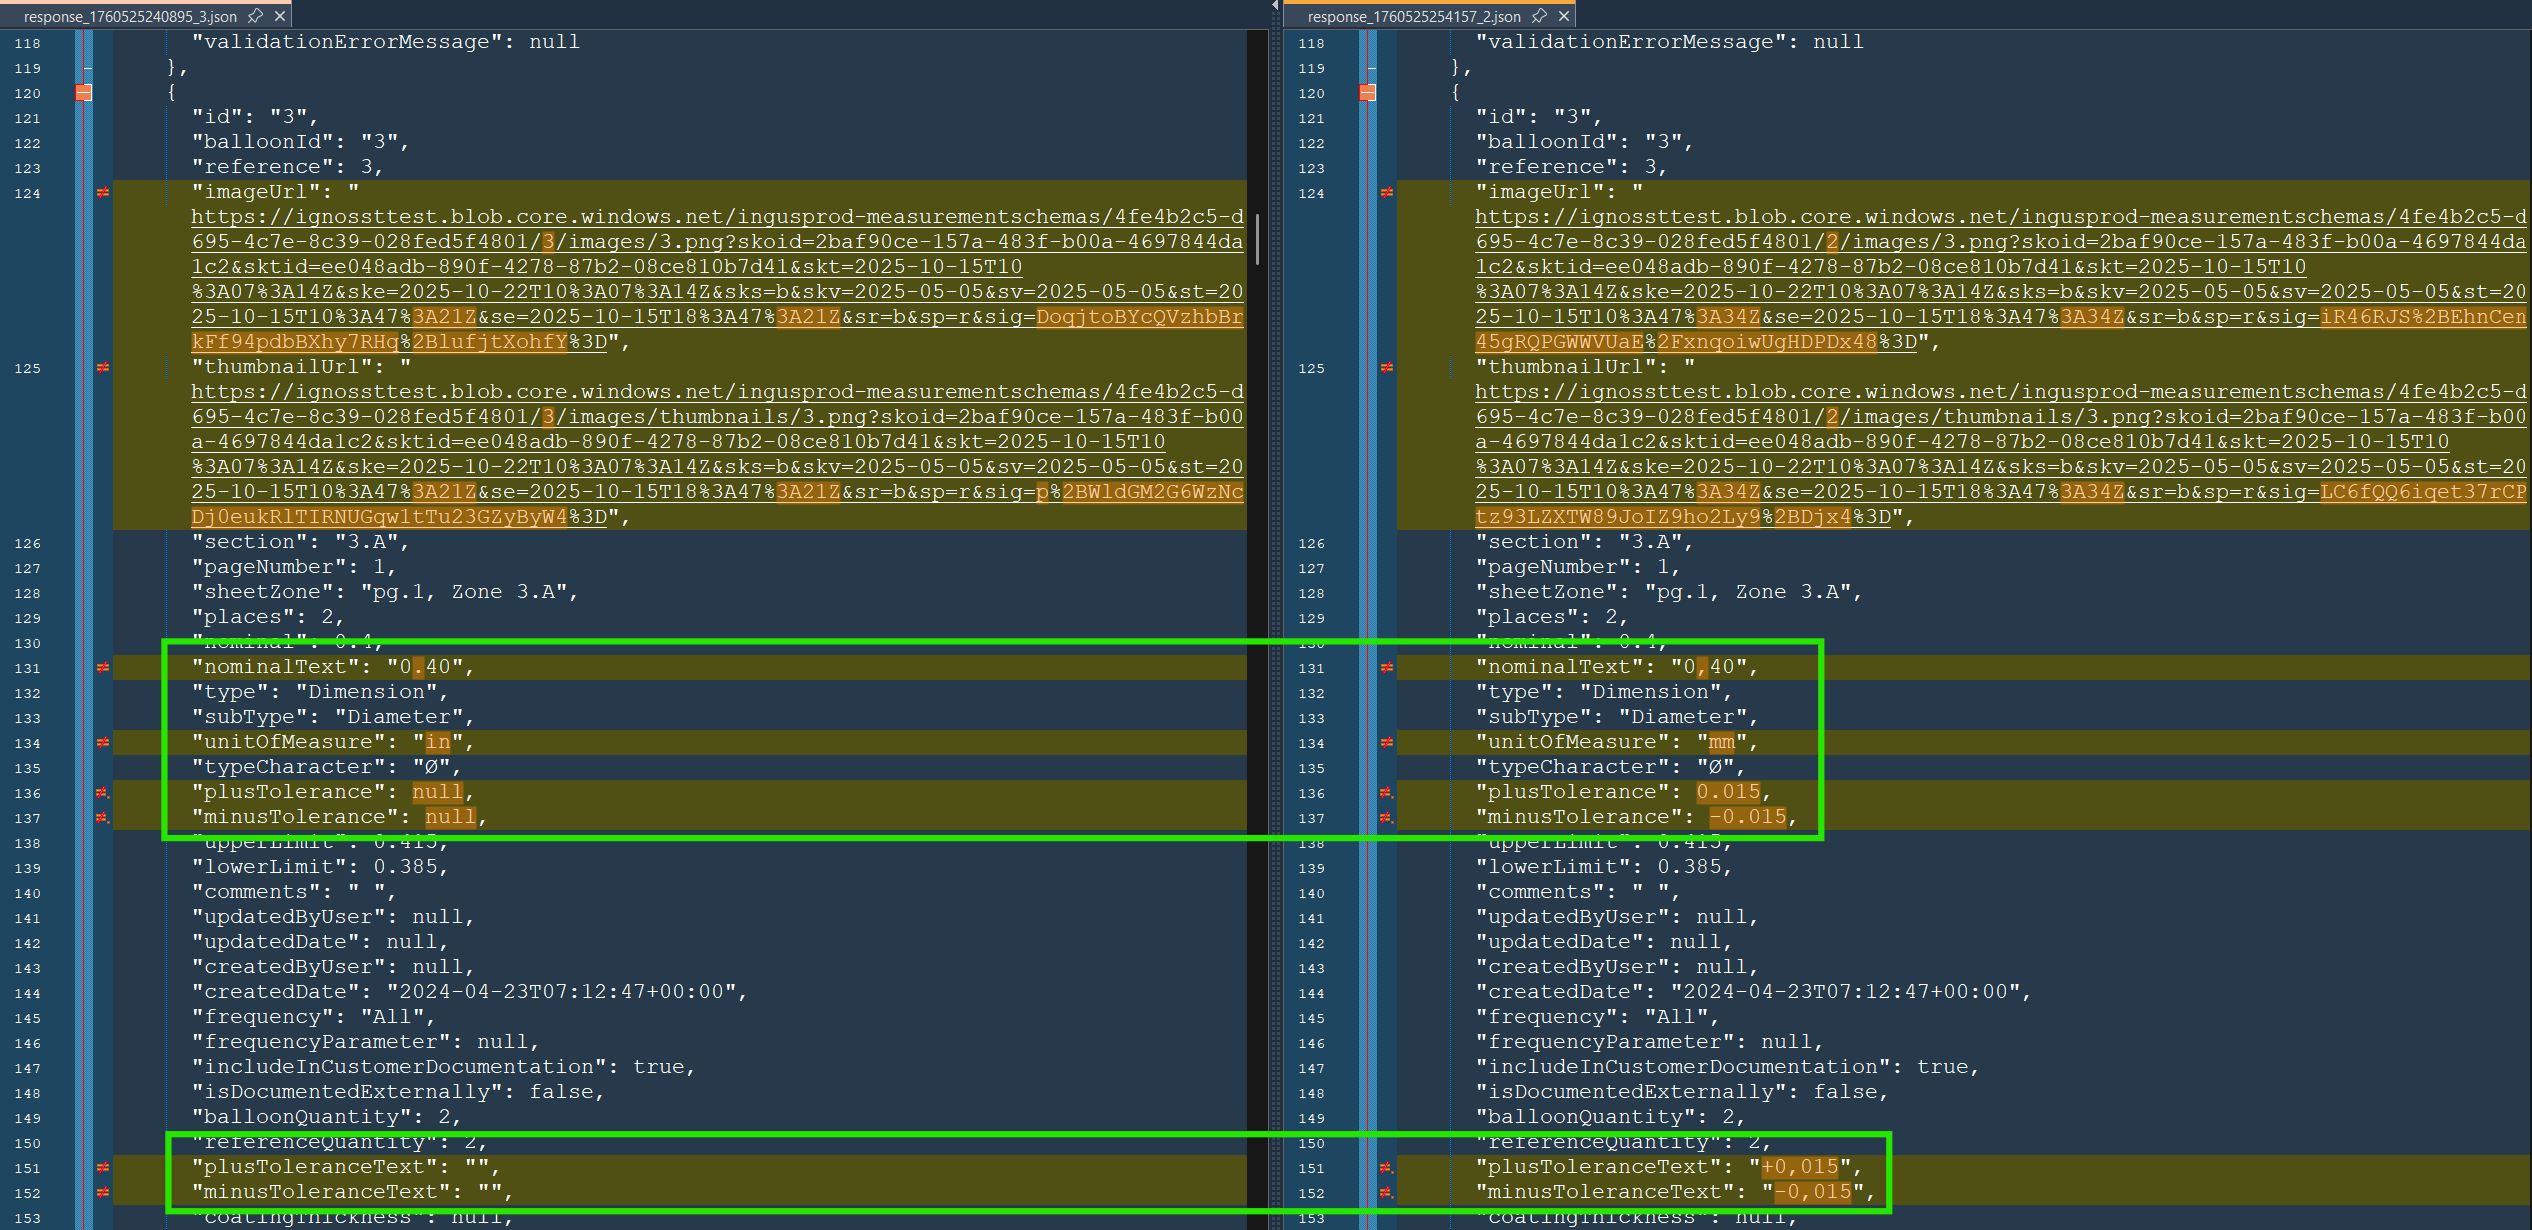
Use a text editor that supports file comparison, such as Notepad++ with the Compare plugin.
This lets you see what has been added, removed, or modified between versions.
Example showing changes detected with Notepad++ Compare:
Supplier access
How to onboard a supplier to Inspect Measure
This guide explains how to connect a supplier to your tenant, so their operators can fill out Measurement Forms (Instances) on your orders in Inspect Measure.
Highlevel overview
What you will need
-
A role that lets you invite suppliers. You need one of the roles Supplier Admin or Admin in your Ignos tenant.
Without one of them, the Suppliers section does not appear in Settings at all. For more info about roles, see this article. -
A Supplier Id. It has to be unique within your tenant, and it cannot be changed later without help from Ignos support.
- ERP users must use the supplier number from the ERP system. Ignos matches on it to give suppliers access automatically. Wrong id will result in no automatic access. See Step 5.
- Manual users can use any identifier they already use for the supplier.
-
An email address for the supplier contact. Any address works, but the user has to sign in with a Microsoft account.
If they do not have one, they can create one for free using their existing address.
Step 1 - Choose who completes the setup
The first user who accepts an invite creates the supplier company and becomes its administrator. So decide who that should be before you create the invite.
Option A - Let the supplier do it themselves
Send the invite to your contact at the supplier and give them the link below. They sign in, fill in their own company details and become the administrator of their company.
This works well when your contact is comfortable with this kind of setup, and it saves you a step. Be prepared for some back and forth, though, guiding them through it and confirming that everything works.
Option B - Do it yourself (recommended)
Send the invite to your own email address, accept it yourself, and complete the setup on the supplier's behalf. Then add the supplier's administrators in Step 4 and hand over in Step 6.
Many administrators find this the smoother route. You control that the company name and organization number are entered correctly, you avoid a back-and-forth with someone who may be unfamiliar with the product, and the supplier's first experience is a working setup rather than a form. It is often the fastest way to get a supplier up and running.
Step 2 - Create the supplier invite
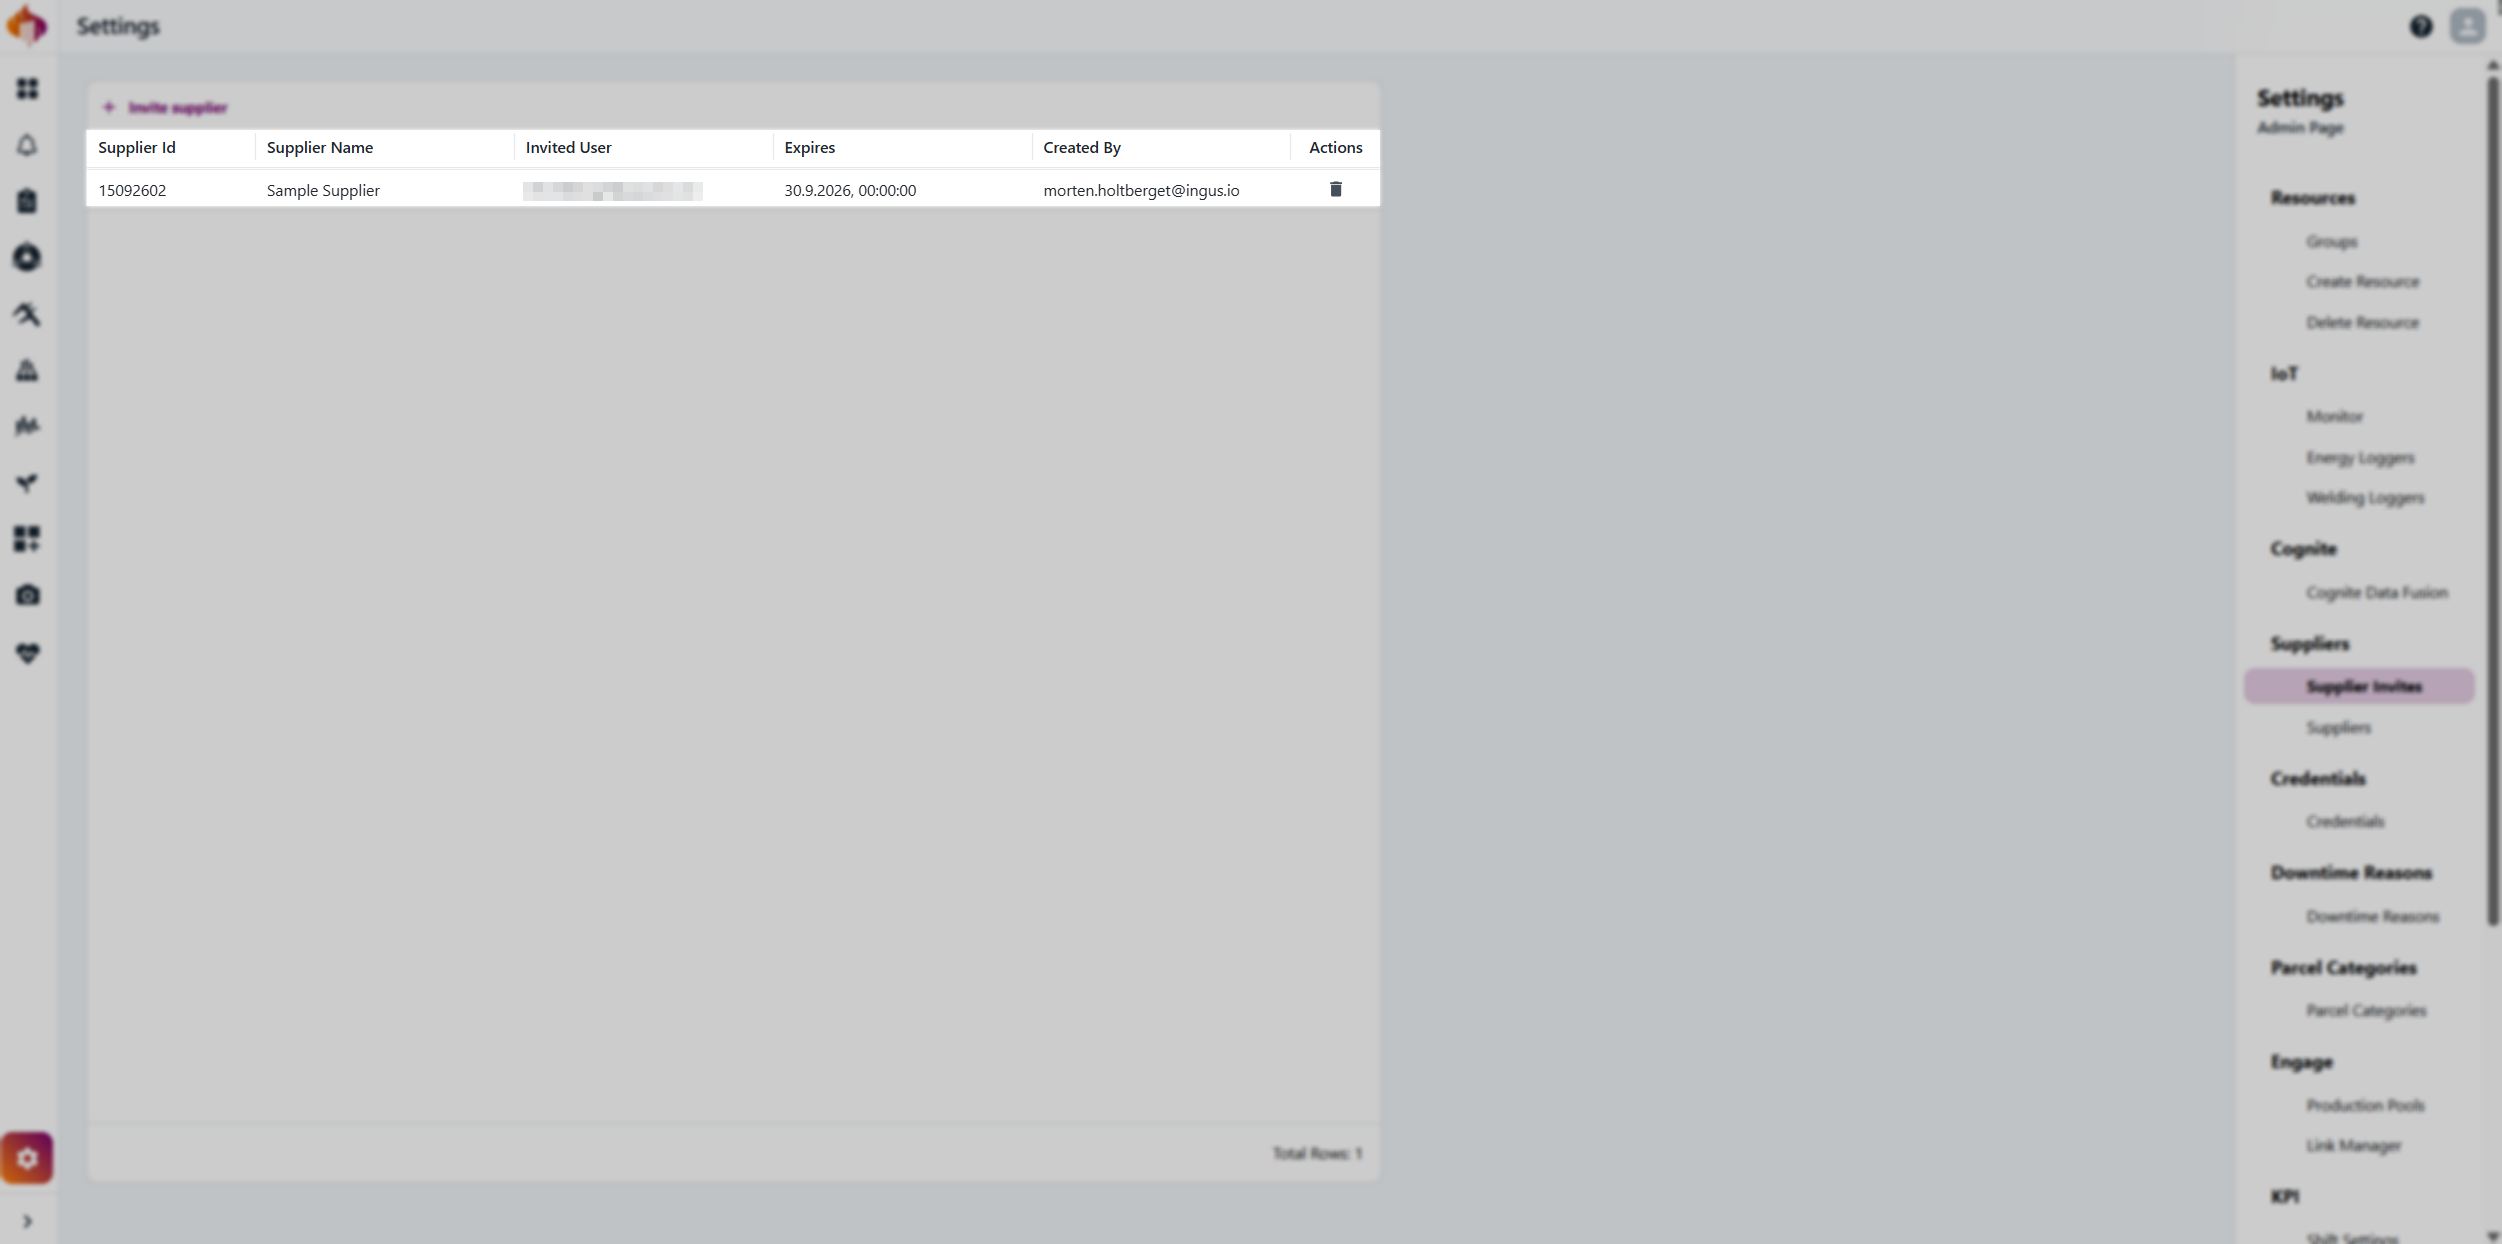
Go to Settings → Supplier Invites and click Invite supplier.
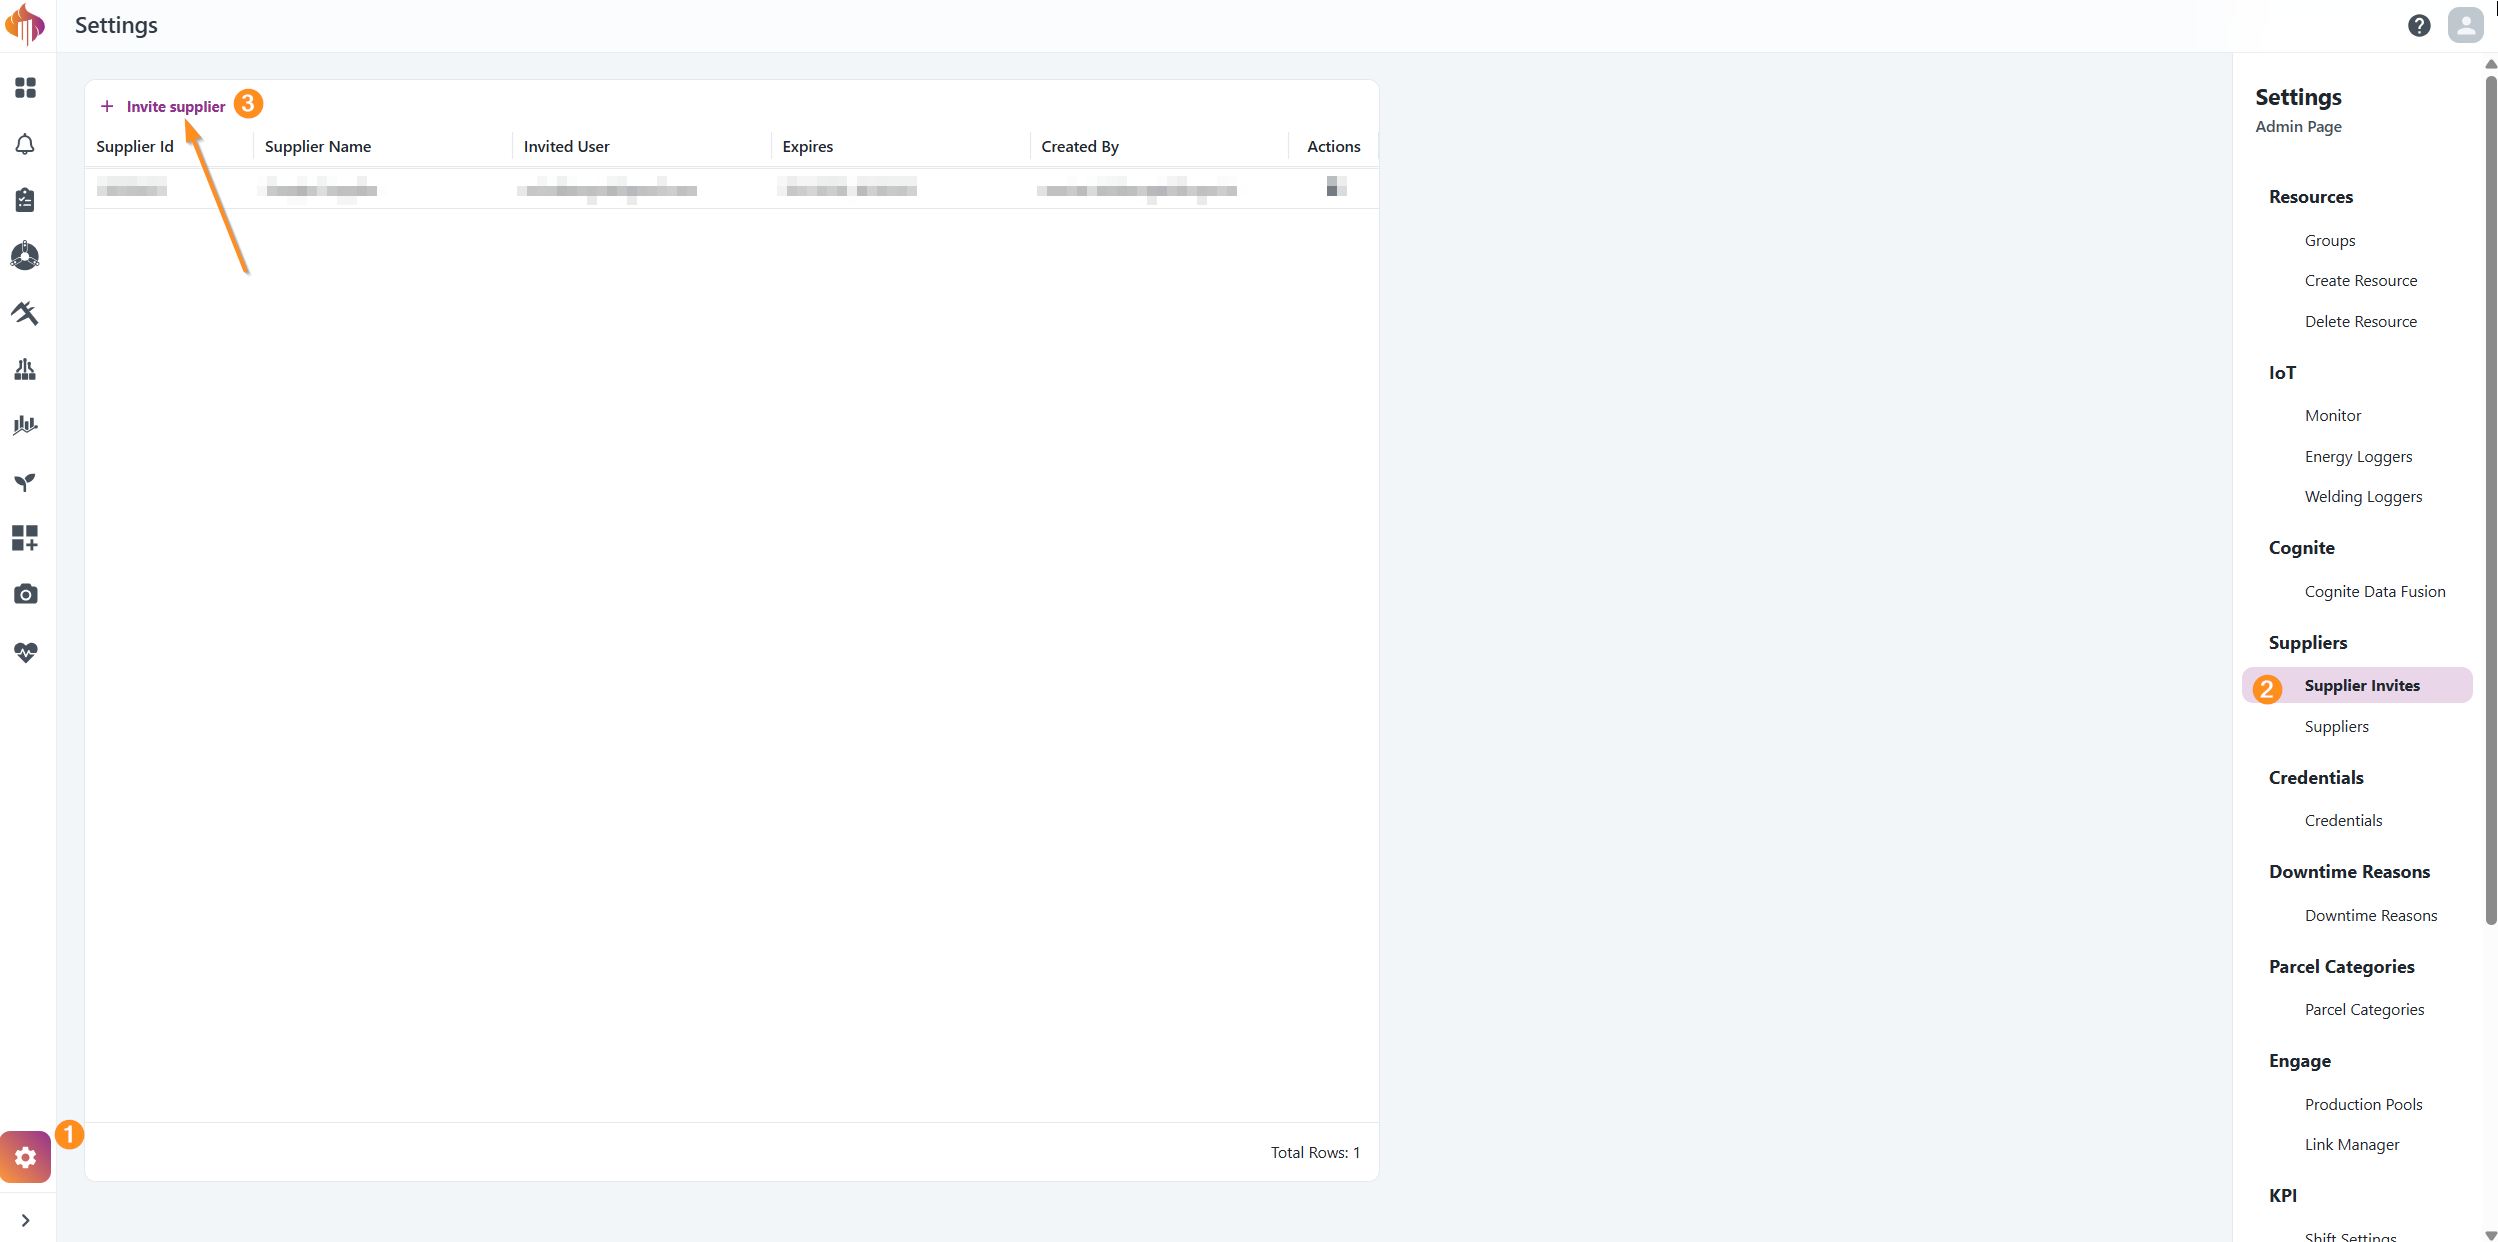
Fill in the form according to the table.
| Field | Description |
|---|---|
| Supplier Id | The supplier number from your ERP. |
| Supplier Name | The name of the supplier company |
| Email address | The email address of the person who will accept the invite |
| Expires | Expiry date. The invite cannot be used after this date |
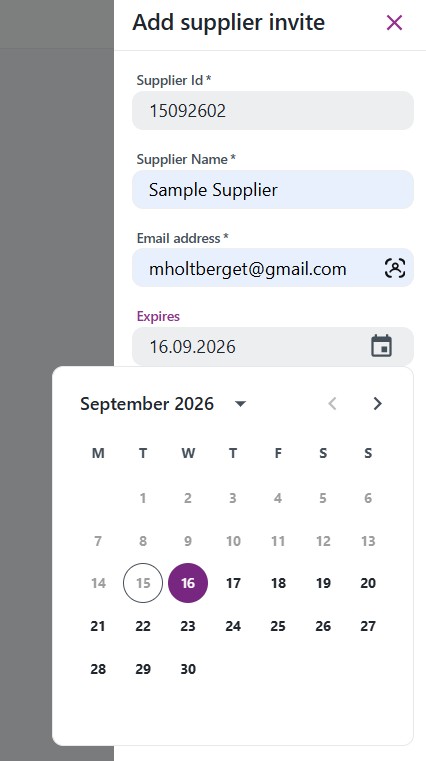
If you are doing the setup for the supplier yourself, the email address should be set to your own.
Your address can only belong to one supplier company.
If you have set up a supplier this way before and did not remove yourself afterwards, two things can happen: you either get an error when accepting, or Ignos offers to connect the old company instead of creating a new one.
Remove yourself from the previous company first, or use a different address.
The invite now appears in the list! You can remove it with the delete icon if something was entered incorrectly.
Sending the link
Whoever is accepting the invite needs this link:
https://ignos.io/accept-invite
Unfortunately Ignos does not send an email automatically. If you are inviting someone at the supplier, you have to send them the link yourself, and tell them to sign in with the exact email address the invite was sent to.
The invite only exists for that address.
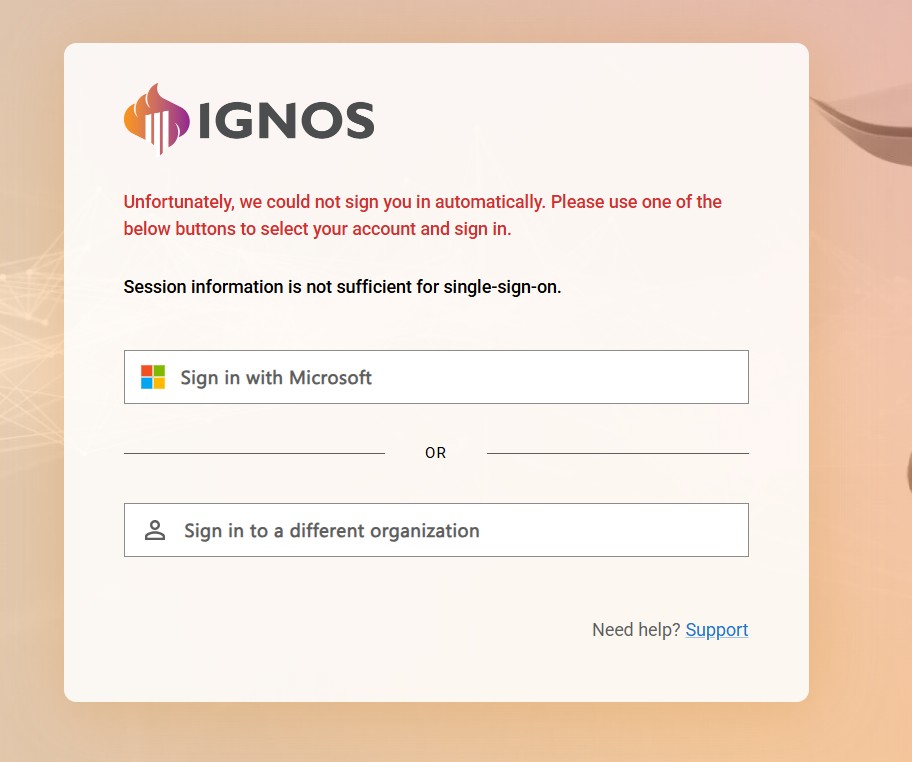
If they see a red message saying they could not be signed in automatically, this is normal. It only means the browser had no active Microsoft session.
Click Sign in with Microsoft, sign in, and you are taken to the invite.
Step 3 - Accept the invite
After signing in, the invite is shown with the company name, who sent it and the expiry date. What happens next depends on whether the user is already connected to a company in Ignos.
If the user is not connected to a company, a form appears with three fields: company name (pre-filled from the invite, can be changed), organization number and country. Completing this creates the supplier company, and the user becomes its administrator.
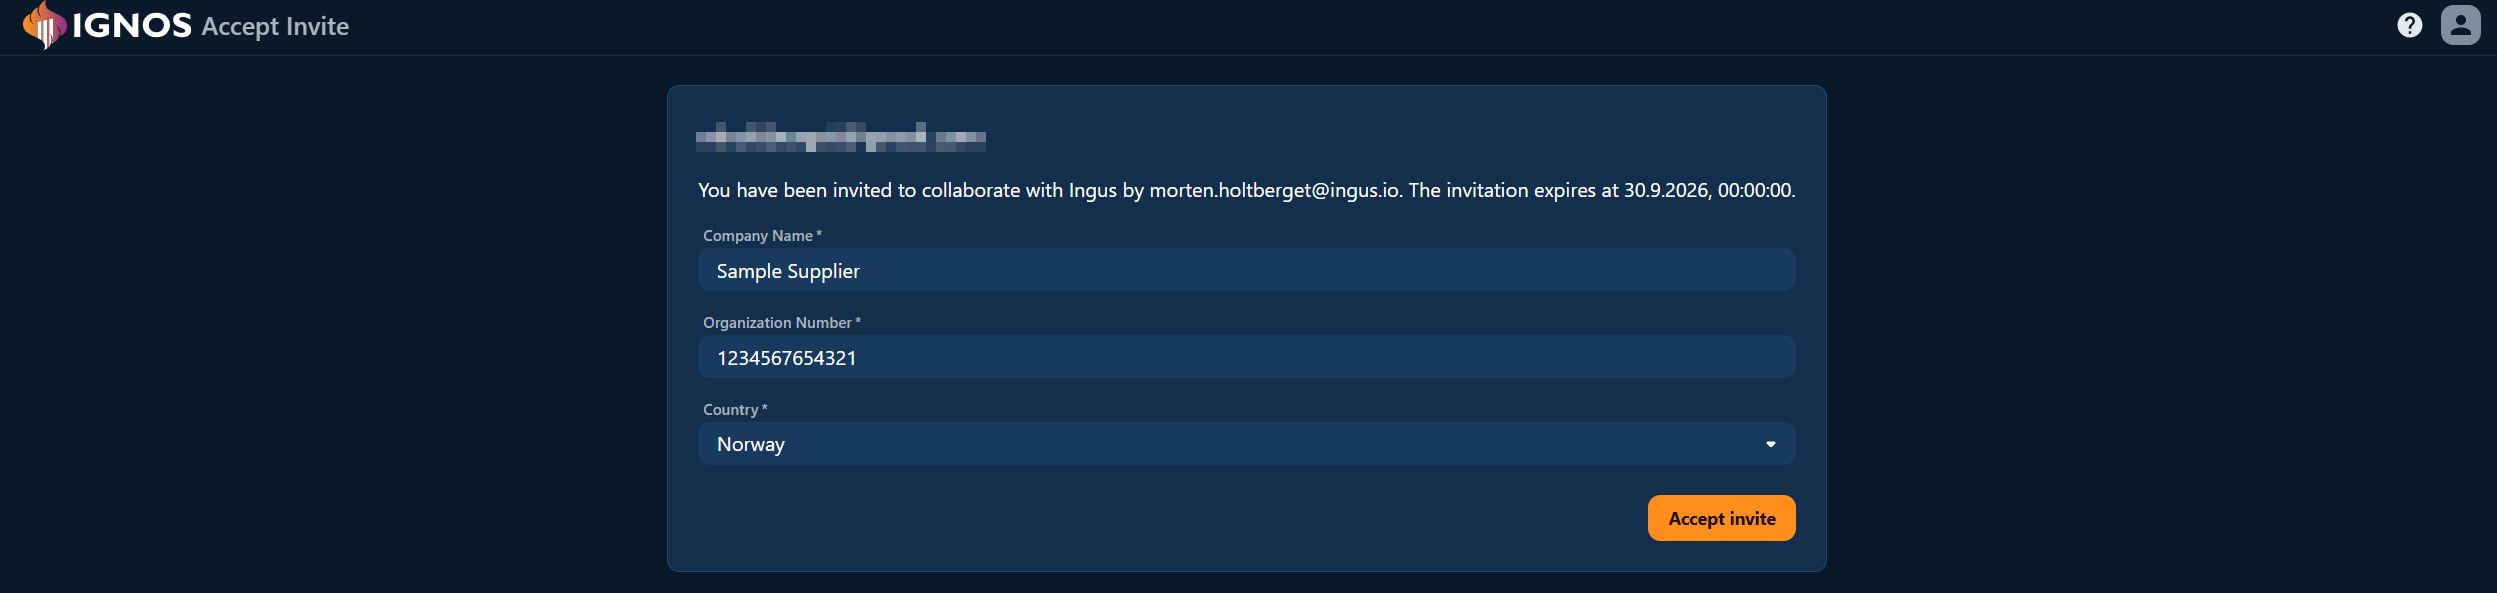
If the user is already connected to a company, that company is shown with its organization number and country. Click Accept invite to register it as a supplier for the customer who sent the invite. The customer name is shown in the first line, so you can see which invite you are accepting.

Ignos offers the company you are already associated with, whichever one that is, and does not ask whether it is the right one. If the name shown is not the supplier you are setting up, do not accept.
Contact Ignos support if that company no longer exists, and you cannot remove yourself from it.
Once accepted, the invite disappears from the Supplier Invites list and the supplier appears in your supplier overview instead.
Step 4 - Add the supplier's users
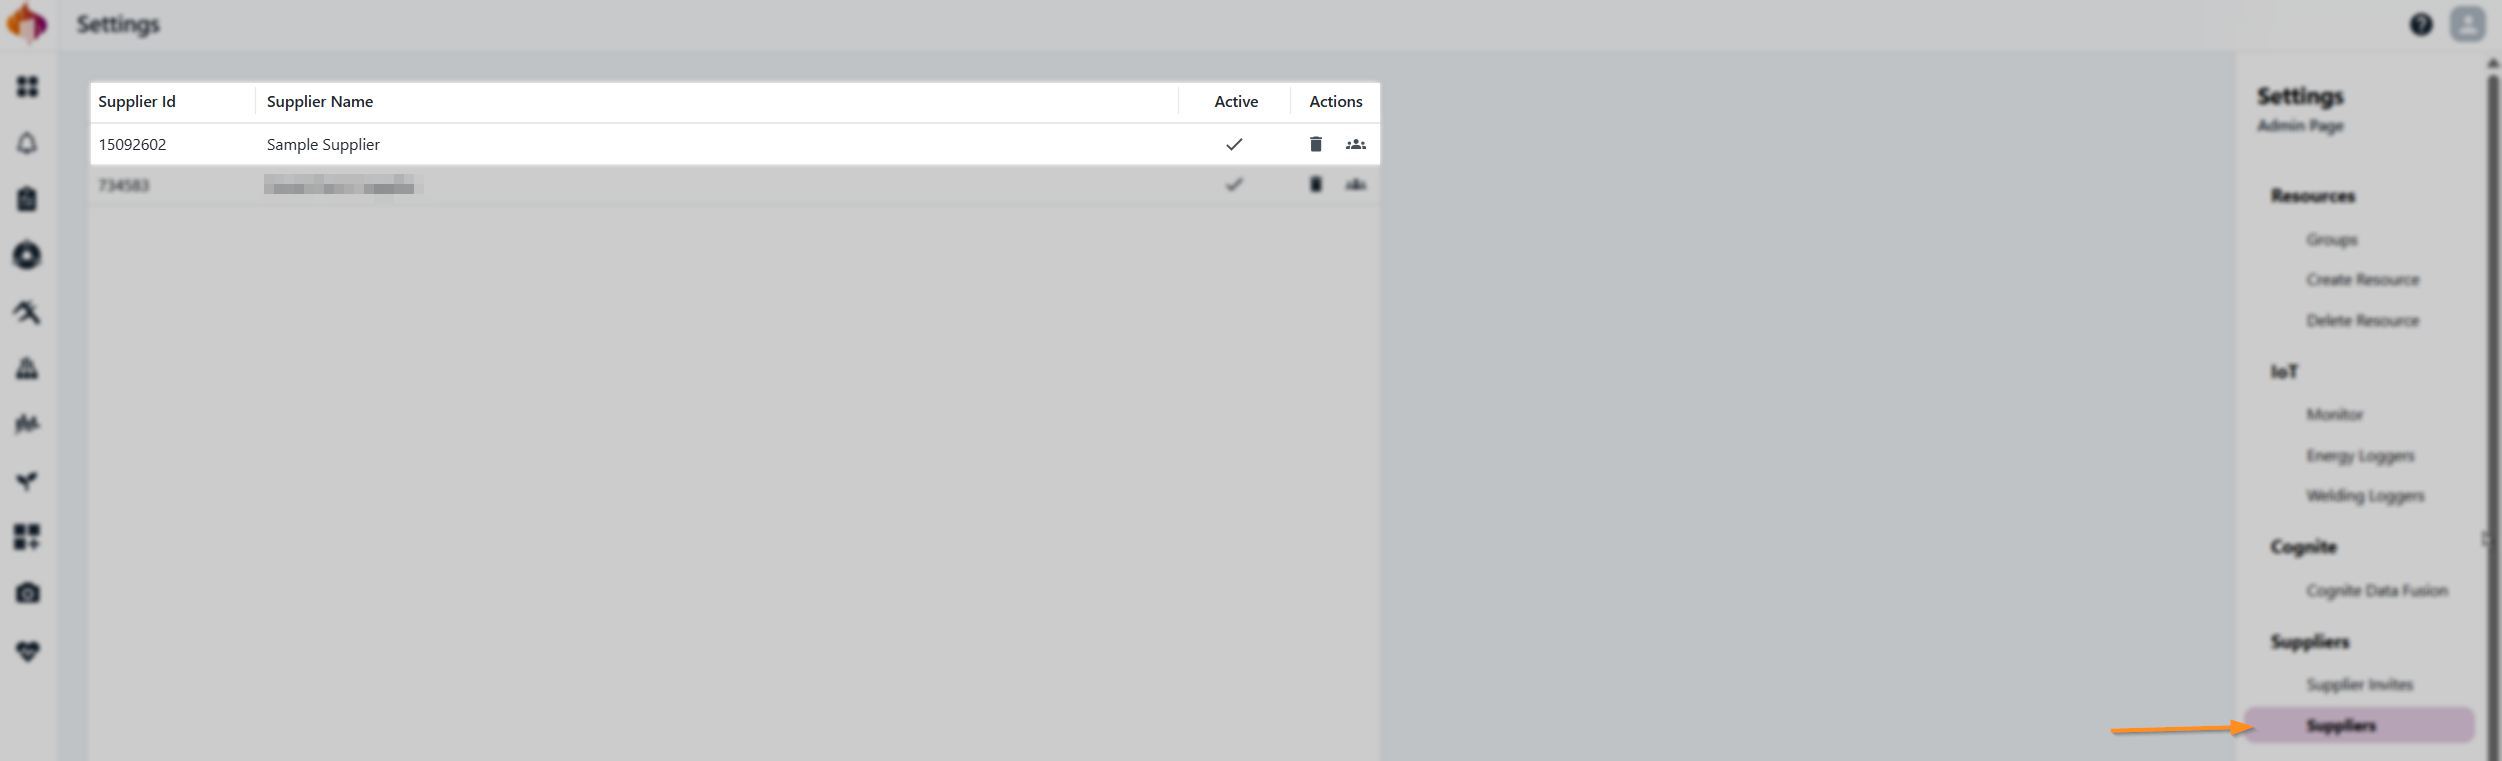
Once the company exists, all remaining users are added directly from the Groups-icon in Settings → Suppliers (circle 3 in the picture below). These users do not receive an invite and should not visit the accept-invite link. They are added with an email address and a role, and can sign in at ignos.io right away.
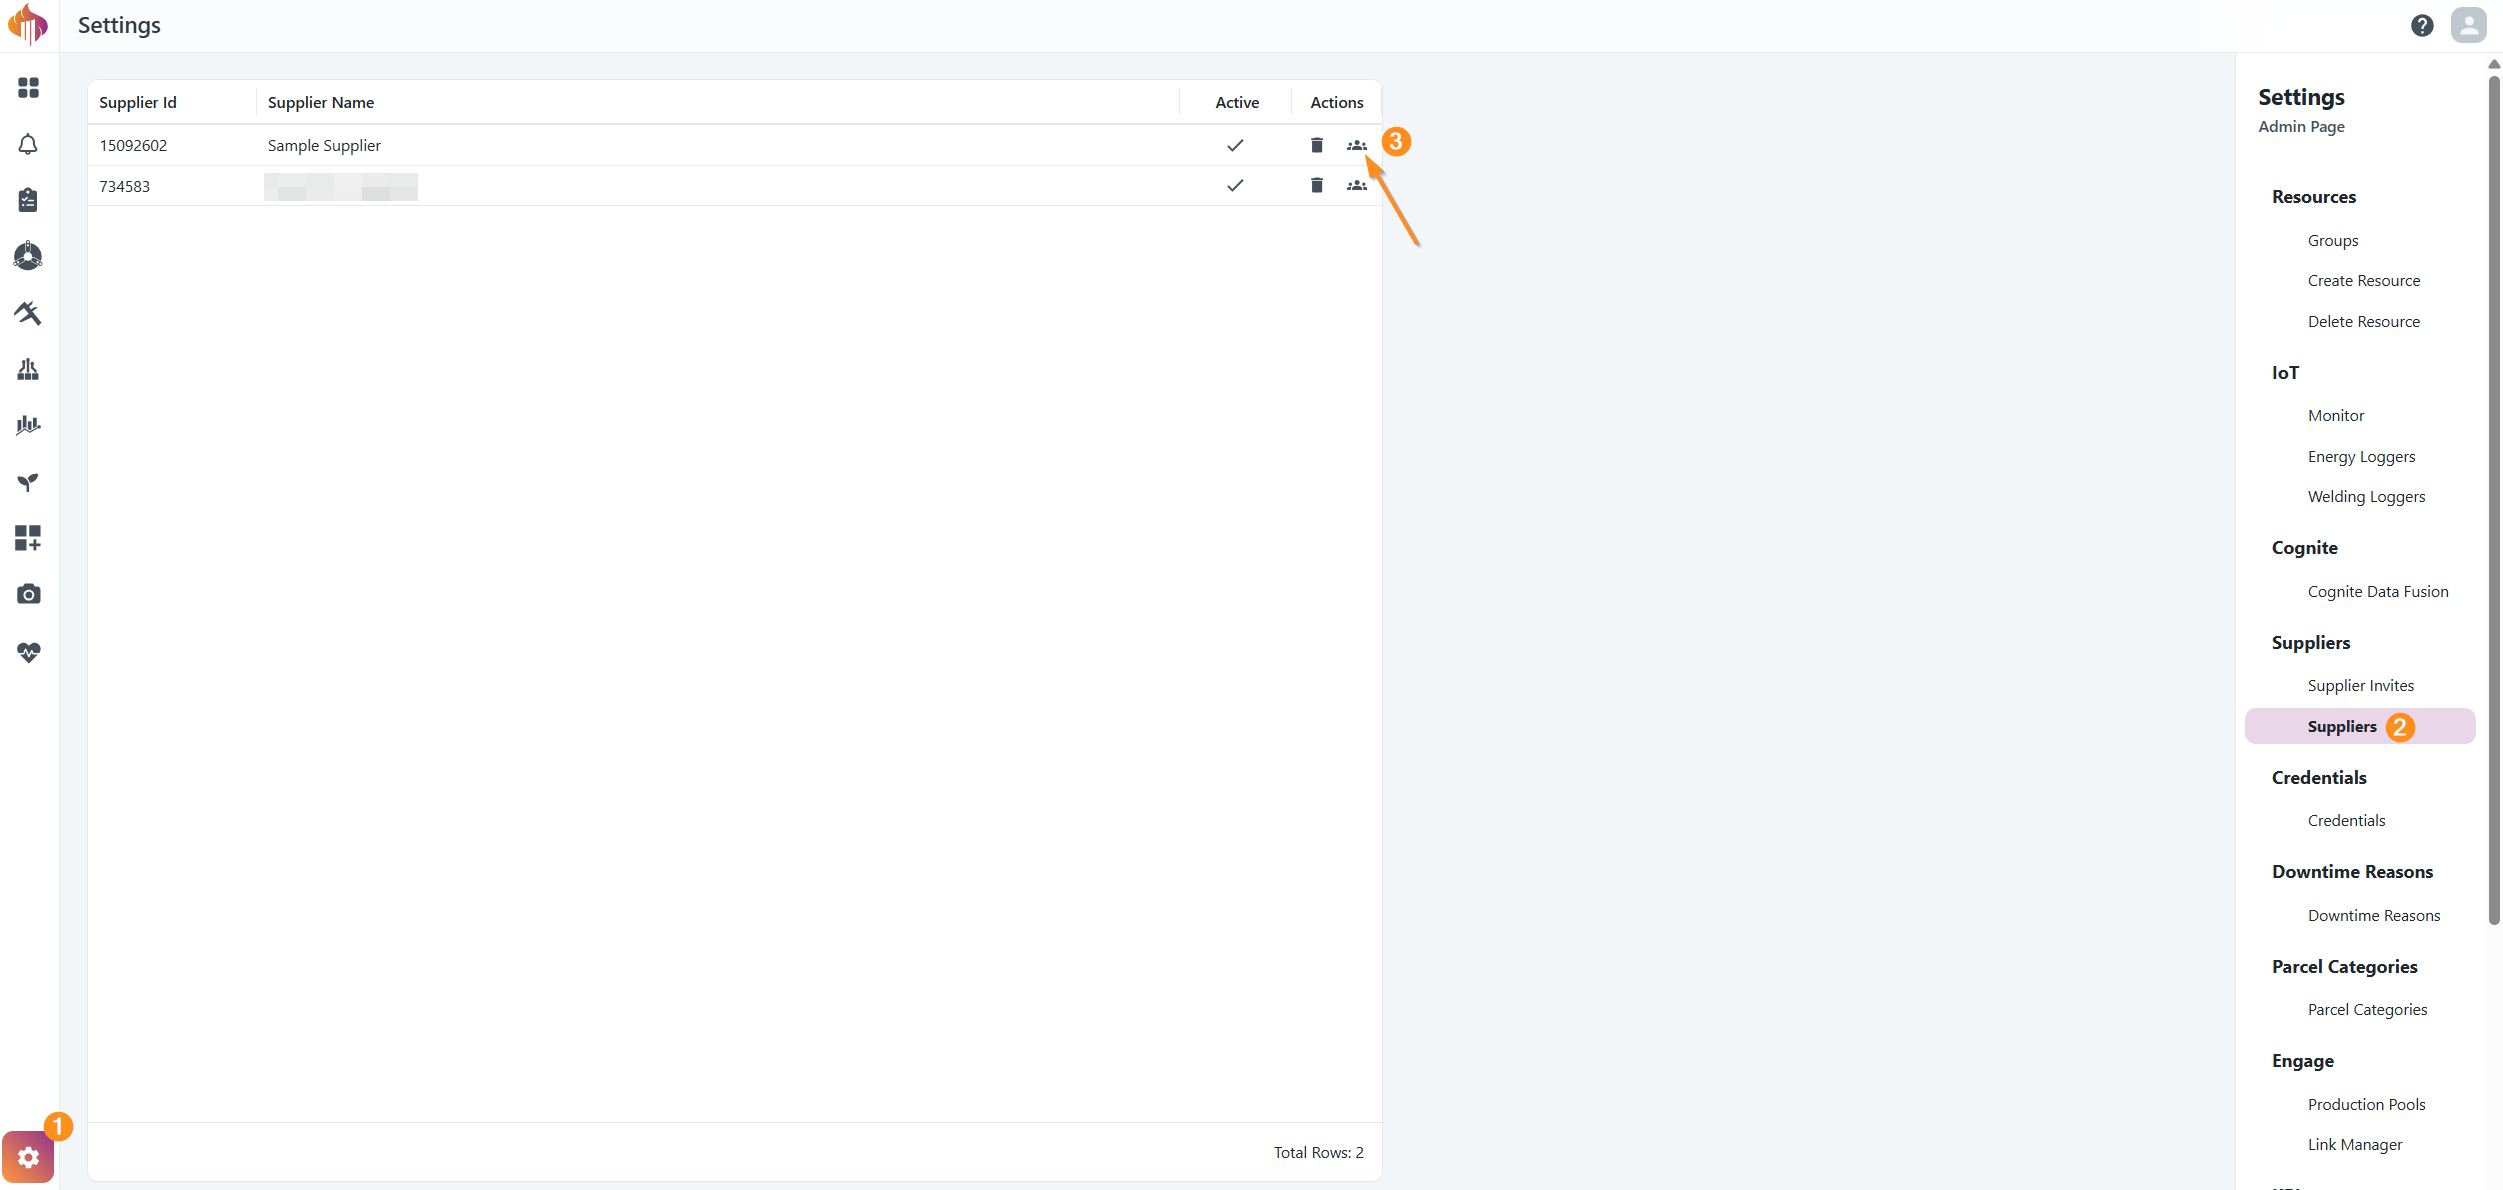
Fill in the name, email address and roles.

| Role | Gives access to |
|---|---|
| Measurement Forms Operator | Filling out Measurement Forms in Inspect. This is the role the operators need |
| Measuring Tools Admin | Managing measuring tools and calibrations |
| Admin | Managing users in the supplier company, including adding new ones |
Several roles can be assigned to a user. A common setup is that two- or three key-people at the supplier get all three roles, and everyone else gets Measurement Forms Operator only.
Step 5 - Share a measurement form with the supplier
The supplier company now exists, but their operators cannot see any Instances yet. Access is granted per Instance, so you decide exactly which measurement forms they get.
Once the supplier is onboarded (Steps 1-4), access to individual Instances is synced automatically every hour, and you do not normally have to do this step yourself.
Access follows the outsourced operation and its purchase order in the ERP system. The supplier gets access to the Instance while the operation is outsourced and still open, with the purchase order details being filled in automatically.
When the operation is closed in the ERP system, the supplier loses access at the next sync, even if they have not finished measuring. If that happens, add the supplier manually using the steps below.
Sharing manually
Manual users would do this for every Instance they share with a supplier.
ERP users only need it when the automatic sync does not cover a case, as described above.
Open the Instance you want to share and find Suppliers with access in the panel on the right.
Click Give access to supplier and fill in the form.
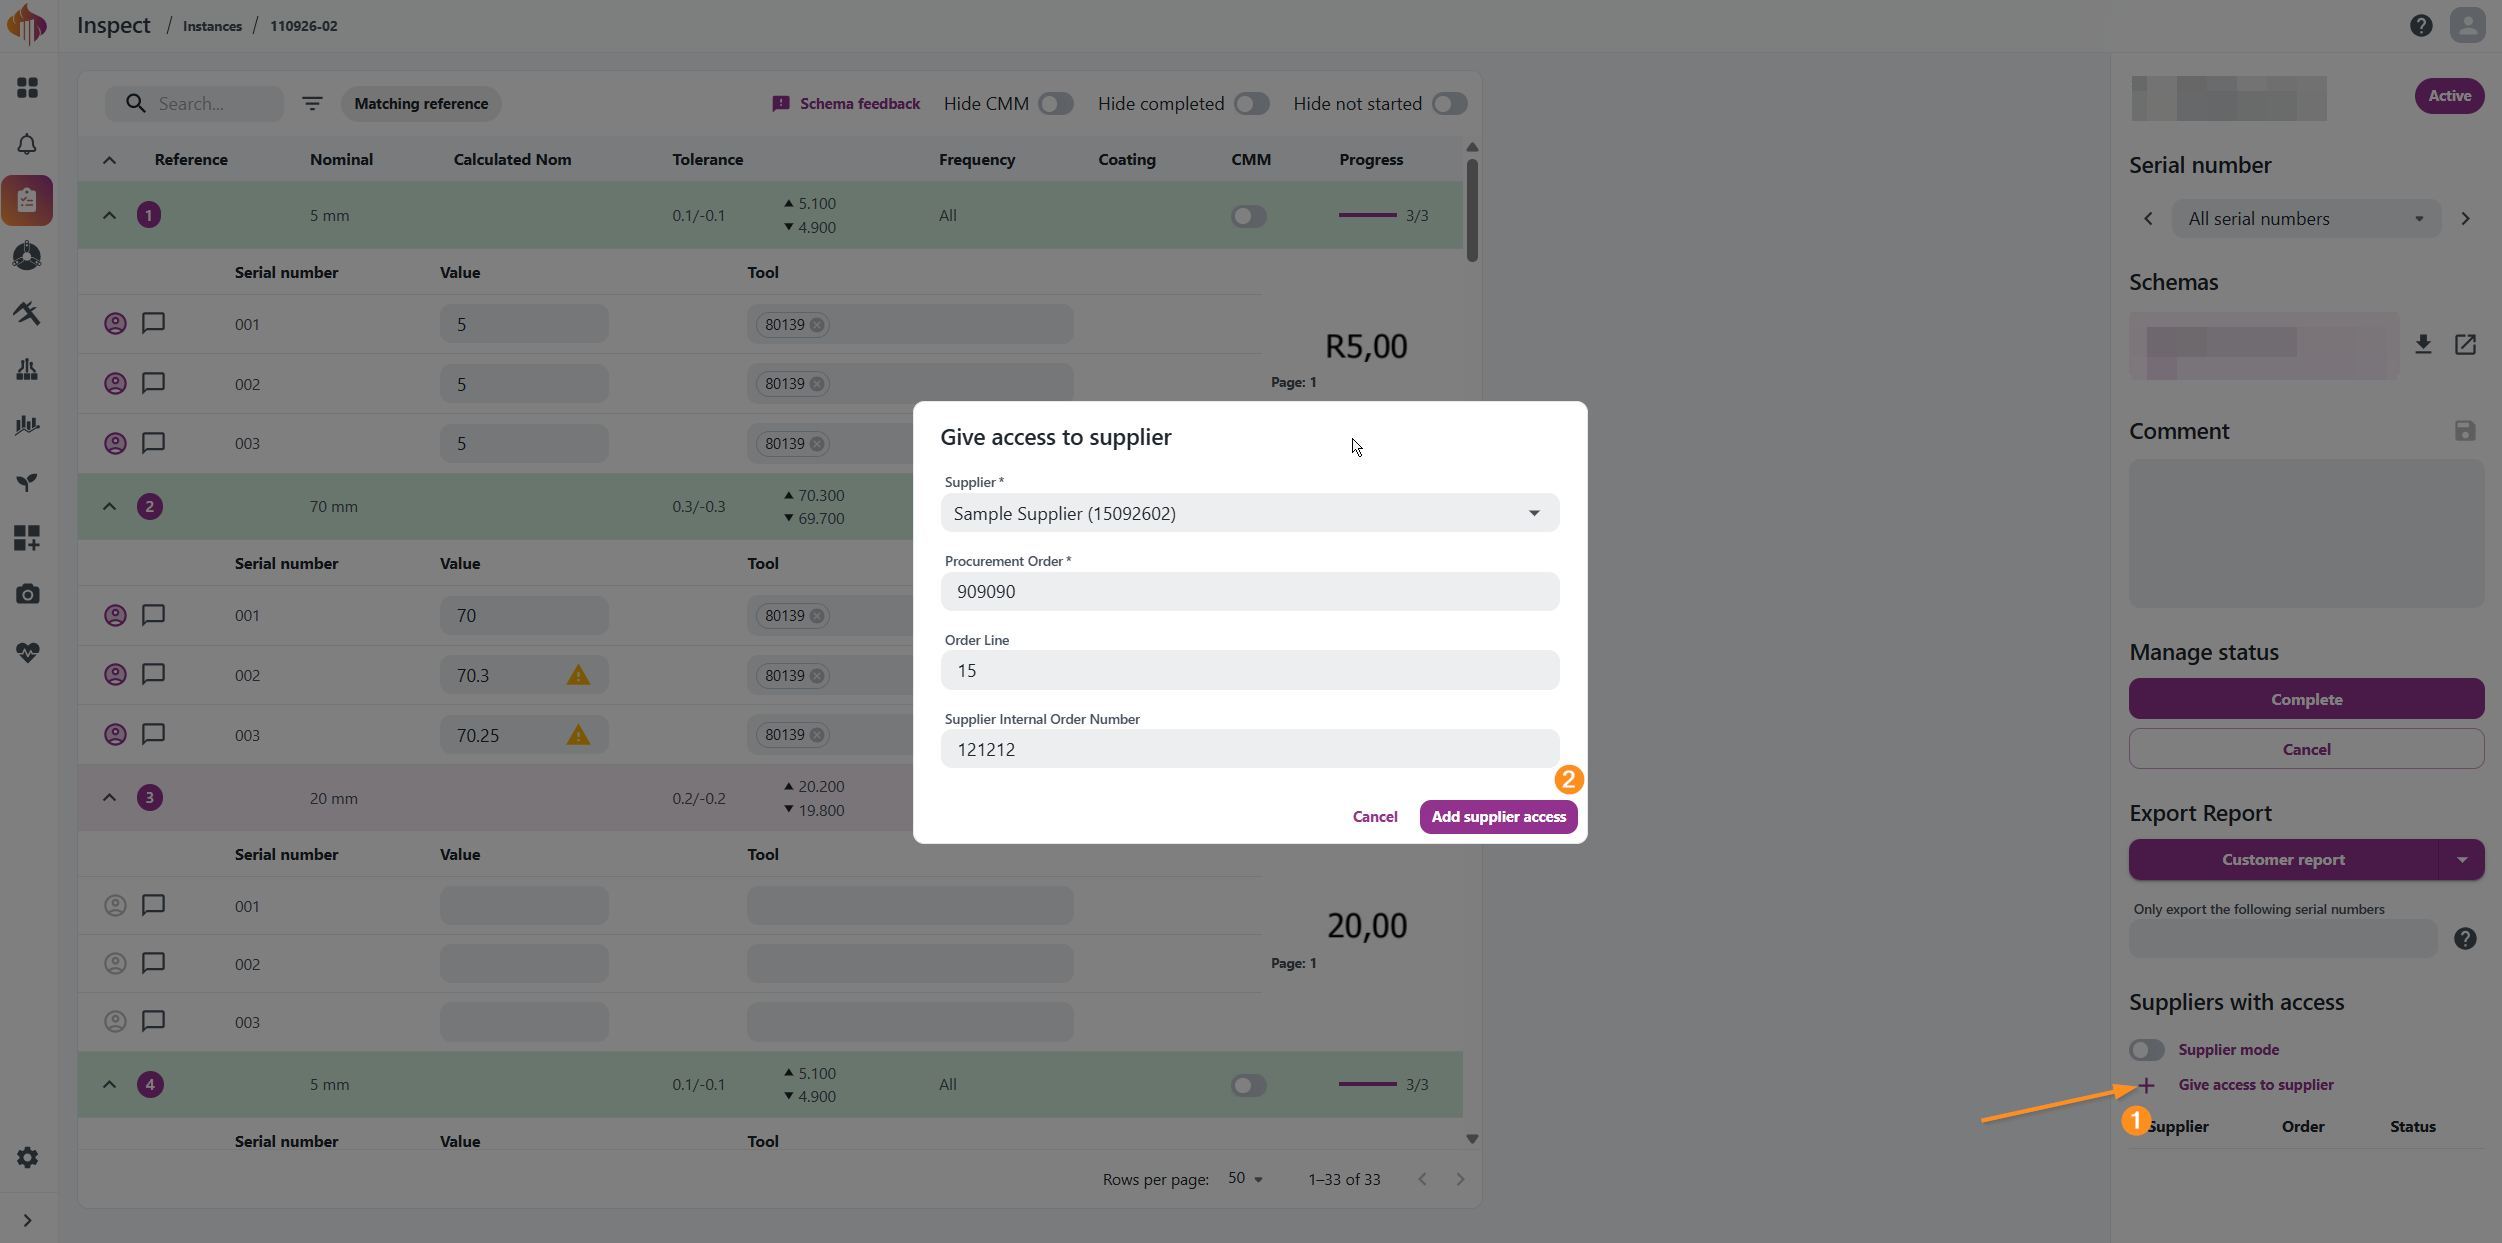
| Field | Description |
|---|---|
| Supplier | The supplier company. Only suppliers already set up in your tenant appear here |
| Procurement Order | Your purchase order number. Required |
| Order Line | The line number on the purchase order |
| Supplier Internal Order Number | The supplier's own order reference if you have it |
The supplier now appears in the list with status Active, and their operators can open the Instance and register measurements.
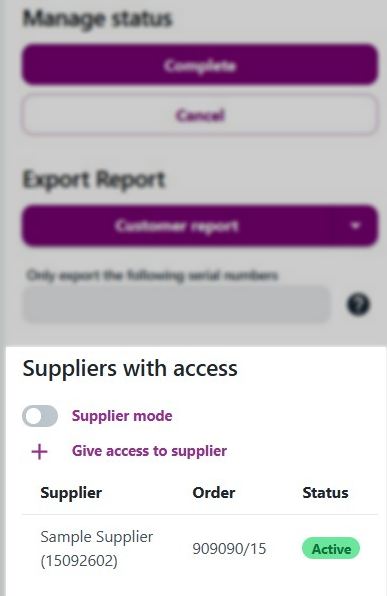
Only needed if you fill in the form on the supplier's behalf. It lets you register their measuring tools without validating them against your own Measuring Tools database. Requires the Inspect Admin, Supplier Admin or Admin role.
Step 6 - Verify access and hand over
Before you step away, confirm that the setup actually works.
- Add one or two Admin users at the supplier, as described in Step 4
- Ask them to sign in with Microsoft at ignos.io and confirm that they can open the Instance you shared in Step 5
- Check that they can register measurements in an Instance, not just view the form
This is what they should see after signing in. Your company name appears under Inspect supplier. If they're registered as suppliers for other Ignos customers, they get one Inspect supplier card per customer.

Once you have seen that their access works, your own user is no longer needed in the supplier company.
Go to Settings → Suppliers → Click the Groups-icon to show all users for that Supplier and remove yourself with the delete-button.
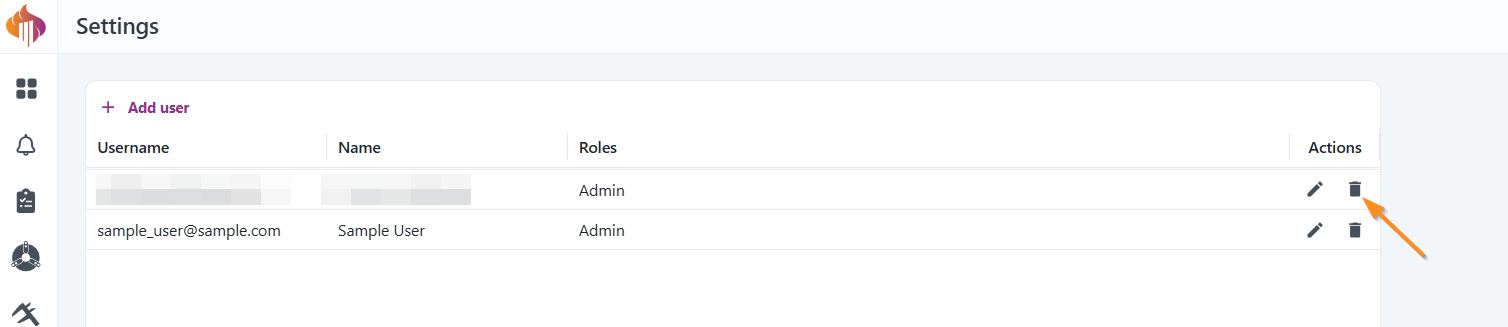
The supplier's own administrators can add and remove operators from here on, without going through you. They do this from Settings → User administration in their own account, where they only see their own company. The roles are the same as in Step 4, so you can point them to this guide.
Troubleshooting
| Problem | Cause and solution |
|---|---|
| No invites found | Usually the 5 minute cache: if the user opened the page before you sent the invite, Ignos keeps showing this for up to 5 minutes. Wait 5 minutes without reloading, then refresh. Each reload starts the wait over again. Otherwise, check that they signed in with exactly the address the invite was sent to, and that the invite has not expired |
| The invite has expired | Delete it and create a new one with a later expiry date |
| Error saying the supplier already exists | An invite or a supplier with the same Supplier Id already exists. Check both the Supplier Invites list and your supplier overview |
| You are already member of another company | The user already belongs to another supplier company in Ignos. Use a different email address, or have an administrator in the existing company handle it |
| Add user fails for a supplier | If the supplier is an Ignos customer with their own tenant, their users are managed through their own Entra ID, not through Ignos |
| "Unfortunately, you do not have access to IGNOS" when signing in | The user is at the wrong page. Supplier users must accept their invite at ignos.io/accept-invite first. The main sign-in page at ignos.io only works for users who are already registered in a tenant |