Engage Planner
Planner is part of Engage. You use it to set the priority order of operations on a resource, week by week. When you publish the plan, operators see the operations in that order in Schedule, where they start and report their work.
Each row in the plan is one operation, a single step of a production order, such as setup or machining. You can drag operations into a new order and move them between weeks. When you are done, save the plan as a draft or publish it.
To open Planner, go to Engage > Planner in the left navigation.

Planner is shown to users with the MES Planner or Admin role. Schedule is shown to users with the MES Reader, MES Operator or Admin role. A user who only has MES Planner sees Planner, but not Schedule. See Access Control.
How it fits together
- The plan for a resource starts from the ERP plan, which is the sequence your ERP system provides.
- You reorder operations, move them between weeks, and lock the sequence as needed.
- You save a draft to keep your work in progress, or publish to send the new sequence to Schedule.
- Schedule shows the last published plan. After a reset, it shows the ERP plan. Saving or discarding a draft does not change Schedule.
- Every save, publish and reset is kept as a version. You can open and restore versions at any time.
Select a resource
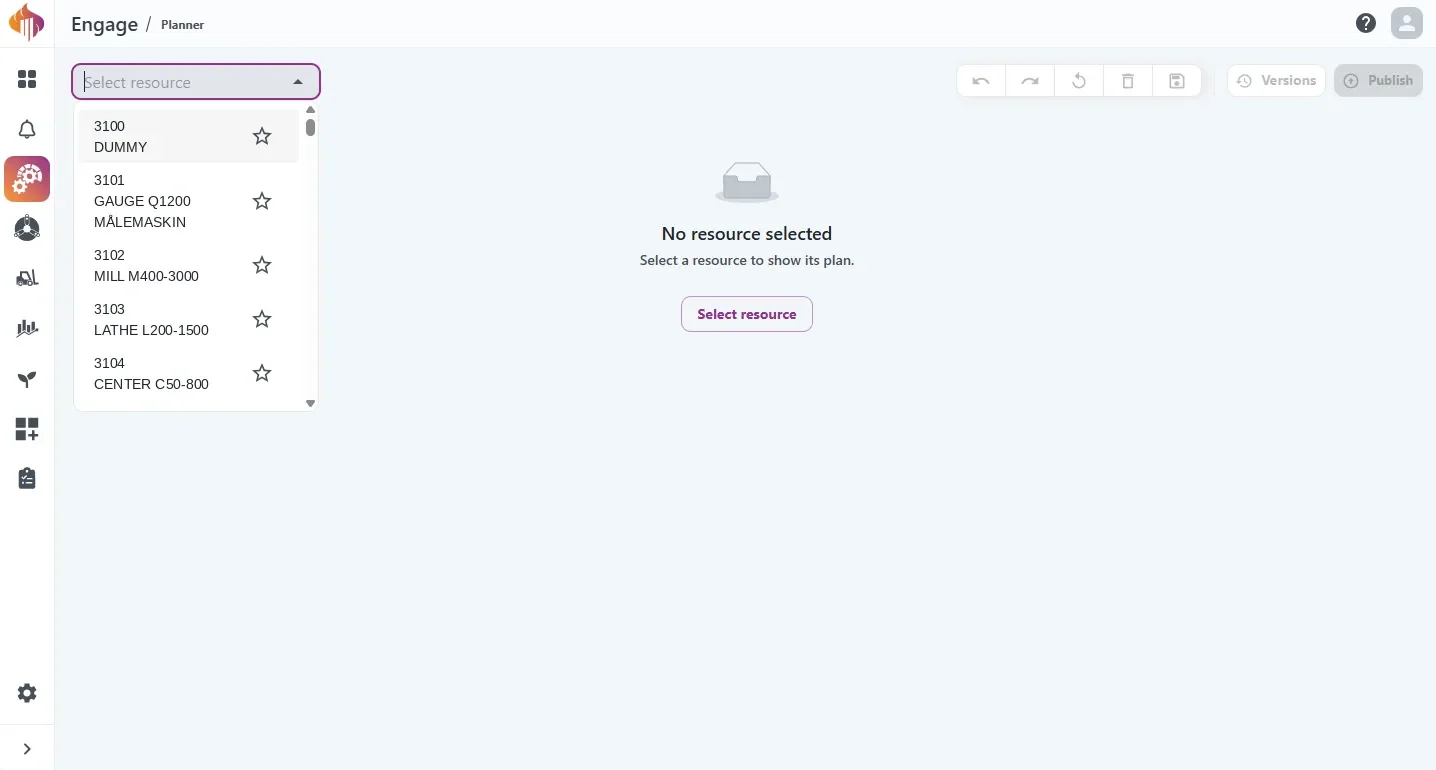
A plan belongs to one resource. Choose the resource in the resource selector at the top left. Your favorite resources are listed first in the selector.
Read the plan
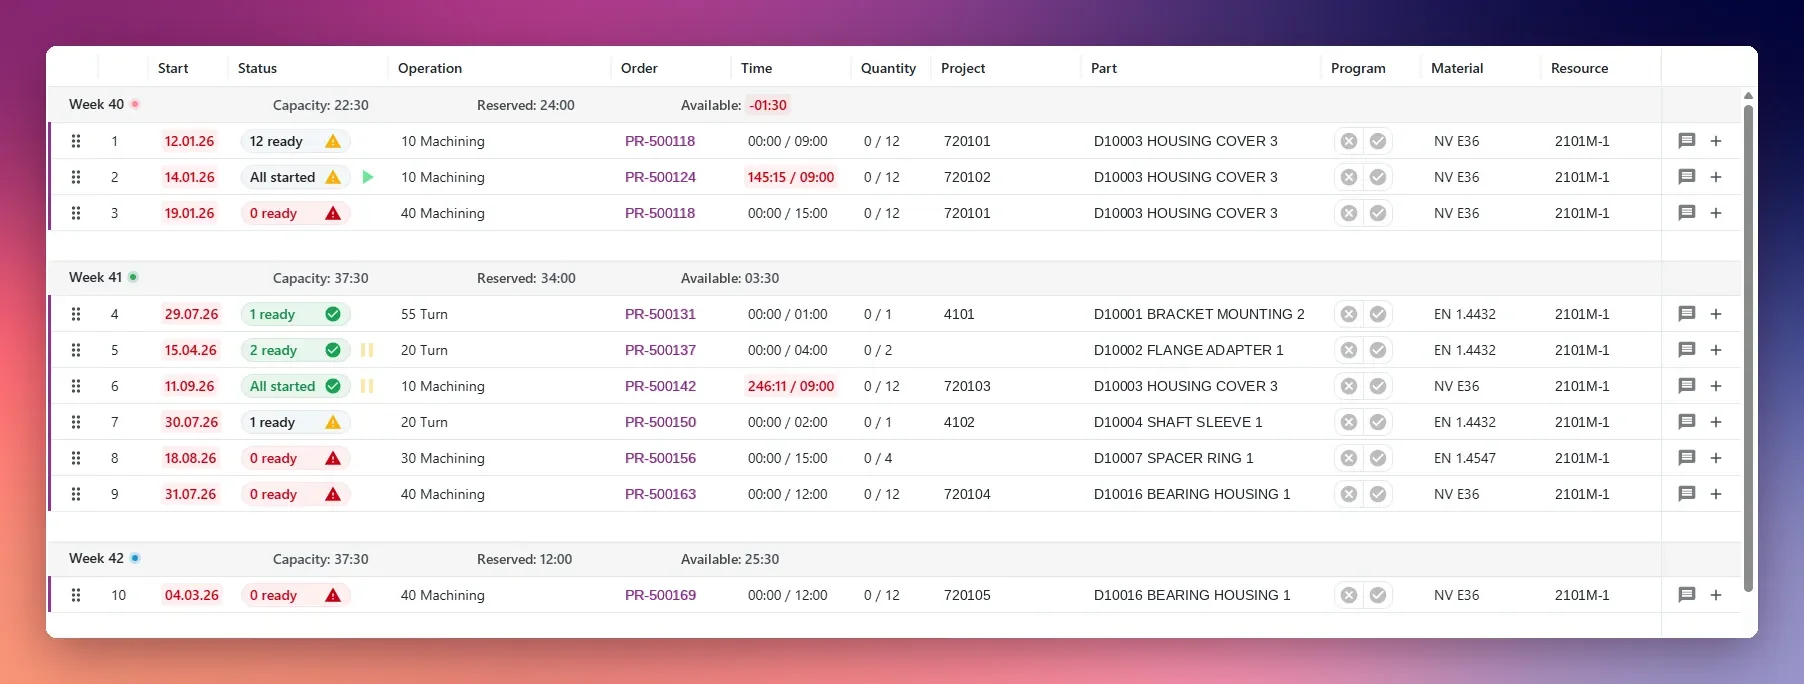
The plan is a list of operations grouped by week. The current week and the next three weeks are always shown, even when they are empty. Later weeks are shown when they contain operations.
How operations are placed
Planner places operations in the plan automatically:
- By planned start date: each operation is placed in the week of its planned start date from the ERP. If you move an operation to another week, it stays there, even if the date in the ERP changes. If it is not completed by the end of the week, it moves to the next week.
- Past planned start dates: an operation whose planned start date has already passed is placed in the current week.
- Unfinished operations: when a week ends, the operations in it that are not completed are moved to the top of the next week.
- New operations from the ERP: a new operation is placed in the week of its planned start date, below any locked operations in that week. If its planned start date has passed, it goes into the current week, also below any locked operations. New operations are highlighted in the plan (see Row highlights).
Week headers
Each week starts with a header row:
| Field | Meaning |
|---|---|
| Week | The ISO week number. |
| Capacity | The hours available on the resource that week. |
| Reserved | The hours of remaining work planned for that week. |
| Available | Capacity minus reserved hours. Shown in red when the week is overloaded. |
The colored dot next to the week number shows the load at a glance:
- Blue: under 90% of capacity
- Green: 90–100% of capacity
- Red: over capacity
- Gray: the resource has no shift plan. The week header then shows only Reserved.
Hover over the week number to see the dates of the week and a capacity breakdown.
Capacity comes from the shift plan for the resource in Settings. For the current week, only the time left in the week is counted, so capacity goes down as the week passes.
Columns
| Column | What it shows |
|---|---|
| # | The position of the operation in the sequence. You can edit it (see Type a new position). |
| Start | The planned start date, or the actual start or end if the operation has started. |
| Status | Whether the operation is ready to start, and whether it is in progress. |
| Operation | Operation number and name. Setup operations are marked (Setup). |
| Order | The production order number. Select it to open the production order. |
| Time | Operation time. |
| Quantity | Planned, started, produced and scrapped quantities. |
| Project | Project number, with the BOM position if there is one. Hover to see the project name. |
| Part | Part number and name, with a button that copies the part number. |
| Program | The CNC program status (see Program status). |
| Material | Part material. |
| Resource | Resource ID. Hover to see the resource name and department. |
On the far right of each row:
- The notes icon opens the discussion for the operation. The icon is highlighted when there are notes, and a dot shows when there are unread notes. Messages you write here are tagged as Planner notes.
- The expand toggle shows the full operation details below the row.
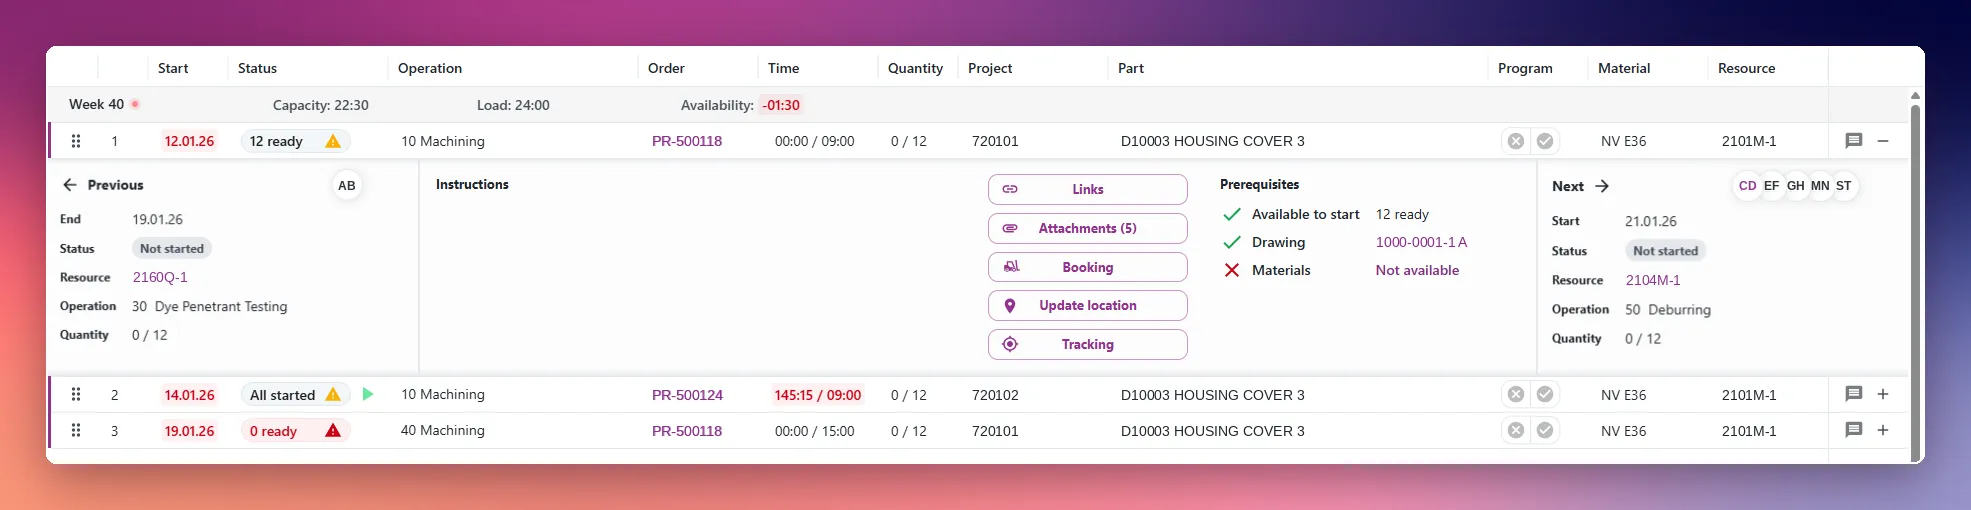
Row highlights
| Highlight | Meaning |
|---|---|
| Purple bar on the left (orange in dark mode) | The row is locked in the sequence. |
| Purple tinted background (orange in dark mode) | You have moved the row and not saved yet. |
| Light blue background | A new operation from the ERP that is not in the saved plan yet and is not locked. |

Change the sequence
Drag operations
Drag an operation by its handle to a new position. The operation moves into the week of the row you drop it below.
To move several operations at once, select them first and then drag one of them. The whole selection moves together and keeps its order.
| To select | Windows | Mac |
|---|---|---|
| A range of operations | Click the first, then Shift+click the last | Click the first, then Shift+click the last |
| Individual operations | Ctrl+click each one | Cmd+click each one |
Type a new position
- Double-click the # cell of an operation.
- Type the new position.
- Press Enter.
The operation moves to that position and into the week of the row it lands next to. If the number is outside the plan, the operation goes to the first or last position.
Lock the sequence
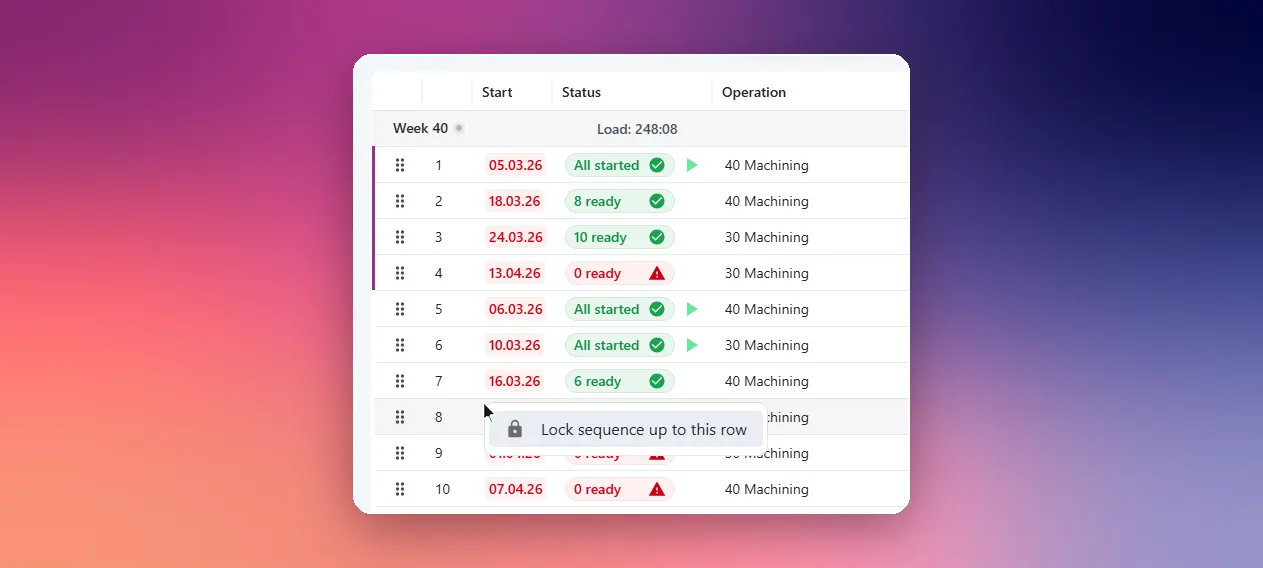
To lock the sequence, right-click an operation and select Lock sequence up to this row. That row and every row above it are locked. If the row is already locked, the menu shows Already locked.
Operations you move are locked too, along with every row above them. The bar on the left shows which rows are locked.
Everything above the lowest row you have moved or locked is locked.
Undo, redo and reset
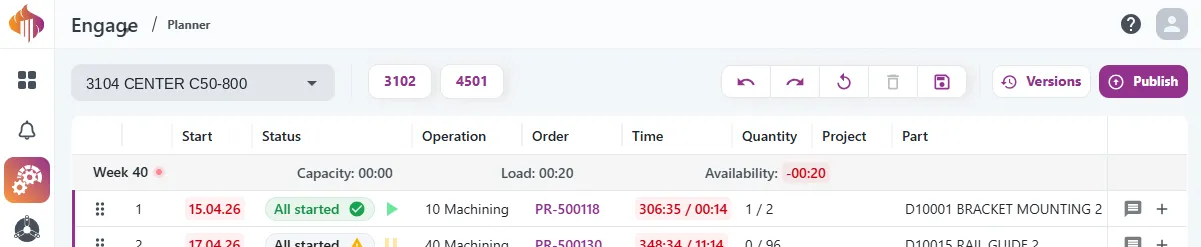
The buttons at the top right let you step through your changes before you save:
| Button | Shortcut | What it does |
|---|---|---|
| Undo | Ctrl+Z / Cmd+Z | Reverses your last change. |
| Redo | Ctrl+Y / Cmd+Shift+Z | Reapplies a change you undid. |
| Reset | Ctrl+R / Cmd+R | Removes all unsaved changes and goes back to the loaded plan. |
Save and publish
Save a draft
- Click Save draft (Ctrl+S / Cmd+S).
- Optionally, add a comment in the Save draft dialog.
- Click Save draft.
A draft is personal. Only you can see it, both in the plan and in the version history. Other planners and operators do not see your changes until you publish. You can come back to your draft later.
Publish
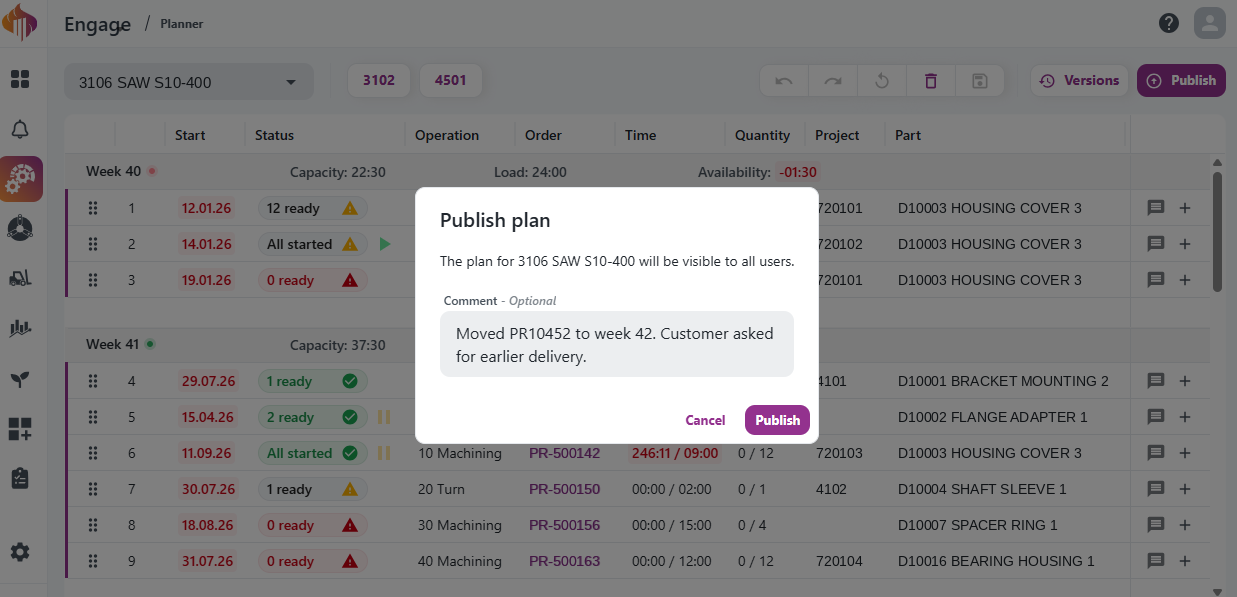
- Click Publish (Ctrl+Enter / Cmd+Enter).
- Optionally, add a comment in the Publish plan dialog, for example the reason for the change. The comment is shown in the version history.
- Click Publish.
The plan becomes the active sequence, and operators see the new order in Schedule right away. If you have unsaved changes, they are saved as part of publishing.
Discard a draft
Click Discard draft (Ctrl+D / Cmd+D) to remove your saved draft and go back to the last published plan. The button is only available when you have a draft.
Unsaved changes
The plan reloads every two minutes, so you see changes from others and from the ERP. Reloading is paused while you have unsaved changes.
If you switch resource, open another version or leave the page with unsaved changes, you are asked to confirm before your changes are discarded.
Program status
The Program column shows whether the CNC program for an operation is ready. It has two icons:
- ✅ Program ok (green when selected): the program is ready.
- ❌ Program not ok (red when selected): the program is not ready.
Click an icon to set the status. Click the selected icon again to clear it.
The program status is saved immediately and is not part of the draft or the published plan. You cannot change it while you are viewing a previous version.
Versions
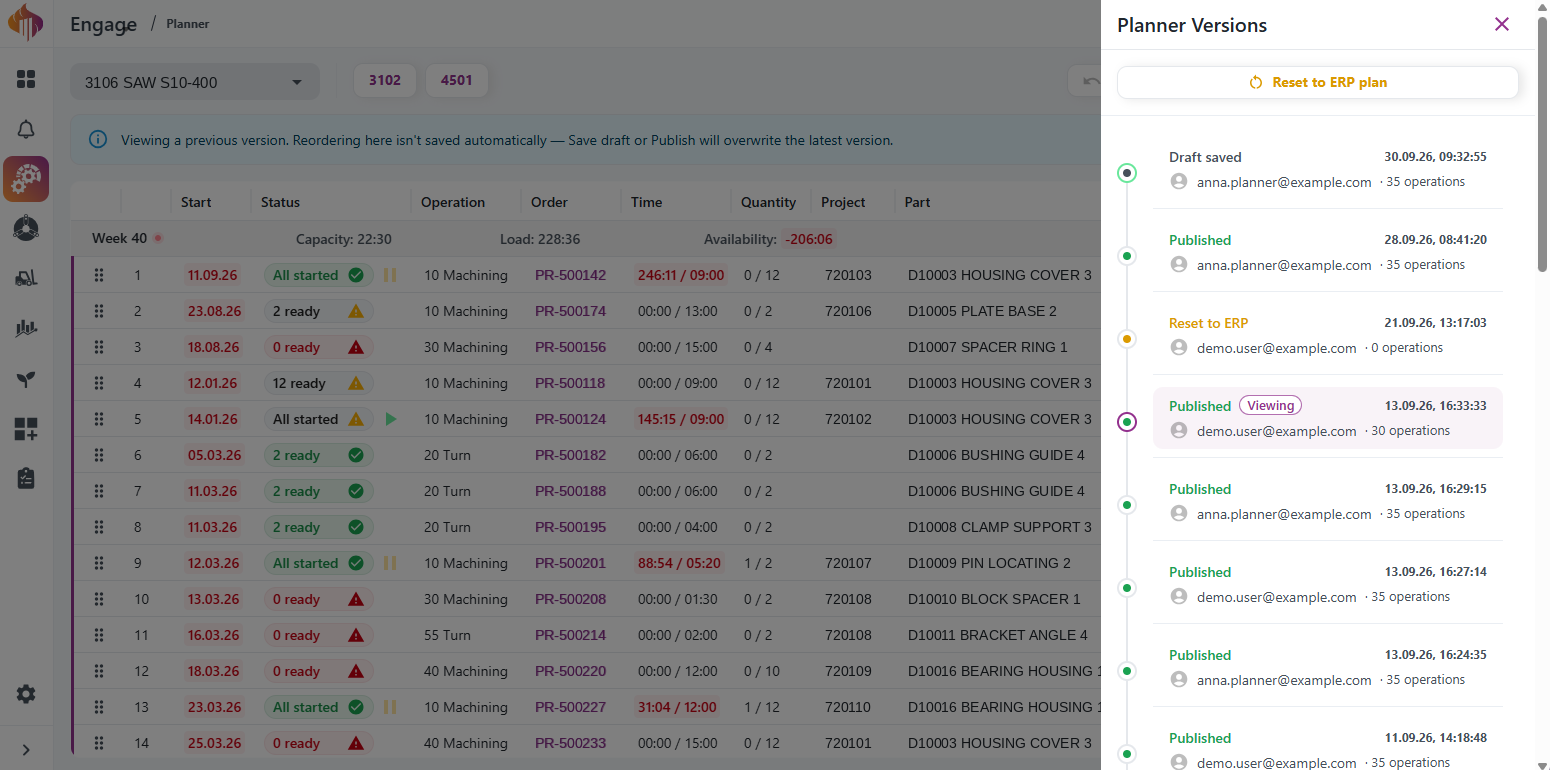
Click Versions to open the version history for the selected resource in the Planner Versions panel. Each entry shows:
- The event type:
- Published
- Draft saved (only your own drafts are shown)
- Reset to ERP
- When it happened, and who did it
- The comment, if one was added
- The number of operations in the plan
The version you are viewing is marked Viewing.
View and restore a previous version
Select a version in the list to open it. A banner shows that you are viewing a previous version. Click Back to latest to return to the latest version.
While you view a previous version, you can still reorder operations. To restore the version, save it as the latest version:
- Save draft restores the version as a draft. Schedule does not change until you publish.
- Publish restores the version as the published plan and updates Schedule.

Reset to the ERP plan
Click Reset to ERP plan at the top of the Planner Versions panel to remove all planning and start again from the sequence provided by the ERP.
Resetting to the ERP plan discards your own draft, if you have one, and the published plan for the resource. Schedule goes back to the ERP sequence straight away. Drafts from other planners are not affected. The reset is recorded in the version history as Reset to ERP.
Keyboard shortcuts
| Action | Windows | Mac |
|---|---|---|
| Undo | Ctrl+Z | Cmd+Z |
| Redo | Ctrl+Y | Cmd+Shift+Z |
| Reset unsaved changes | Ctrl+R | Cmd+R |
| Save draft | Ctrl+S | Cmd+S |
| Discard draft | Ctrl+D | Cmd+D |
| Publish | Ctrl+Enter | Cmd+Enter |