Supplier tenants
With a supplier tenant, you invite your suppliers to IGNOS and manage their users in a dedicated tenant in Microsoft Entra ID, separate from your own organization's tenant.
How it works
User management
Supplier users are managed in ignos.io, the same way as before.
Sign up
When a supplier user is added, they are invited to the supplier tenant in Microsoft Entra ID, but Microsoft does not send them an invitation email. The person who added the user lets them know:
- For a new supplier, you send the invitation to the supplier's initial administrator from ignos.io. See Invite a supplier.
- For other supplier users, the supplier's administrator tells their colleagues which address to sign in with.
The first time the user signs in to {companyname}.ignos.io, Microsoft asks them to set up two-factor authentication. They can sign in with a verification code sent to their email.
Sign in
The supplier user signs in to the supplier tenant at {companyname}.ignos.io. After they have authenticated with Microsoft, they are returned to {companyname}.ignos.io, where they get access to your IGNOS solution, limited to the supplier company they are registered to.
{companyname}.ignos.io is only for supplier users. Your own employees cannot sign in there. They continue to sign in at ignos.io with their organization's account.
Setup
The first-time setup of supplier tenants is done together with IGNOS. You can do the steps below yourself, but IGNOS also has to do some steps before suppliers can sign in. See Connect the supplier tenant to IGNOS.
Contact IGNOS before you create the supplier tenant, so we can plan the setup with you. The setup is complete when IGNOS has confirmed that both your steps and ours are done.
To do the steps below, you need to be a Microsoft Entra ID administrator.
Create the supplier tenant
Create a new tenant in Microsoft Entra ID with these settings:
| Setting | Value |
|---|---|
| Tenant type | Workforce |
| Organization name | {Company name} Supplier |
| Initial domain name | {Company name}supplier |
| Country/Region | The country where your company is located |
See Microsoft's documentation on the invitation redemption flow for how invited users experience their first sign-in.
Redemption settings (optional)
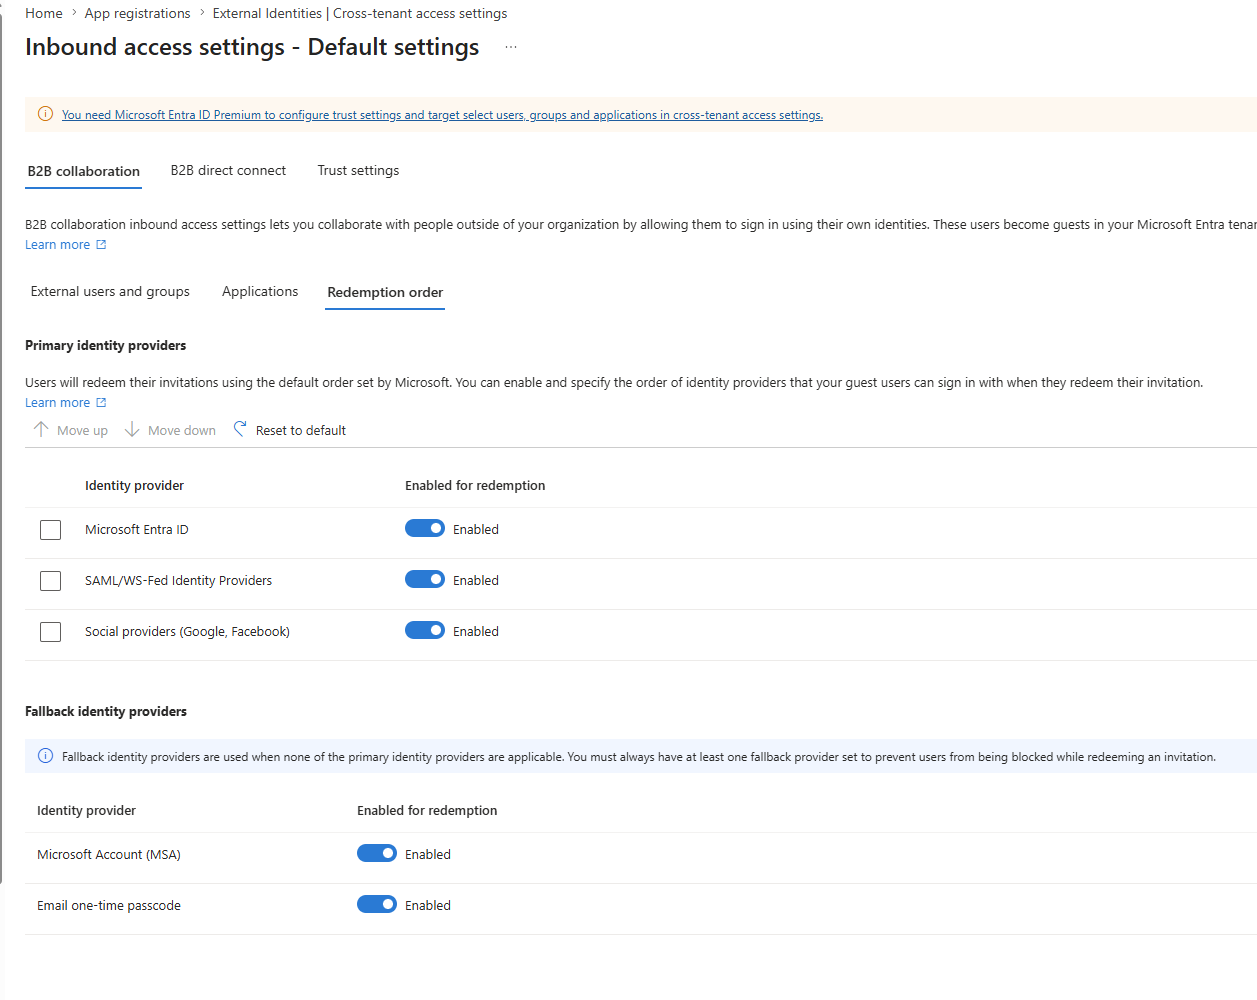
You can choose which identity providers invited users can redeem their invitation with under External Identities > Cross-tenant access settings > Default settings > Inbound access settings > Redemption order.
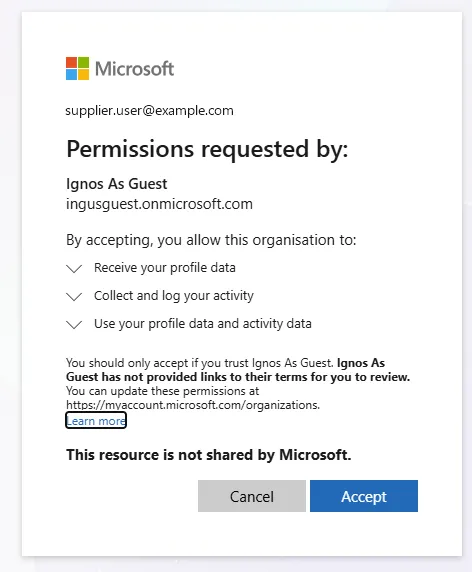
You can also turn on automatic redemption, so users don't have to accept a consent prompt like this one the first time they sign in:
Changing cross-tenant access settings requires a Microsoft Entra ID P1 subscription linked to the supplier tenant. Without it, saving fails with this error:

Install the IgnosSuppliers enterprise application
IGNOS uses a dedicated application, IgnosSuppliers, to manage users in the supplier tenant.
-
In your browser, sign in to the supplier tenant in Microsoft Entra ID as the tenant administrator, and go to:
https://login.microsoftonline.com/YOUR_EID_TENANT_ID/adminconsent?client_id=cd3f8eb3-2f86-421c-b52f-719867b178a0YOUR_EID_TENANT_IDis the tenant ID of the supplier tenant. To find your tenant ID, see this article. -
If prompted, confirm the account you want to use to consent to the request.
-
Review the permission request, and click Accept.
For more information, see Consent experience for applications in Microsoft Entra ID.
Permissions
IgnosSuppliers requires these application permissions:
| Permission | Used for |
|---|---|
| User.ReadWrite.All | Basic management of supplier users |
| User.Invite.All | Inviting supplier users to the supplier tenant |
| AppRoleAssignment.ReadWrite.All | Giving supplier users their IGNOS roles |
| Application.Read.All | Looking up IGNOS application roles by name |
The supplier tenant also needs the IGNOS application. See Register the Ignos application in Microsoft Entra ID.
Connect the supplier tenant to IGNOS
Send IGNOS:
- The tenant ID of the supplier tenant.
- The address you want for your supplier portal,
{companyname}.ignos.io.
When you have installed the IgnosSuppliers enterprise application and sent us this information, IGNOS will:
- Register the tenant ID of the supplier tenant on your IGNOS solution. This tells IGNOS which tenant to invite your supplier users to.
- Register the address of your supplier portal,
{companyname}.ignos.io. Supplier users who sign in there get access to your IGNOS solution.
You can invite suppliers when IGNOS has confirmed that the setup is done.
Invite a supplier
To invite a supplier, you need the Supplier Admin role in your own organization.
-
In ignos.io, go to Settings > Suppliers > Supplier Invites, and click Invite supplier.
-
Fill in the Add supplier invite form:
Field Description Supplier Id Your own ID for the supplier, for example the supplier number in your ERP system. Country The supplier's country. If it is not in the list, select My supplier's country is not listed, and then select the country in the new list. Supplier organization number The supplier's organization number. Supplier Name Only for countries that are not listed. For listed countries, the name is looked up in the national business registry. Email address for initial administrator The email address of the person who will administer the supplier's users. Initial administrator user full name The full name of that person. -
Click Add.
-
Click the email icon next to the invited user to send the invitation from your own email client. The email tells the initial administrator which address to sign in with, and links to your supplier portal.
The initial administrator is added to the supplier tenant with the Admin role. They sign in to your supplier portal and accept the invite. After that, they can add their colleagues under Settings > Access management > User administration.
When the invite is accepted, IGNOS connects the supplier to your organization based on the organization number:
- If the supplier is already a supplier to another IGNOS customer, the existing supplier company is used.
- If the supplier is an IGNOS customer itself, the supplier is connected to their own IGNOS solution, and their users sign in with their own organization's account.
- Otherwise, a new supplier company is created.
You can delete an invite until it has been accepted. Deleting an invite also removes the initial administrator from the supplier tenant.
Roles
Supplier users' roles are managed in Microsoft Entra ID. When you give a supplier user a role in ignos.io, IGNOS assigns the matching app role to the user on the IGNOS enterprise application in the supplier tenant. Roles that are added or removed directly in Microsoft Entra ID are also shown in ignos.io.
A supplier user can have one or more of these roles:
| Role in ignos.io | App role in Microsoft Entra ID | Description |
|---|---|---|
| Admin | Collaboration.Admin | Manages the supplier company's users and their roles, and accepts invitations from customers |
| Measuring Tools Admin | MeasuringTools.Admin | Manages measuring tools, calibrations, tool types, whitelists and imports |
| Measurement Forms Operator | MeasurementForms.Operator | Reads form instances and logs measurements |
You can see a user's role assignments in the supplier tenant under Enterprise applications > Ignos > Users and groups.
Remove users and suppliers
Removing supplier users or suppliers in ignos.io also deletes the users from the supplier tenant in Microsoft Entra ID.
- Delete a supplier user: The user is removed from the supplier company and deleted from the supplier tenant.
- Delete a supplier: Under Settings > Suppliers > Suppliers. The supplier is removed from your organization, and all of the supplier's users are deleted from the supplier tenant.