Move Documentation - How to
This documentation is regularly updated to reflect any changes or improvements in the software.
If you have any questions or need further assistance, please don't hesitate to contact us or submit a ticket through our service desk.
We're here to help! 😇
Tracking

You will find everything regarding the Tracking module in this chapter.
Track an order
There's several ways one can track an order. Depending on which device you're logged in with you will start from either option 1 or 2. Option 3 is for customers using Ignos Engage.
1. Tracking from pc
Input the part name, part number, ERP-, TR order number (Move order number) or Parcel number directly into the search box.
![]()
Search for order from the search box.
2. Tracking from Mobile/tablet
From a tablet or mobile device you can also use the QR-tracking option which will launch the device's camera ready for QR-scanning of a label:
![]()
QR-scanning available from mobile device.
3. Tracking from Ignos Engage
Tracking from Engage can be done from either a work order or a work order operation:
Work order tracking
![]() The Tracking window will open in a new tab.
The Tracking window will open in a new tab.
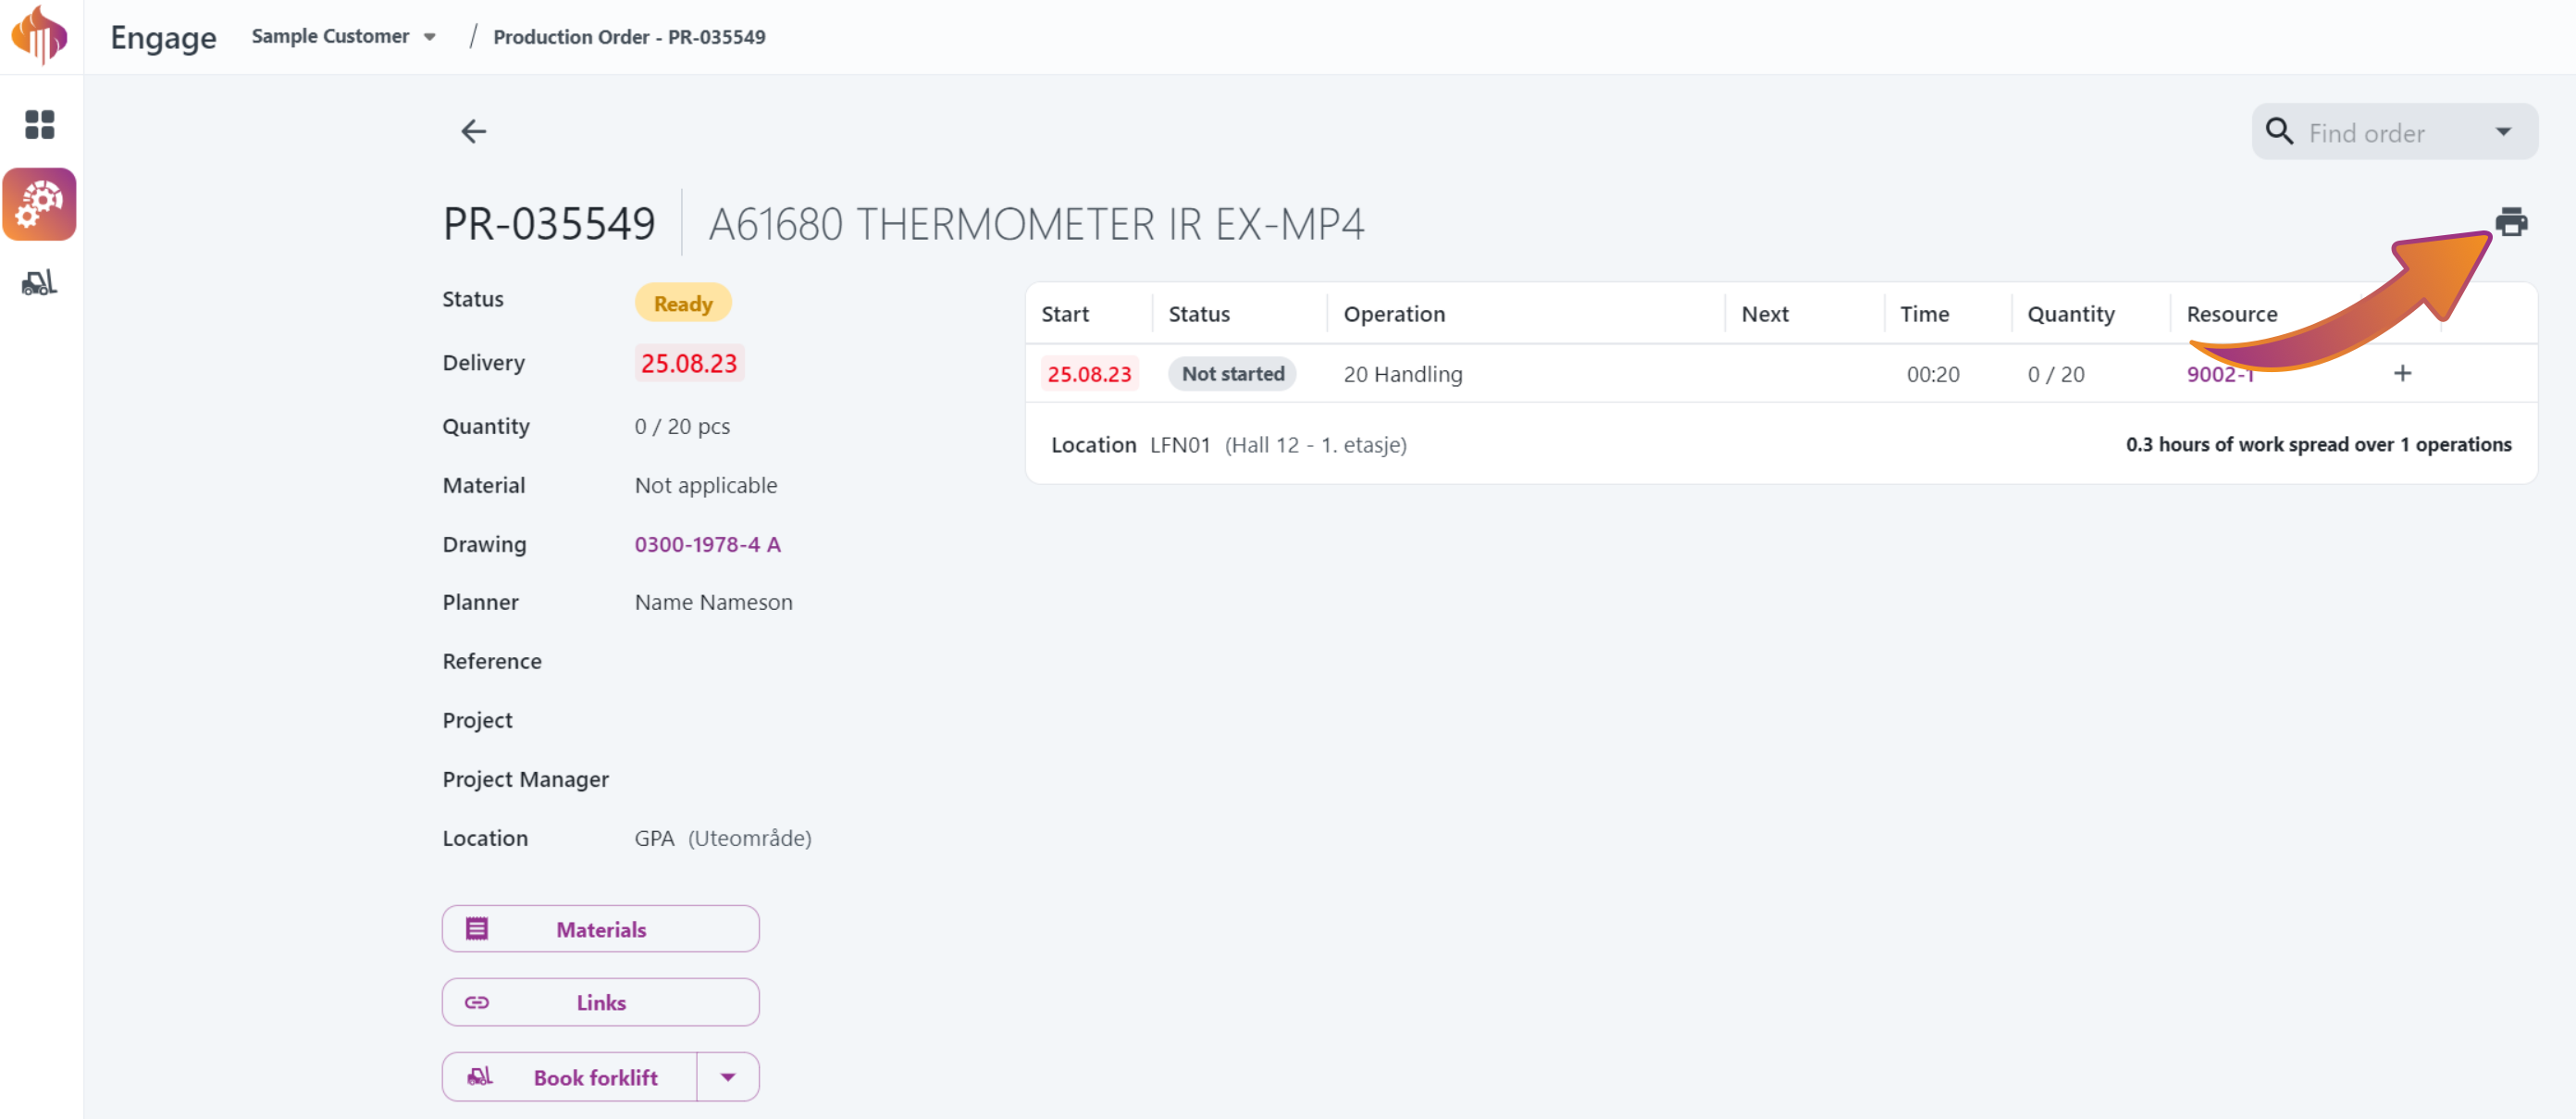
Work order operation tracking
![]() The Tracking window will open in a new tab.
The Tracking window will open in a new tab.
Booking

You will find everything regarding the Booking module in this chapter.
Place a booking
There's several ways one can place a booking. Below you'll find a list of options.
1. From the Booking module
Here you can choose from four kinds of bookings: Standard, Chip, Garbage and Other
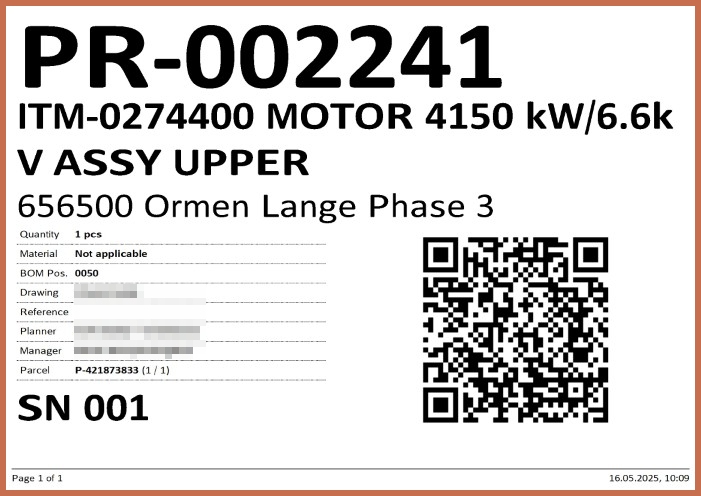
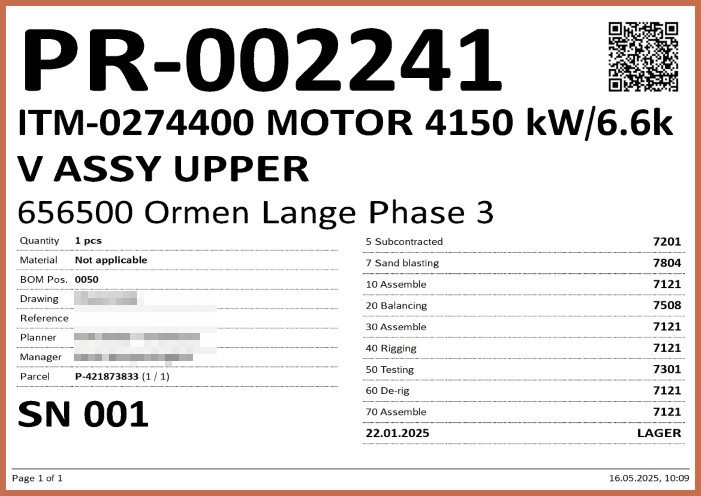
Notice below that the parcels each has a P-number which is what we call Parcel number in Move.
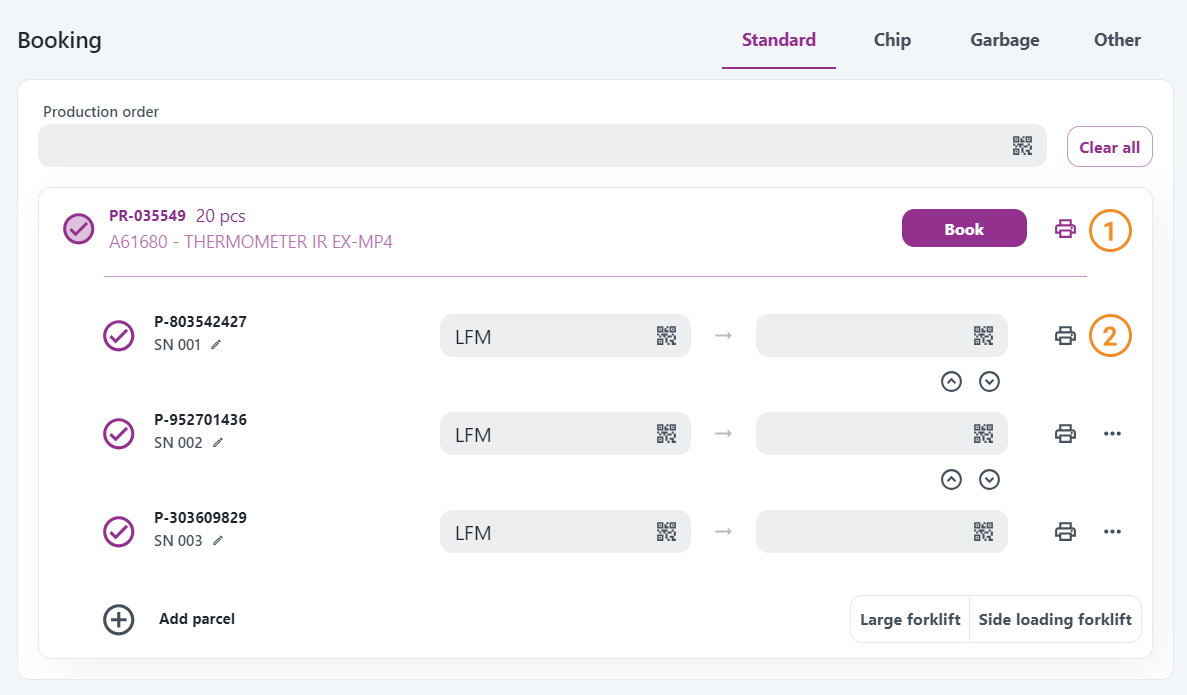
Standard
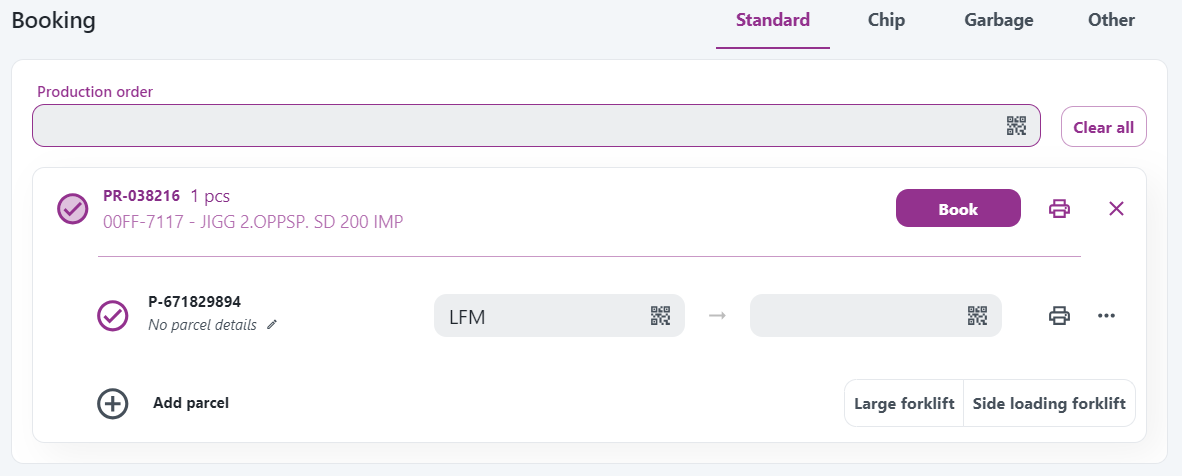
Instructions:
- Production order: Requires a part name, part number, ERP-, TR order number (Move order number) or Parcel number.
When an order has been inputted, the picture will look something like this:
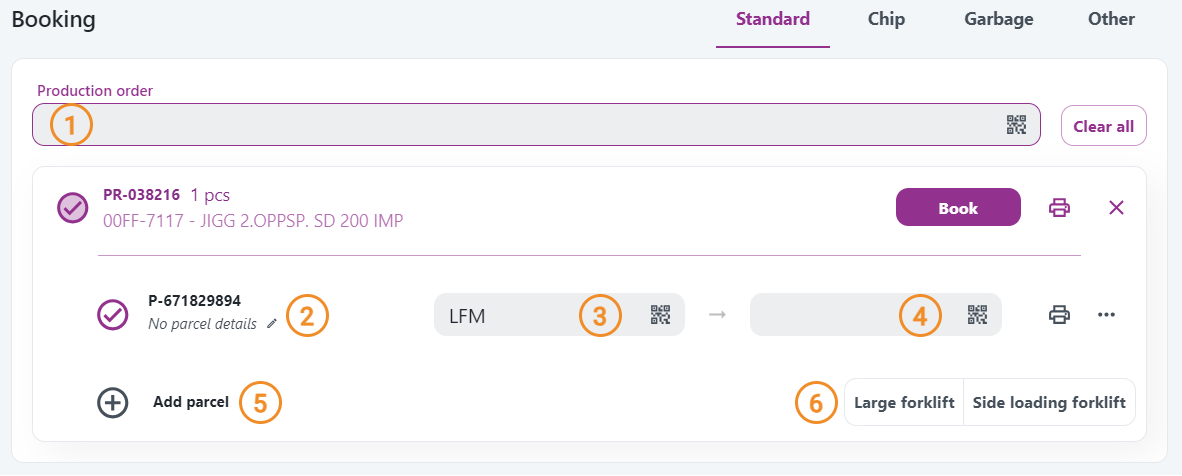
-
Parcel details: The intended use for this box is to describe what's in the parcel.
-
From: Auto-fills with the last known tracking point.
-
To: Automatically suggests and fills the next likely location. Use the dropdown suggestions for quick selection.
-
Add parcel: Add more parcels to divide the work order into multiple parcels.
-
Special needs: Select any, or defaults to a Normal forklift booking.
Chip

Instructions:
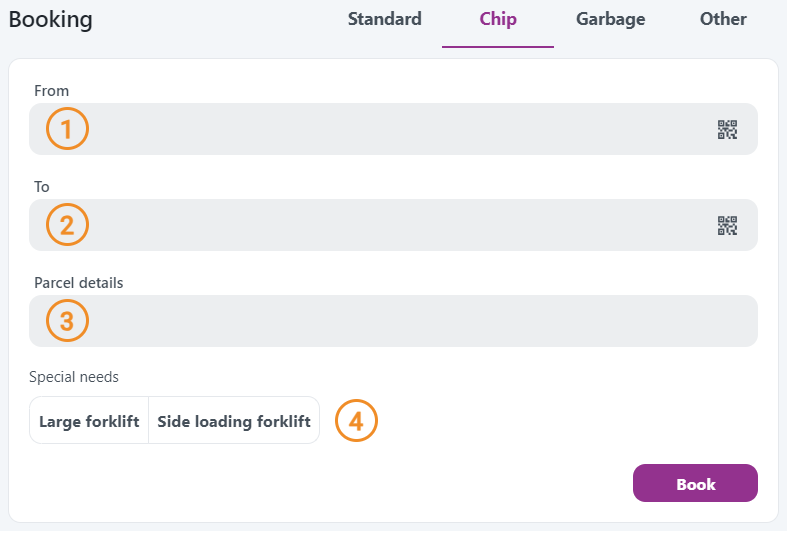
-
From: Enter your location. Use suggestions for quick fill.
-
To: Assumes and fills in the next likely location. Use suggestions for quick fill.
-
Parcel details: The intended use for this box is to describe what's in the parcel (e.g. material type).
-
Special needs: Select any, or defaults to a Normal forklift booking.
Garbage
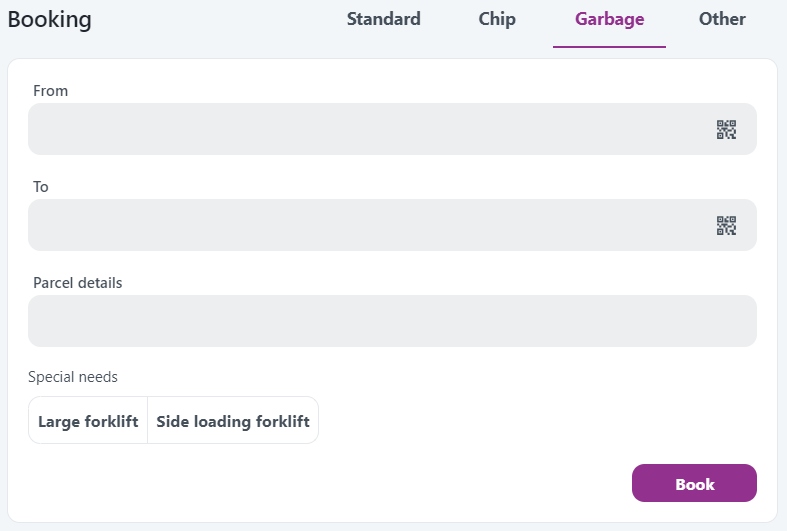
Instructions:
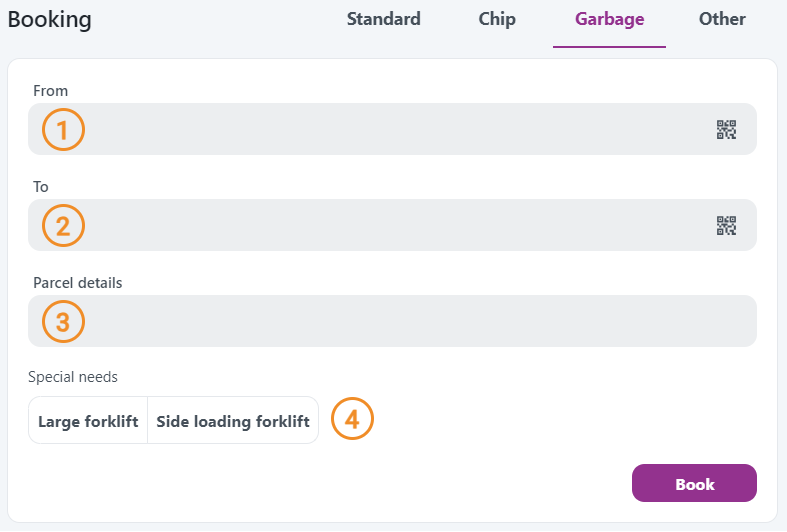
-
From: Enter your location. Use suggestions for quick fill.
-
To: Assumes and fills in the next likely location. Use suggestions for quick fill.
-
Parcel details: The intended use for this box is to describe what's in the parcel (e.g. garbage type).
-
Special needs: Select any, or defaults to a Normal forklift booking.
Other
Other orders generate a Move order number (TR-XXXXXX), which you can use to store items that aren't in the ERP system, such as assemblies, tools, equipment, etc.
You can only create one parcel for each Move order number!
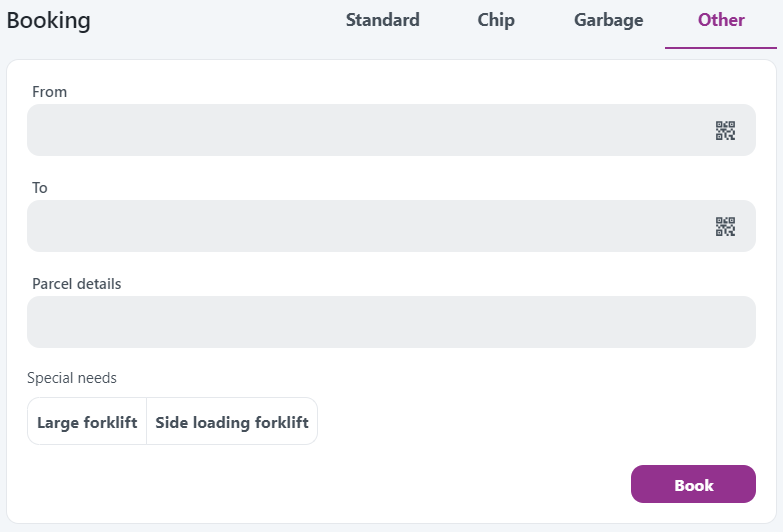
Instructions:
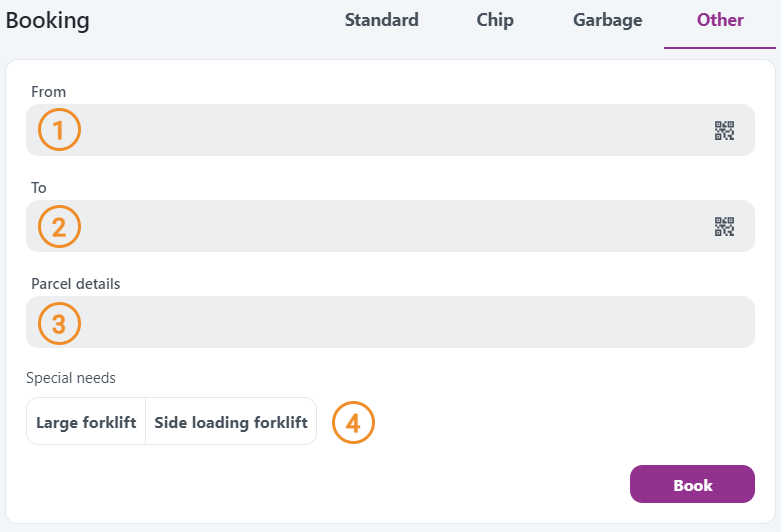
-
From: Enter your location. Use suggestions for quick fill.
-
To: Assumes and fills in the next likely location. Use suggestions for quick fill.
-
Parcel details: The intended use for this box is to describe what's in the parcel.
-
Special needs: Select any, or defaults to a Normal forklift booking.
2. From the Tracking module
Click this button to go directly to the booking screen in Move:
![]()
All your parcels will be pre-selected and ready for transport booking:
![]()
3. From Engage
Work order booking
 The Booking dialogue window will open directly within Engage.
Work order operation booking
 The Booking dialogue window will open directly within Engage.
Material booking
You can make a booking for material lines from the Materials and Consume Materials dialogs. Select material lines with available quantity and use the booking button in the top corner to place a booking.

- From the Materials or Consume Materials dialog in Engage, select the material lines you want to create a booking for by marking the select button to the left of the line.
- Click the Move icon in the top right corner.
- Adjust preferred locations, quantity, and description in the form.
- Click Book and voilà: Your booking will appear like other Move bookings for transporters to pick up.
Output in Move
Material bookings are marked with an M throughout Move. The part information and quantity follows the material line and not the work order.
Output in Driver:
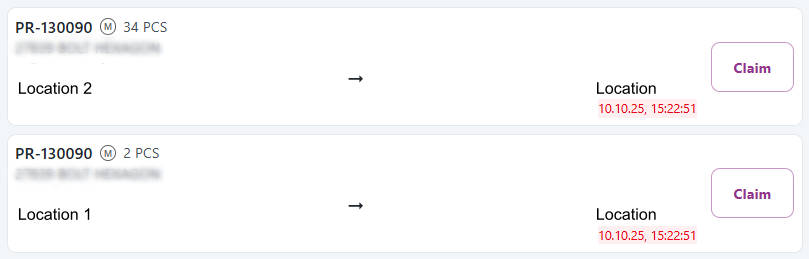
Output in Tracking:
![]()
Material lines with bookings in status complete, pending, or in progress get a booking status marker. Hovering over this will give more information about the booking.
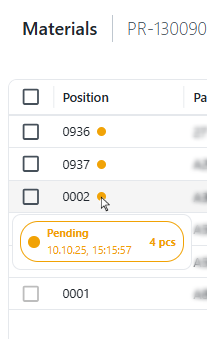
Example shows material lines with active bookings in status Pending.
4. Auto-fill From location setting
This setting is designed specifically for stationary scanning setups.
It allows the user to configure a default From location that will automatically pre-fill in the From field during bookings.
The pre-filled value can still be cleared if needed, allowing the field to function as usual.
However, it will remain pre-filled until the setting is deactivated.
Here's a quick demo showing how to use it.

My bookings
All bookings users place will appear in the My bookings list. From the My bookings list users can:
- Cancel bookings
- Track bookings
- Display active and completed bookings
- Print labels (only from pc/tablet)
Below you will find screenshots from from both pc and a phone.
Notice that on the pc screenshot the user has clicked the booking to display the parcel-id. Users can click the parcel-id to track it.
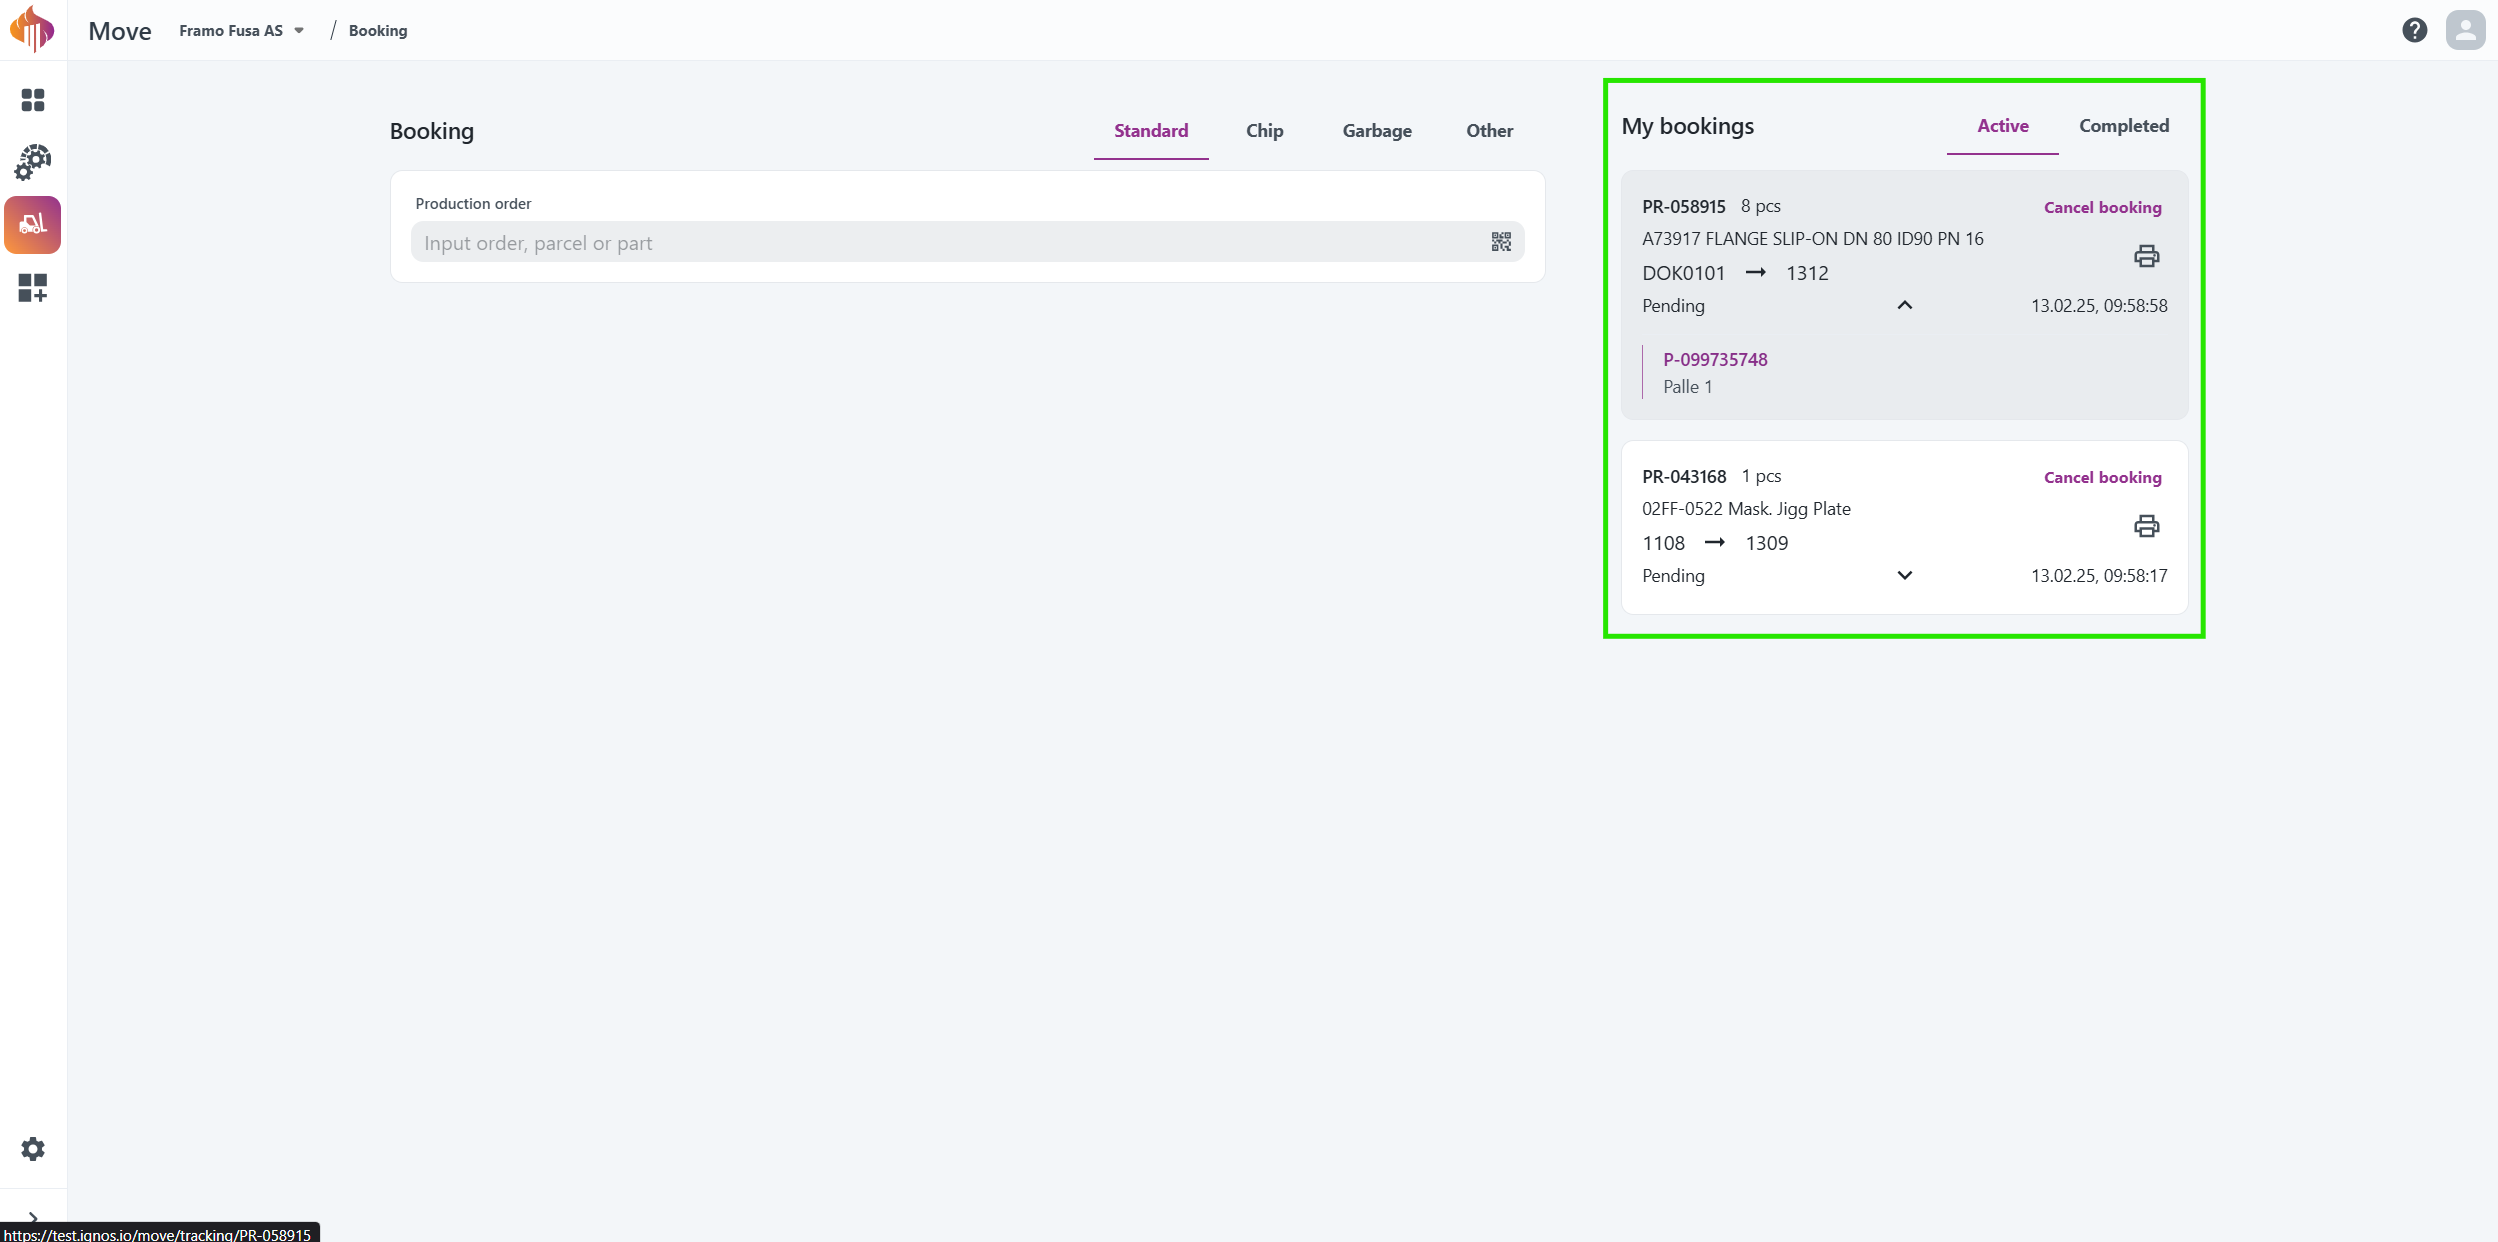
My bookings from pc.
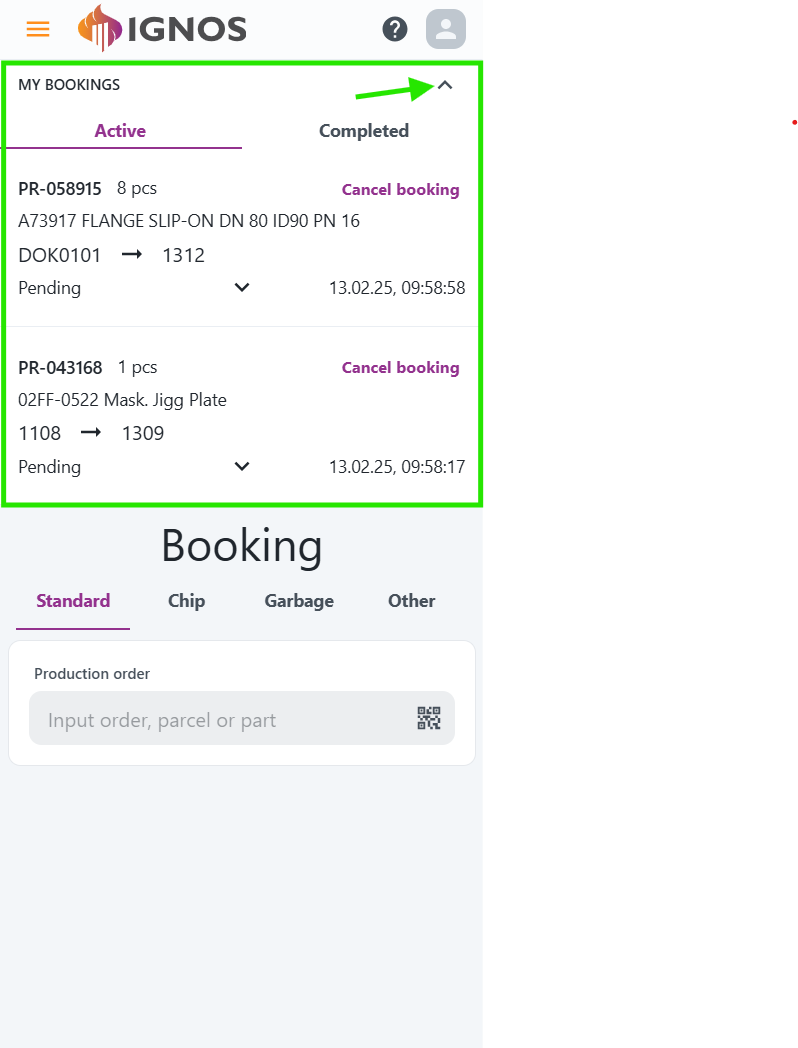
My bookings from phone.
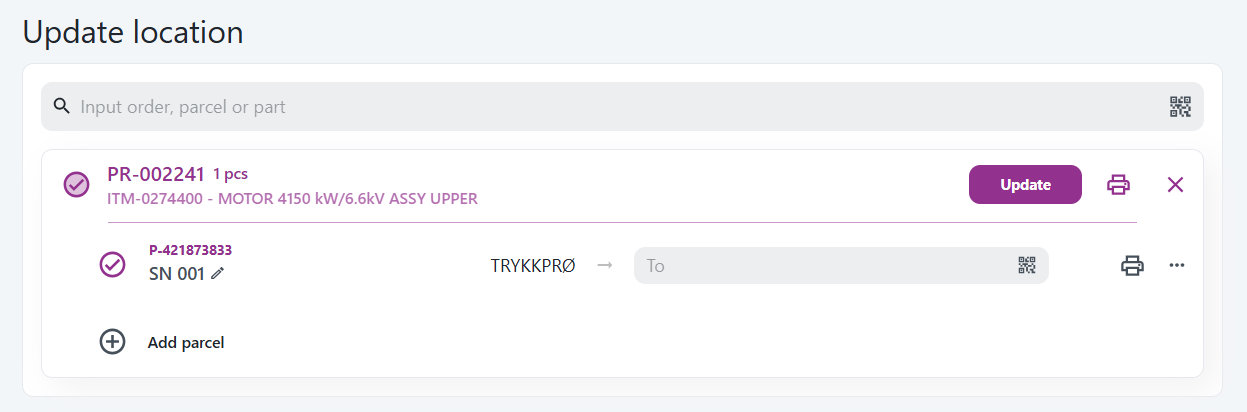
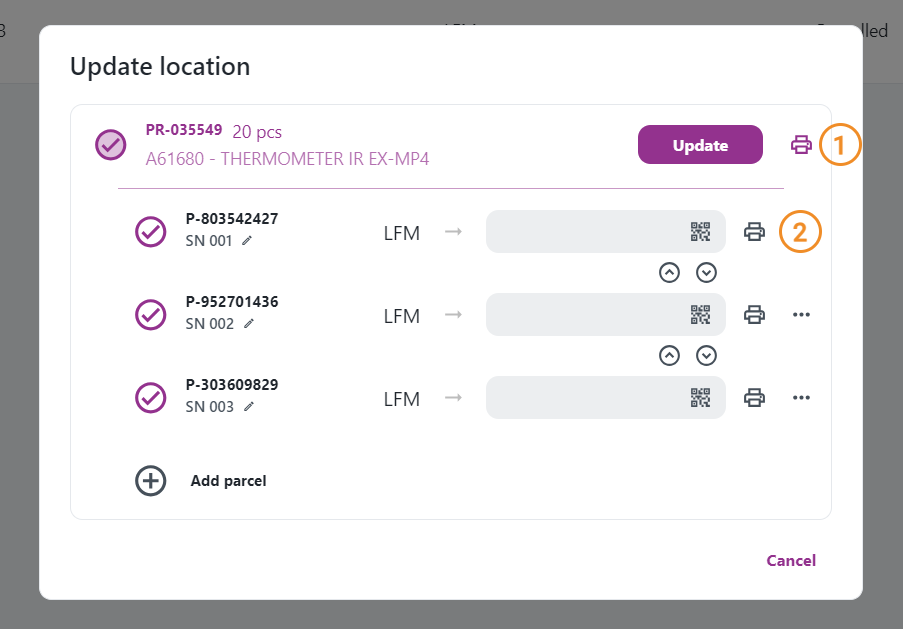
Update location

You will find everything regarding the Update location module and how to update locations in this chapter.
Standard Update location
The Update location interface is more simple, but still very similar to the Booking module.
Update locations enables you to:
- Add or remove parcels from an order.
- Modify parcel descriptions.
- Update the location for all, or individual parcels.
- Print labels labels for all or individual parcels.
Instructions:
- Production order: Requires a part name, part number, ERP-, TR order number (Move order number), Parcel number or QR-code.
When an order has been inputted, the picture will look something like this:
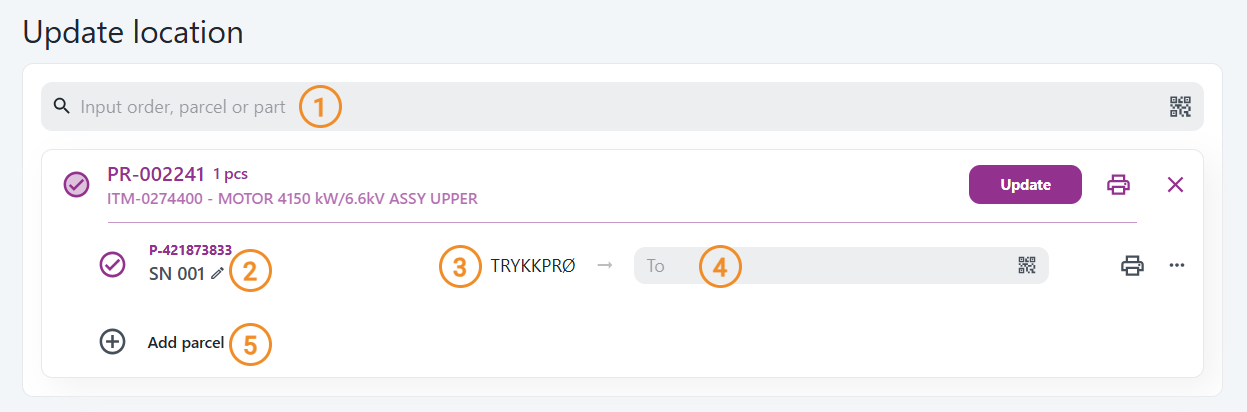
-
Parcel details: The intended use for this box is to describe what's in the parcel.
-
Location text: Shows the last known tracking point.
-
To: Fill in or scan the desired location. Use the dropdown suggestions for quick selection.
-
Add parcel: Add more parcels to divide the work order into multiple parcels.
Update location via Tracking
Below is a demonstration of how to update location from the Tracking module:
There's also a Book forklift button that takes you directly to the Booking interface.
Update location via Engage
How to update location from Engage.
These same buttons are also available from the Schedule table.

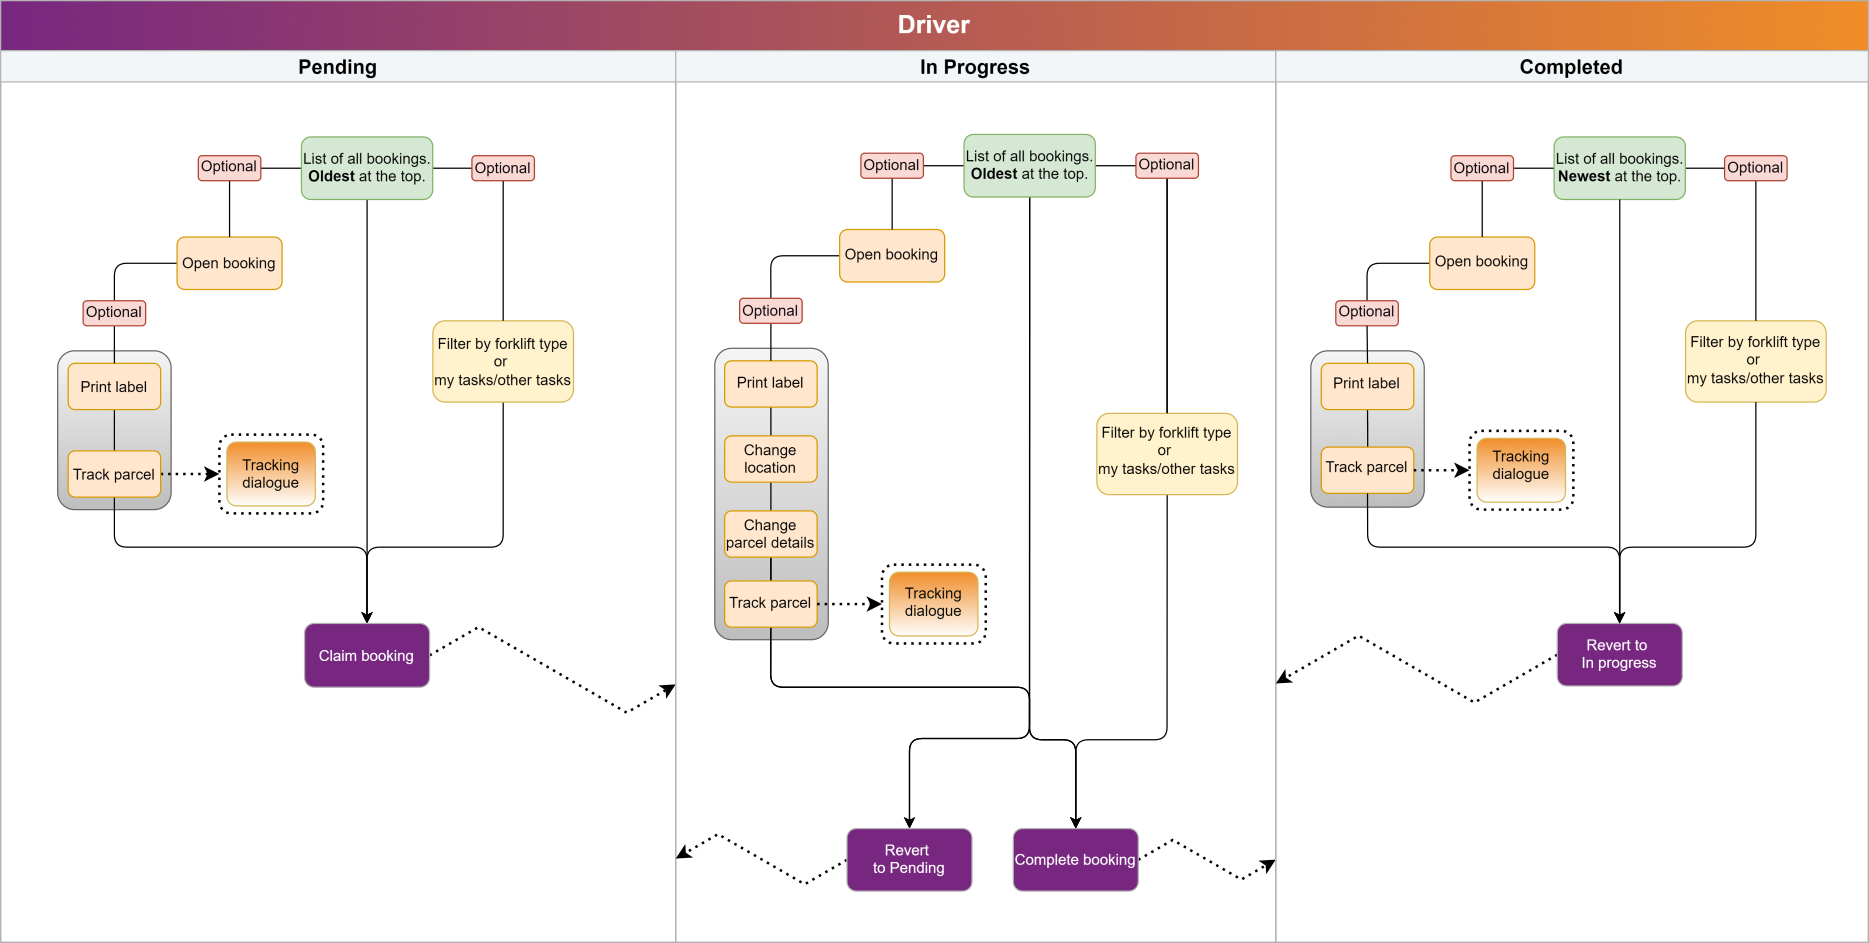
Driver

You will find everything regarding the Driver module in this chapter. This module is primarily designed for tablet users but is also fully compatible with mobile devices and PCs.
The Driver module has three tabs: Pending, In Progress and Completed:

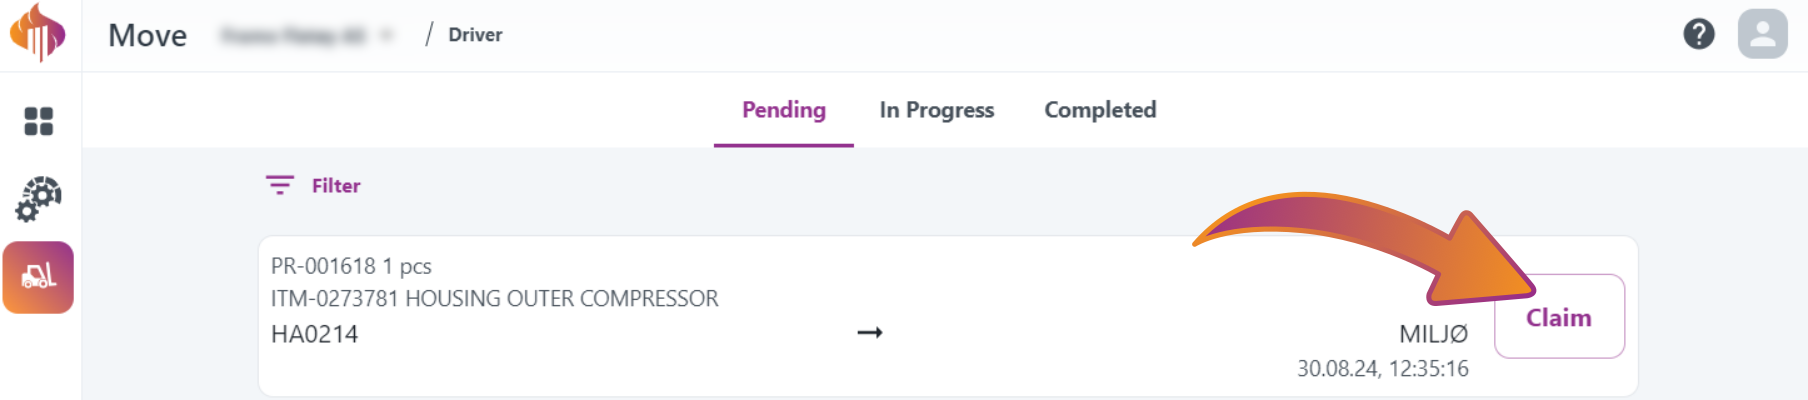
Pending
In the Pending tab, all bookings are listed with the oldest ones appearing at the top.
You can use filtering options and open individual bookings to view more details, Claim bookings or print labels.
Here’s a quick demo:
The title in the booking-details works as a hyperlink directly into the Tracking module:
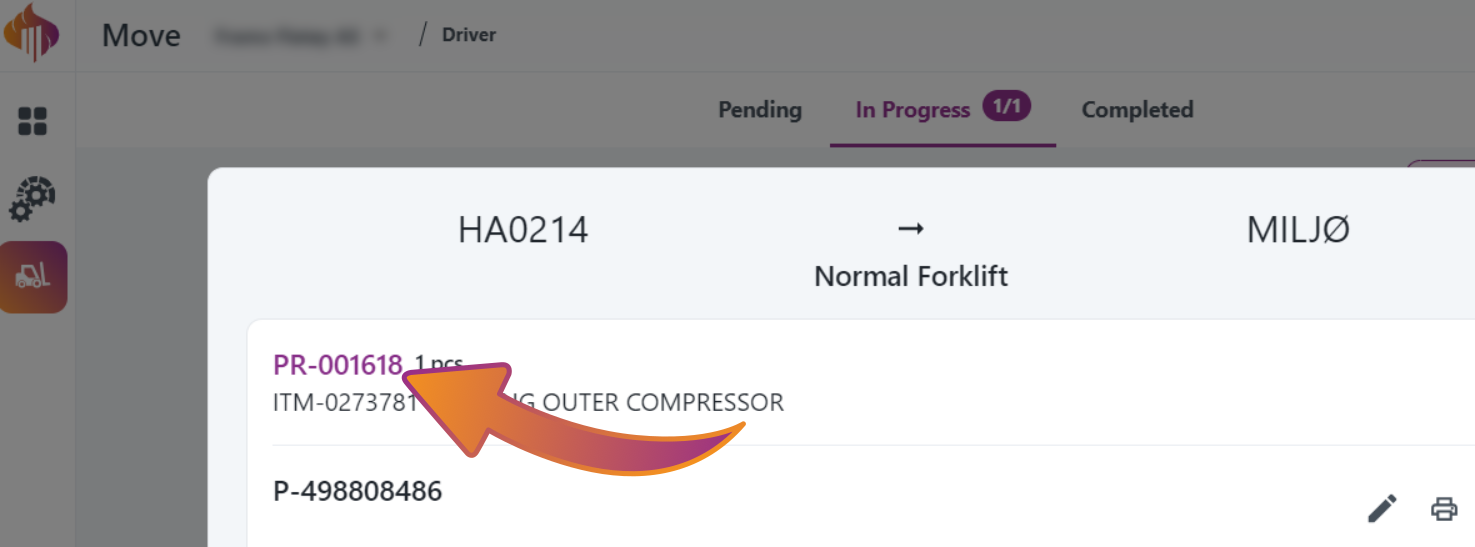
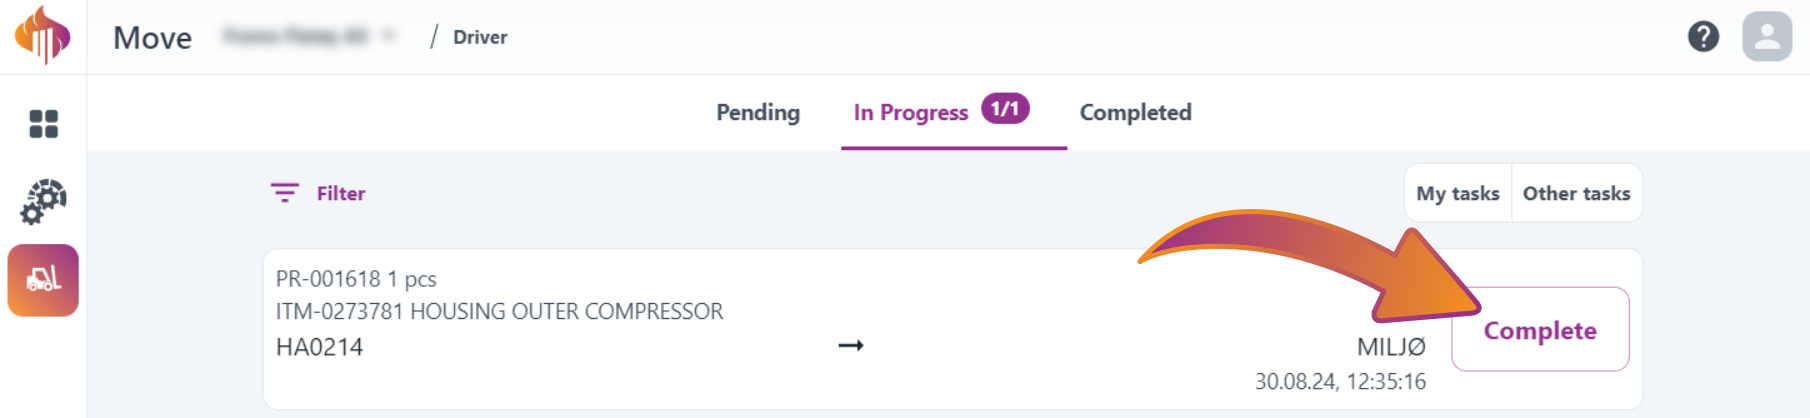
In Progress
To move a booking to the In Progress tab, simply Claim the job.
In the In Progress tab, bookings are also listed with the oldest ones at the top.
You can apply filters, open bookings for more details, and perform the following actions:
- Revert bookings to Pending
- Complete bookings
- Print labels
- Modify parcel details
- Change delivery location
Here’s a quick demo:
The title in the booking-details works as a hyperlink directly into the Tracking module:
Completed
To move a booking to the Complete tab, simply Complete the job.
Unlike the other two tabs, bookings in the Complete tab are sorted with the newest ones at the top.
You can apply filters, open bookings for more details, and perform the following actions:
- Revert bookings to In Progress
- Print labels
Here’s a quick demo:
The title in the booking-details works as a hyperlink directly into the Tracking module:
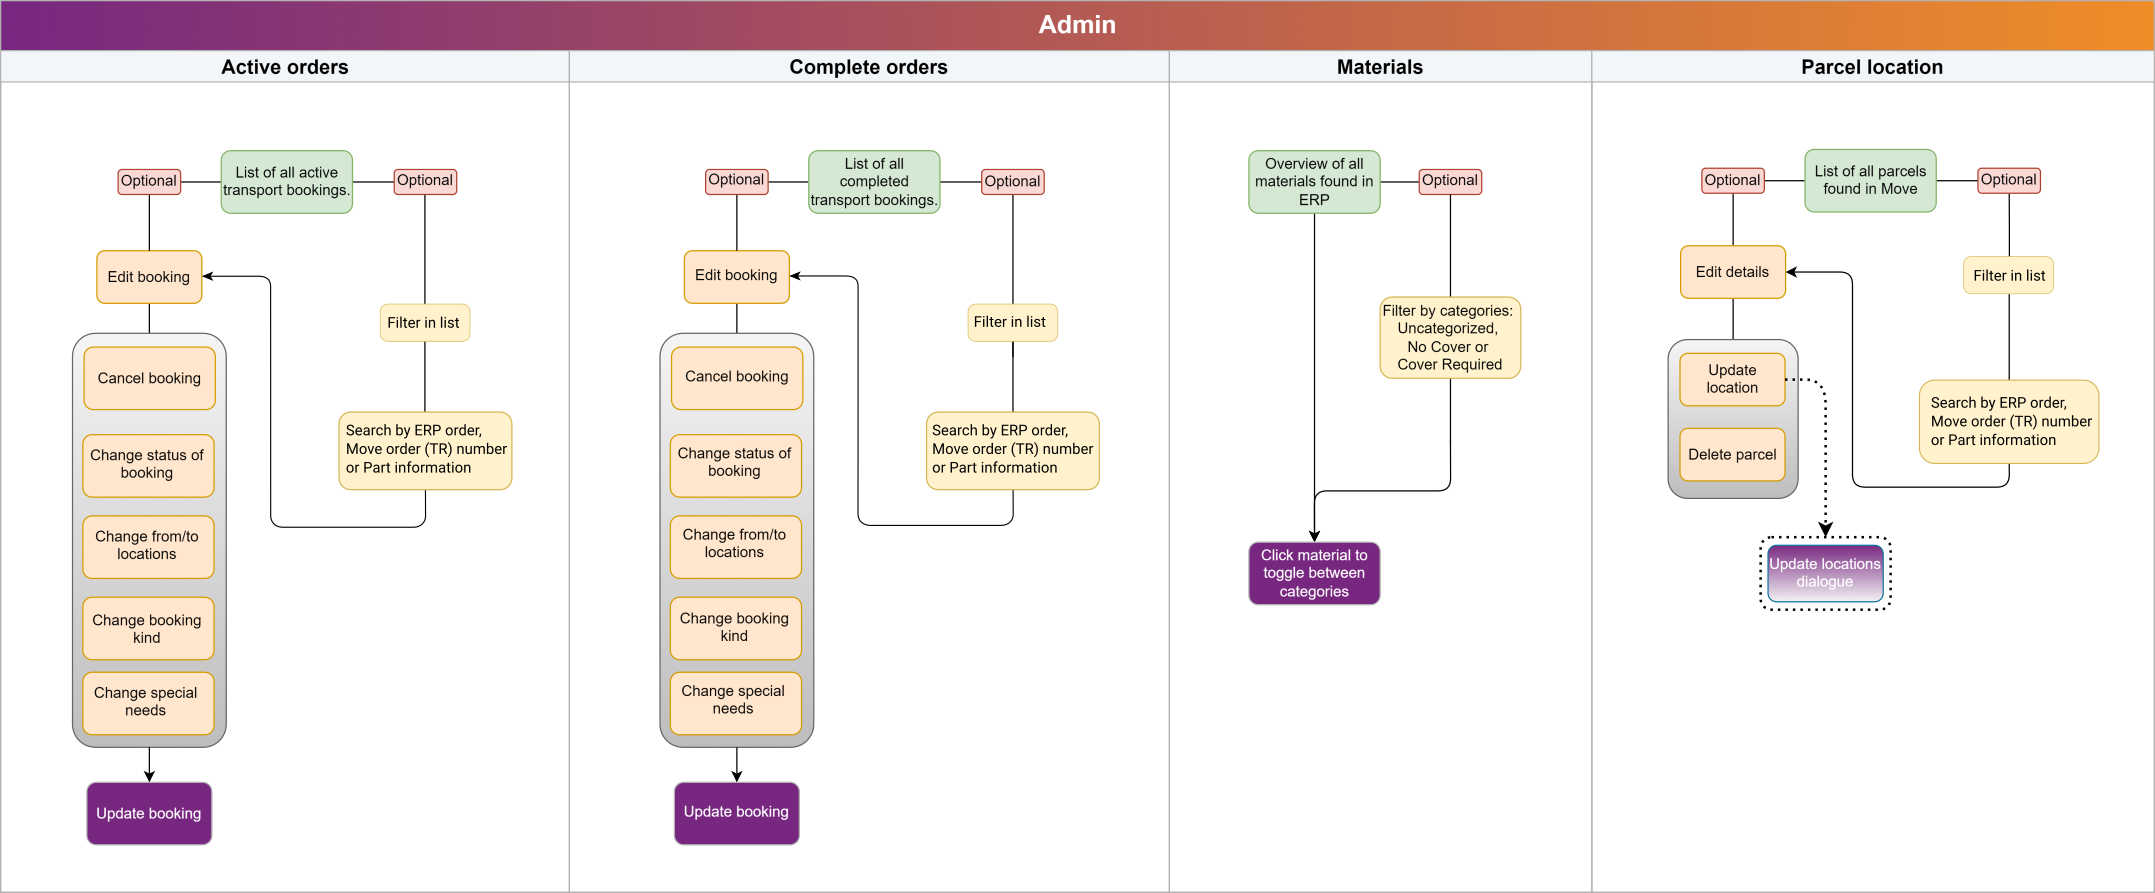
Admin

You will find everything regarding the Admin module in this chapter.
This module is primarily designed for PC users, though it can also be accessed on mobile devices, albeit with reduced user-friendliness.
The Admin module has four tabs: Active bookings, Completed bookings, Materials and Parcel locations:

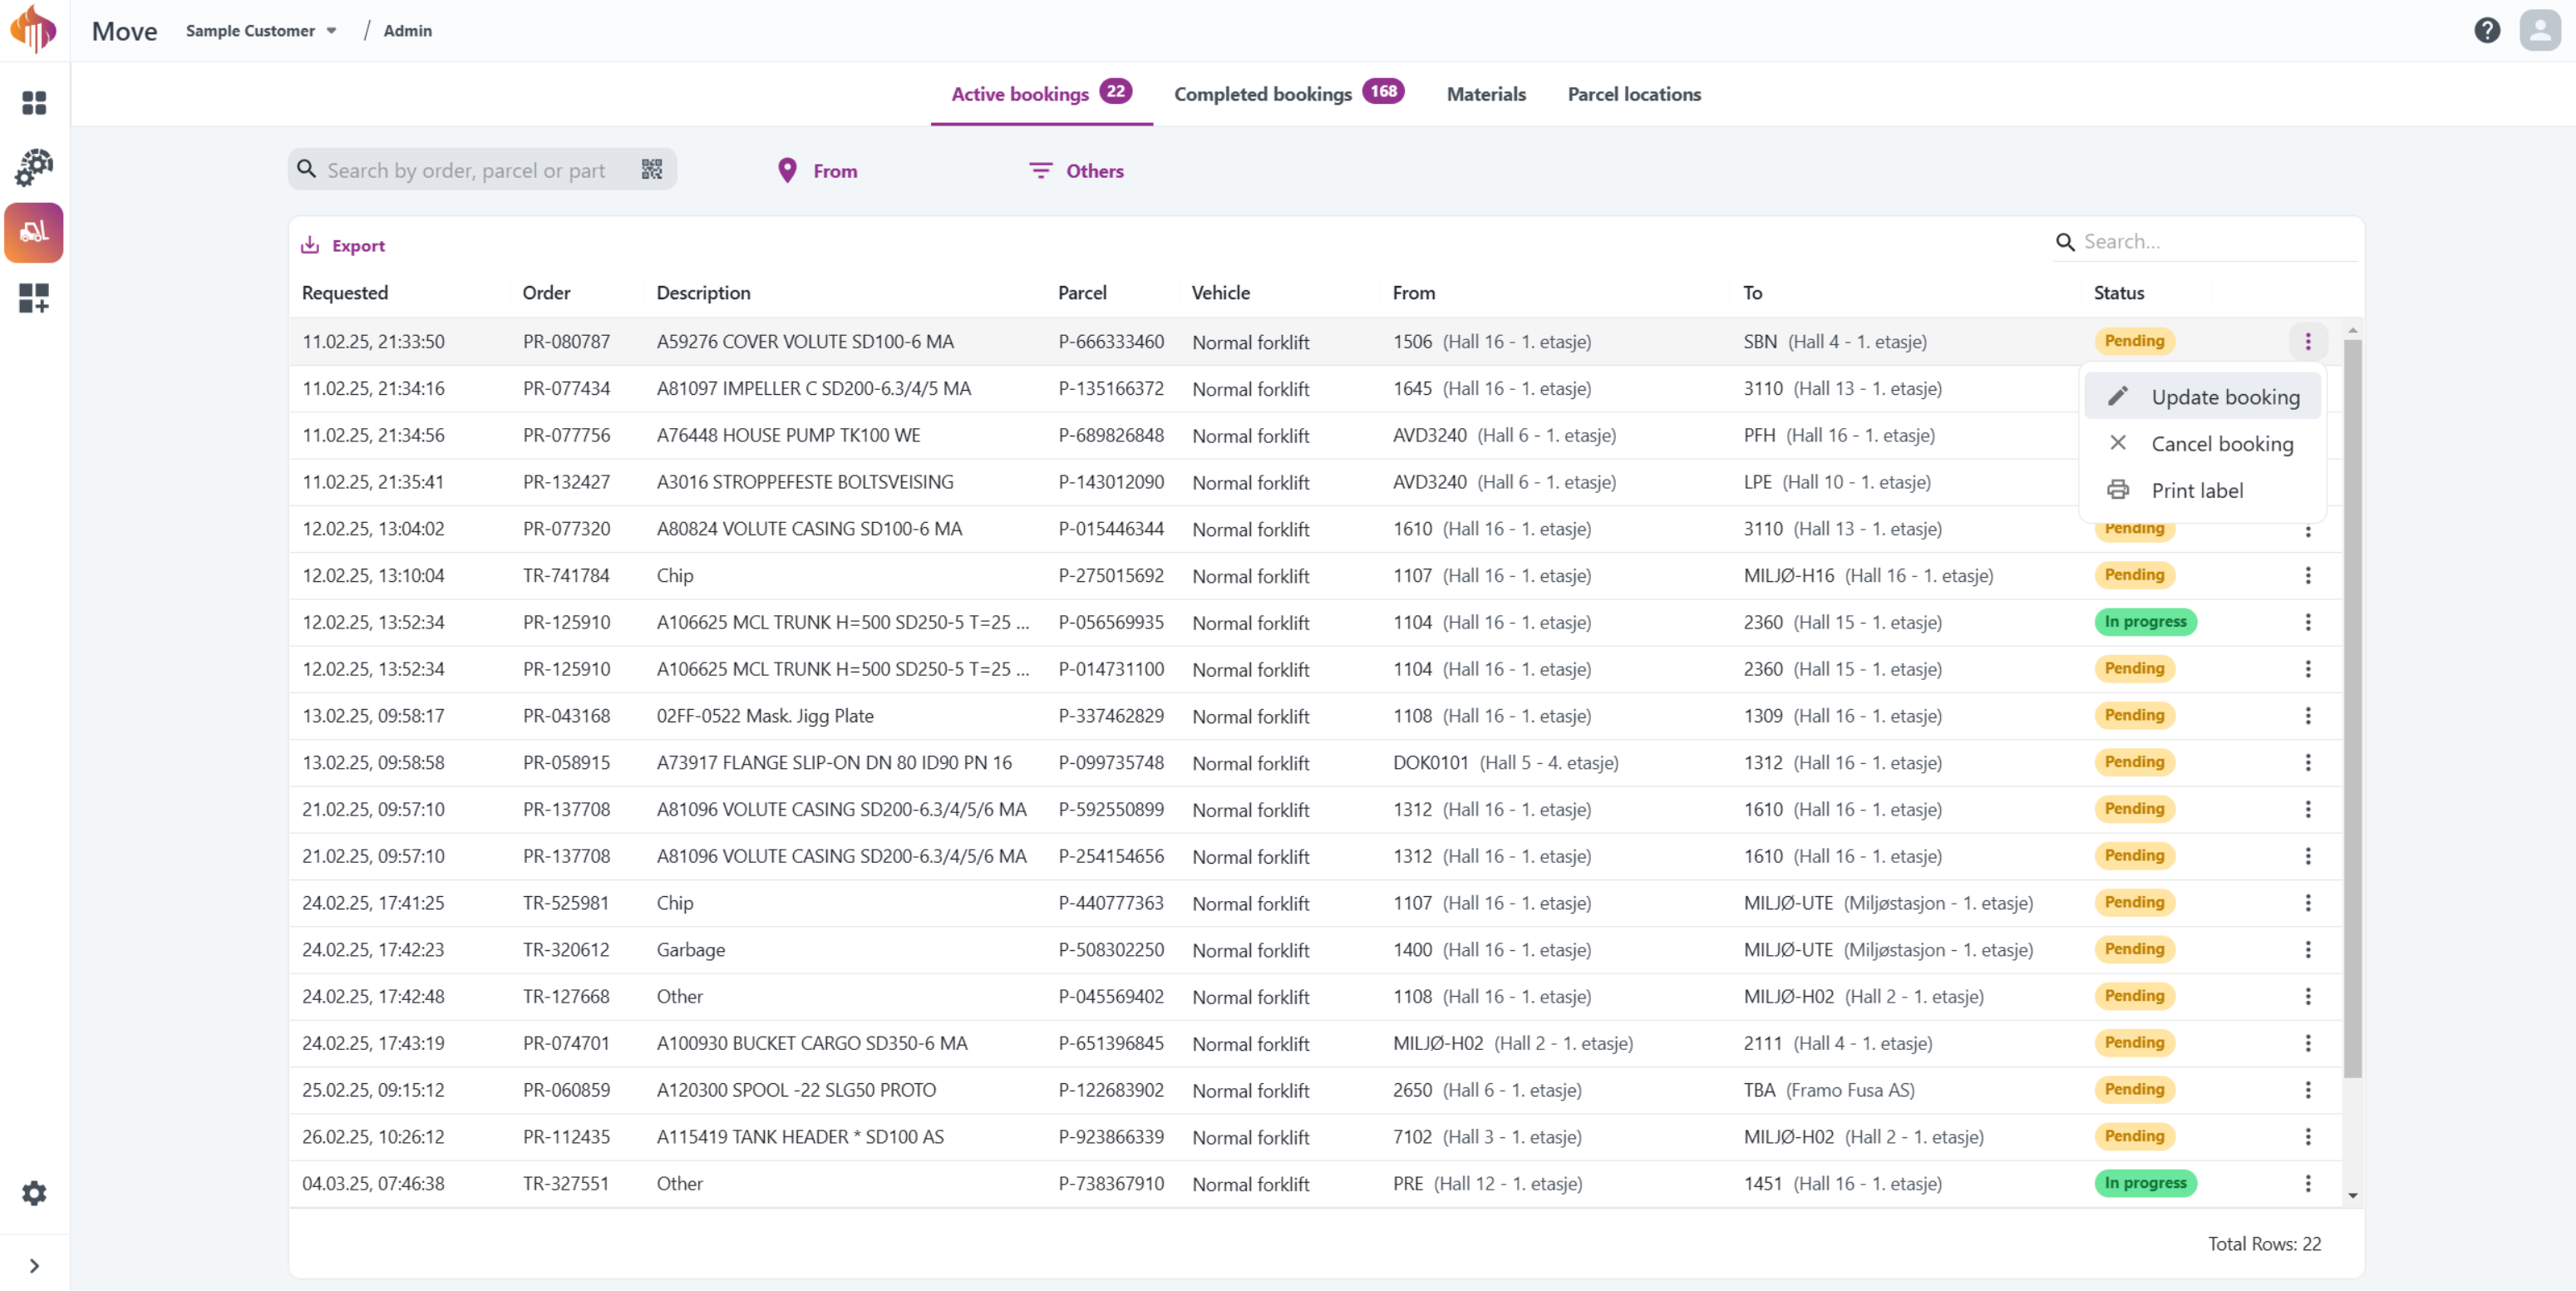
Active bookings
Active bookings* provides an overview of all active bookings in the system, along with filtering options. You can also update statuses, cancel bookings and print labels as needed.
Instructions:
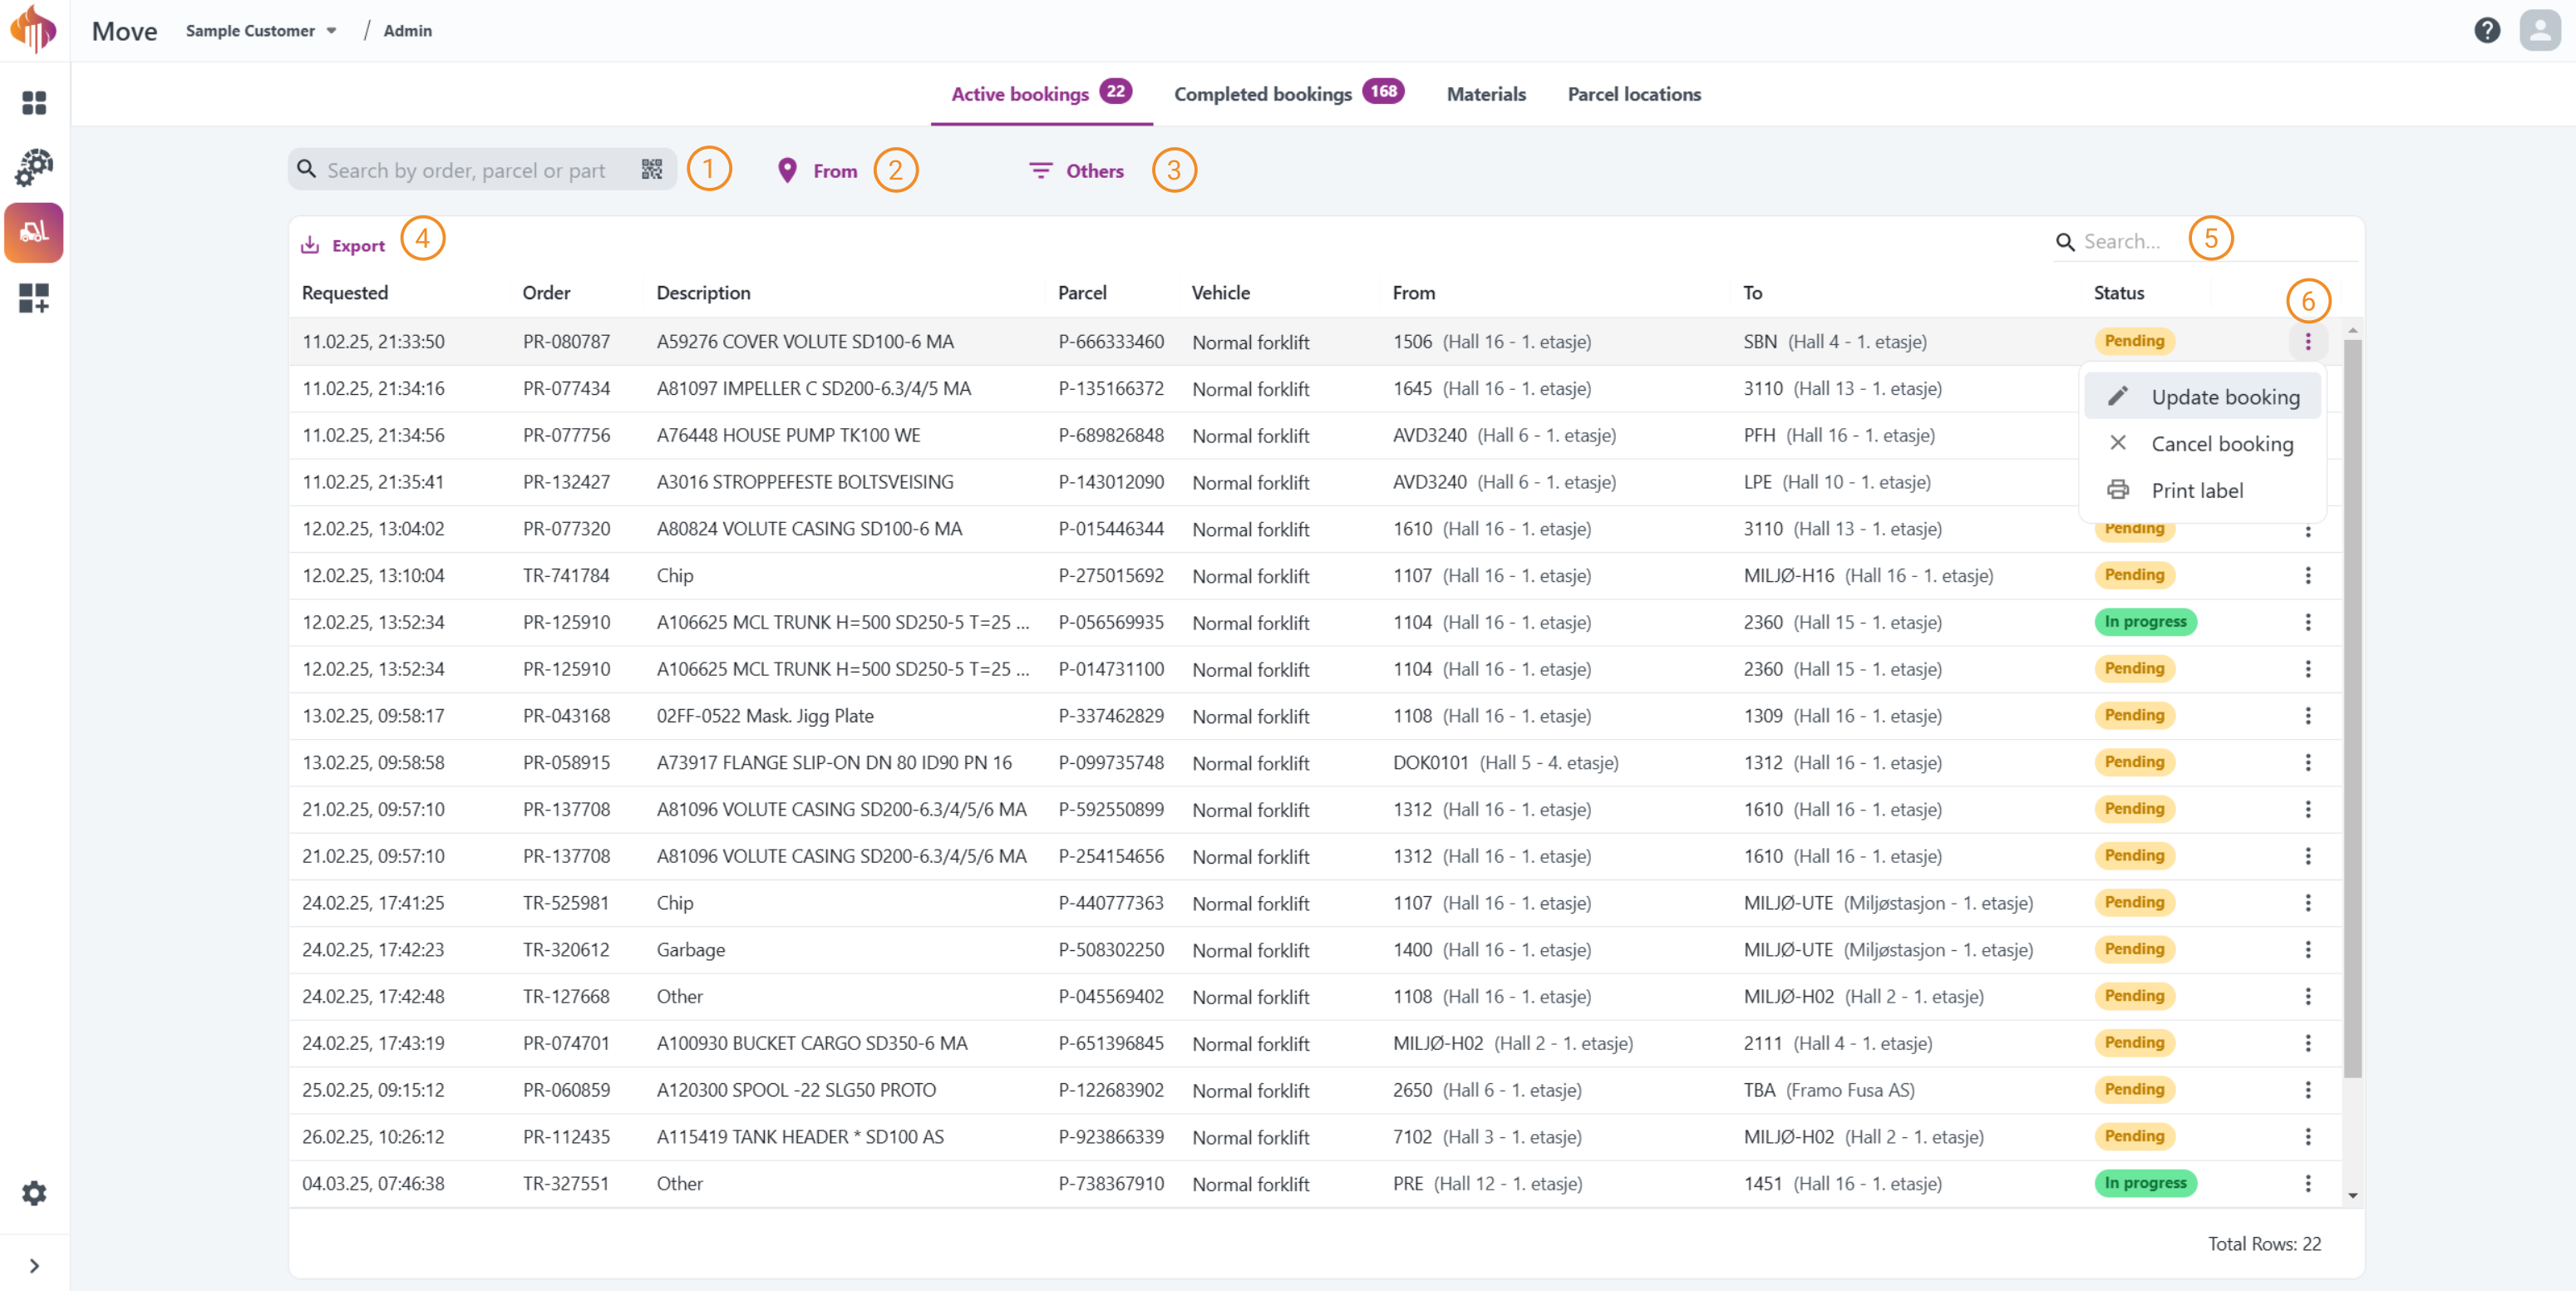
-
Search: Search by ERP order, Move order (TR) number or Part information.
-
From-filter: Filter by From-location.
-
Others-filter: Filter by To-location, Category or Vehicle.
-
Export: Export the table as either a CSV or an Excel file.
-
Additional search box: This search box allows users to search for properties across all columns in the table instead of using the filters located at the top of each column.
-
More options: Gives you the options to Update booking, Cancel booking or Print label.
Use the Additional search box to filter out all bookings with status In progress or similar.
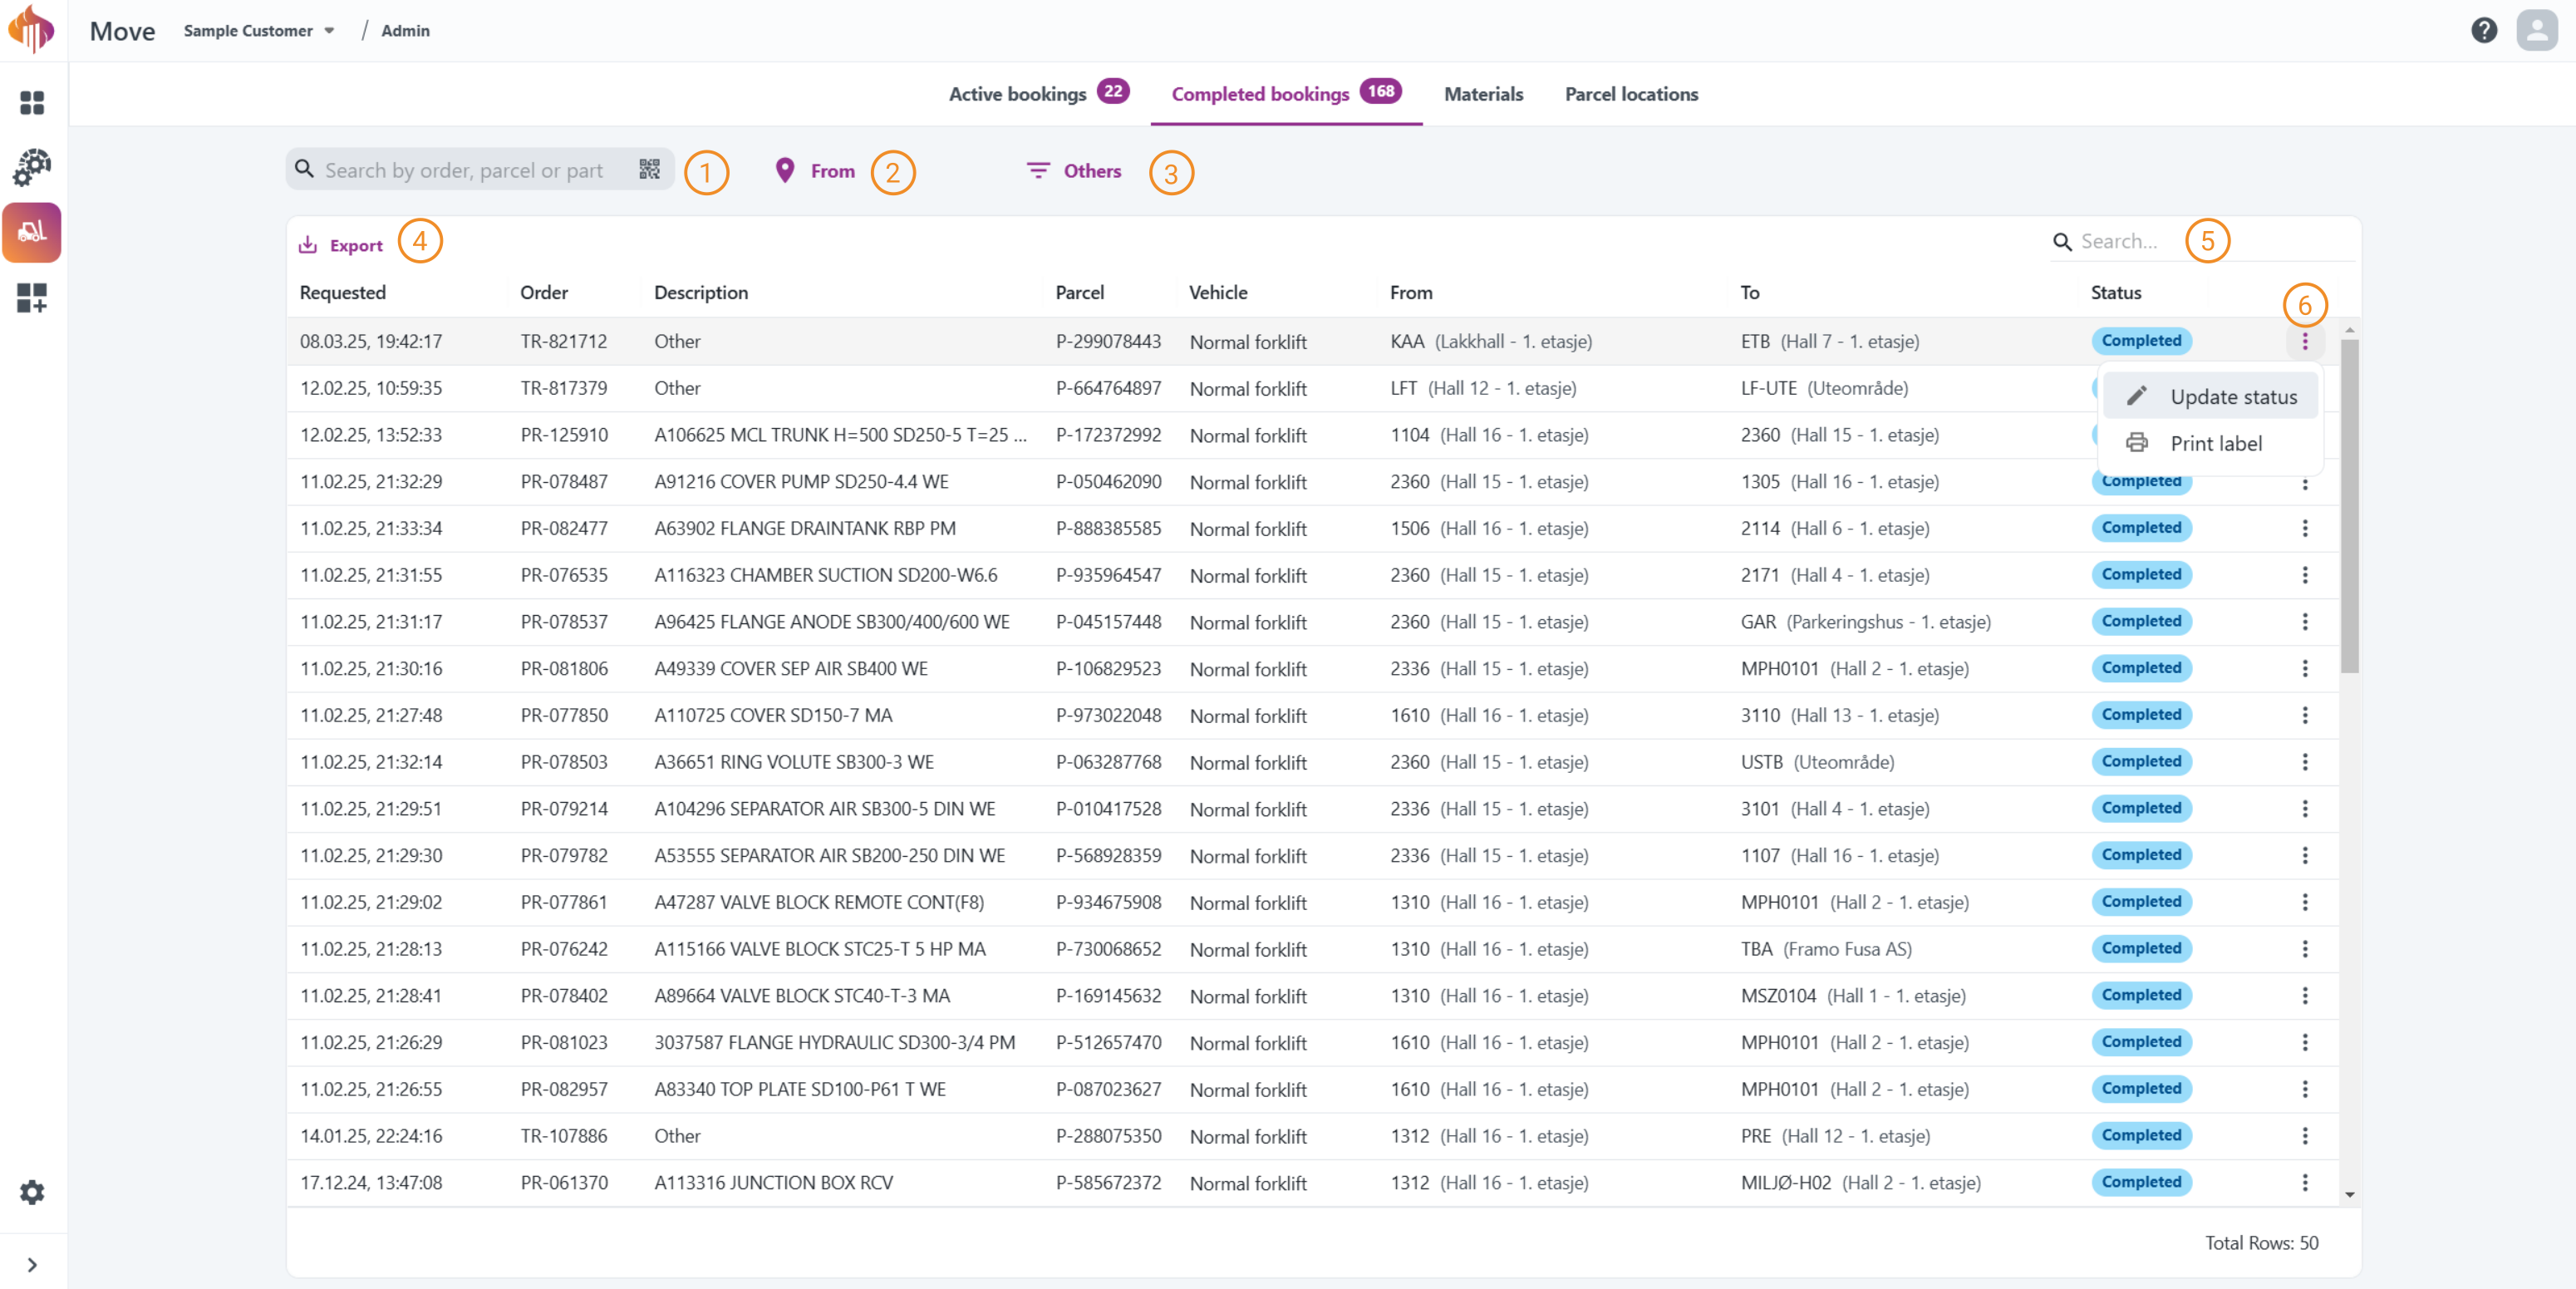
Completed bookings
Completed bookings provides an overview of all completed bookings in the system, along with filtering options. You can also update statuses and print labels as needed.
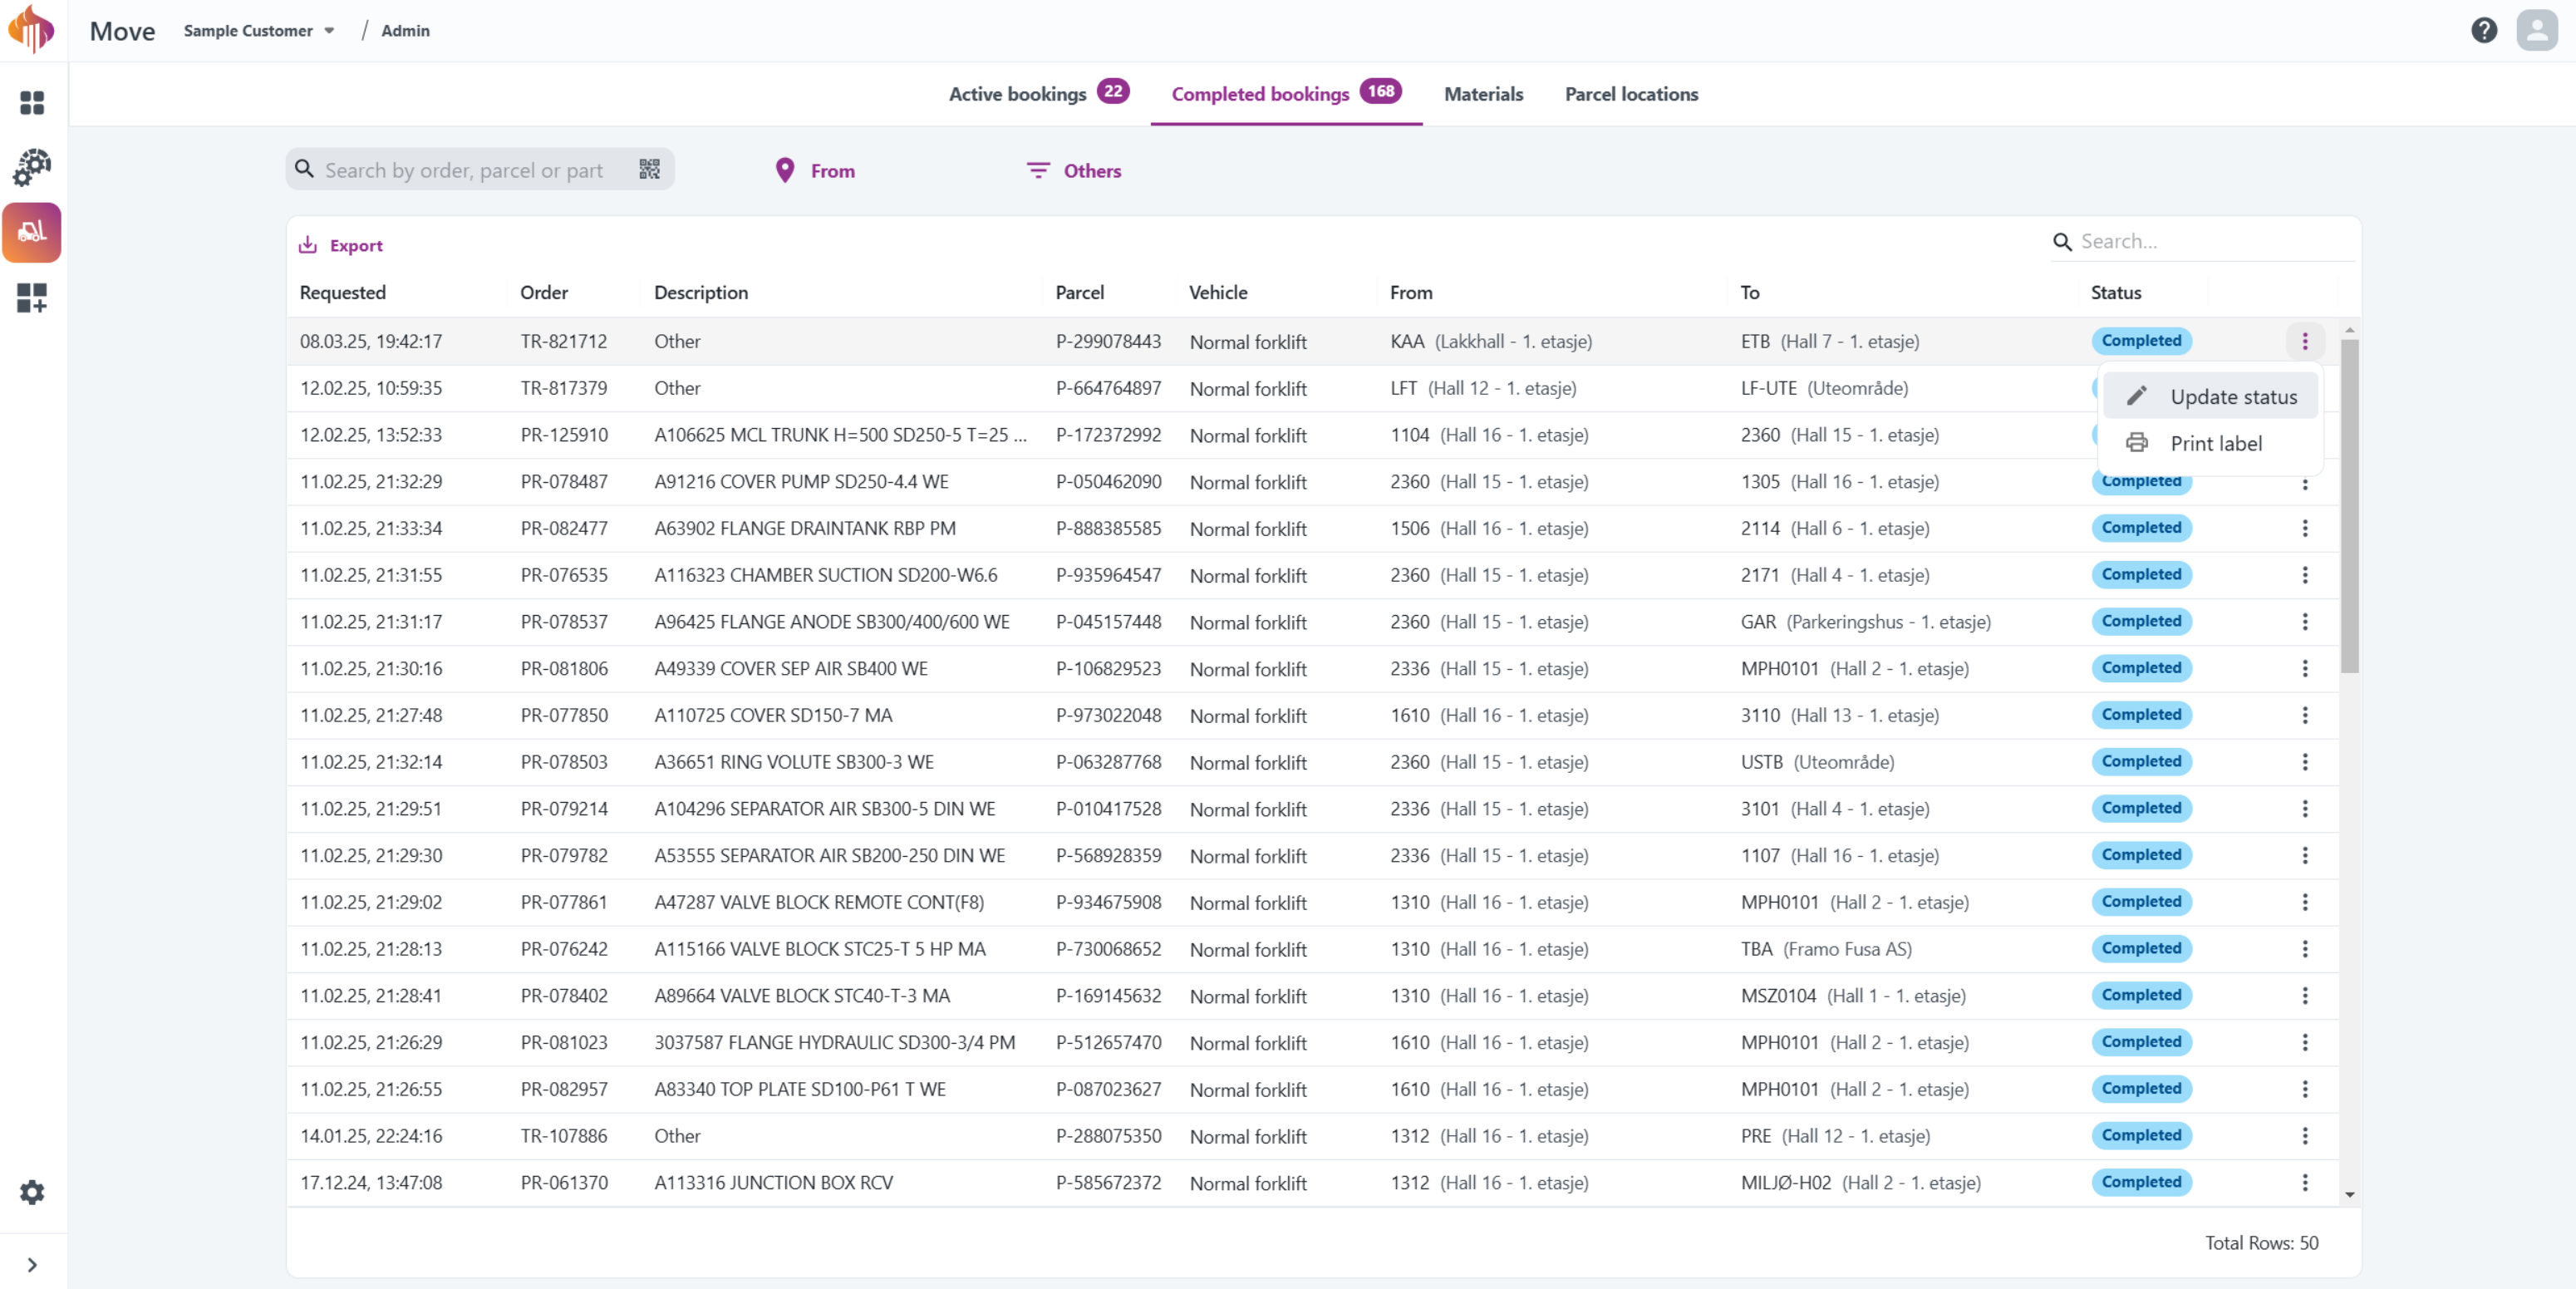
Instructions:
-
Search: Search by ERP order, Move order (TR) number or Part information.
-
From-filter: Filter by From-location.
-
Others-filter: Filter by To-location, Category or Vehicle.
-
Export: Export the table as either a CSV or an Excel file.
-
Additional search box: This search box allows users to search for properties across all columns in the table instead of using the filters located at the top of each column.
-
More options: Gives you the options to Update booking or Print label.
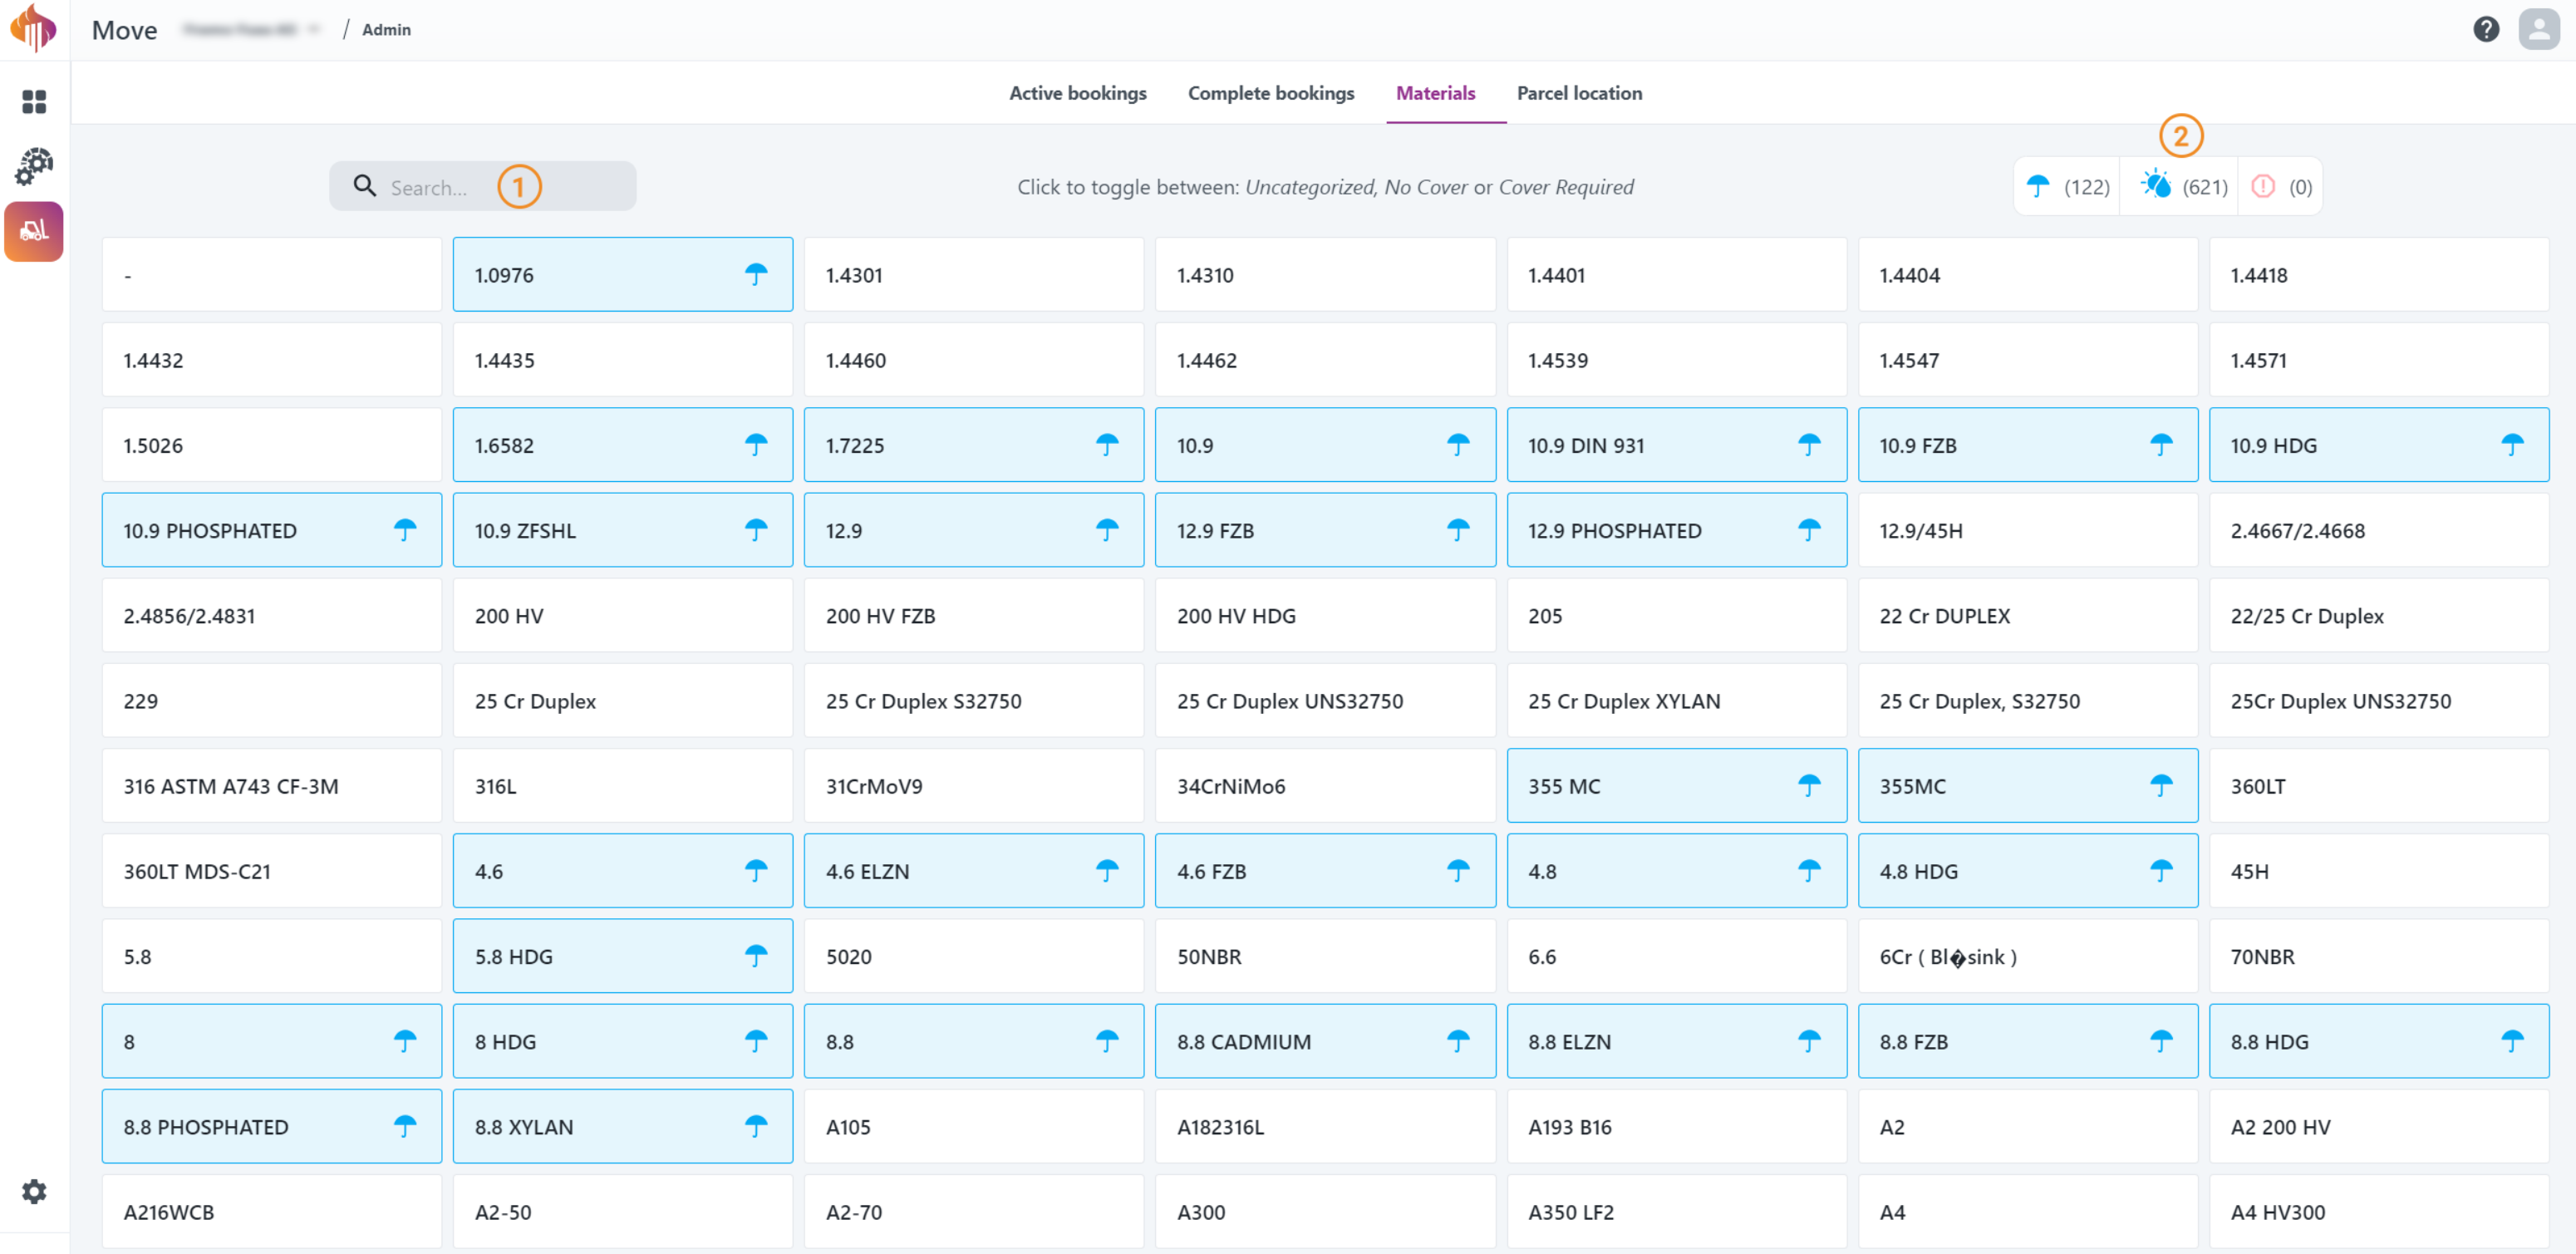
Materials
In the Materials module, you can administrate which materials require coverage and which ones does not.

Instructions:
-
Search: Search for materials.
-
Filter: Filter by Uncategorized, No Cover or Cover Required
Click each material to toggle between categories.
Parcel locations
The primary function for Parcel locations is to find stored parcels based on location.
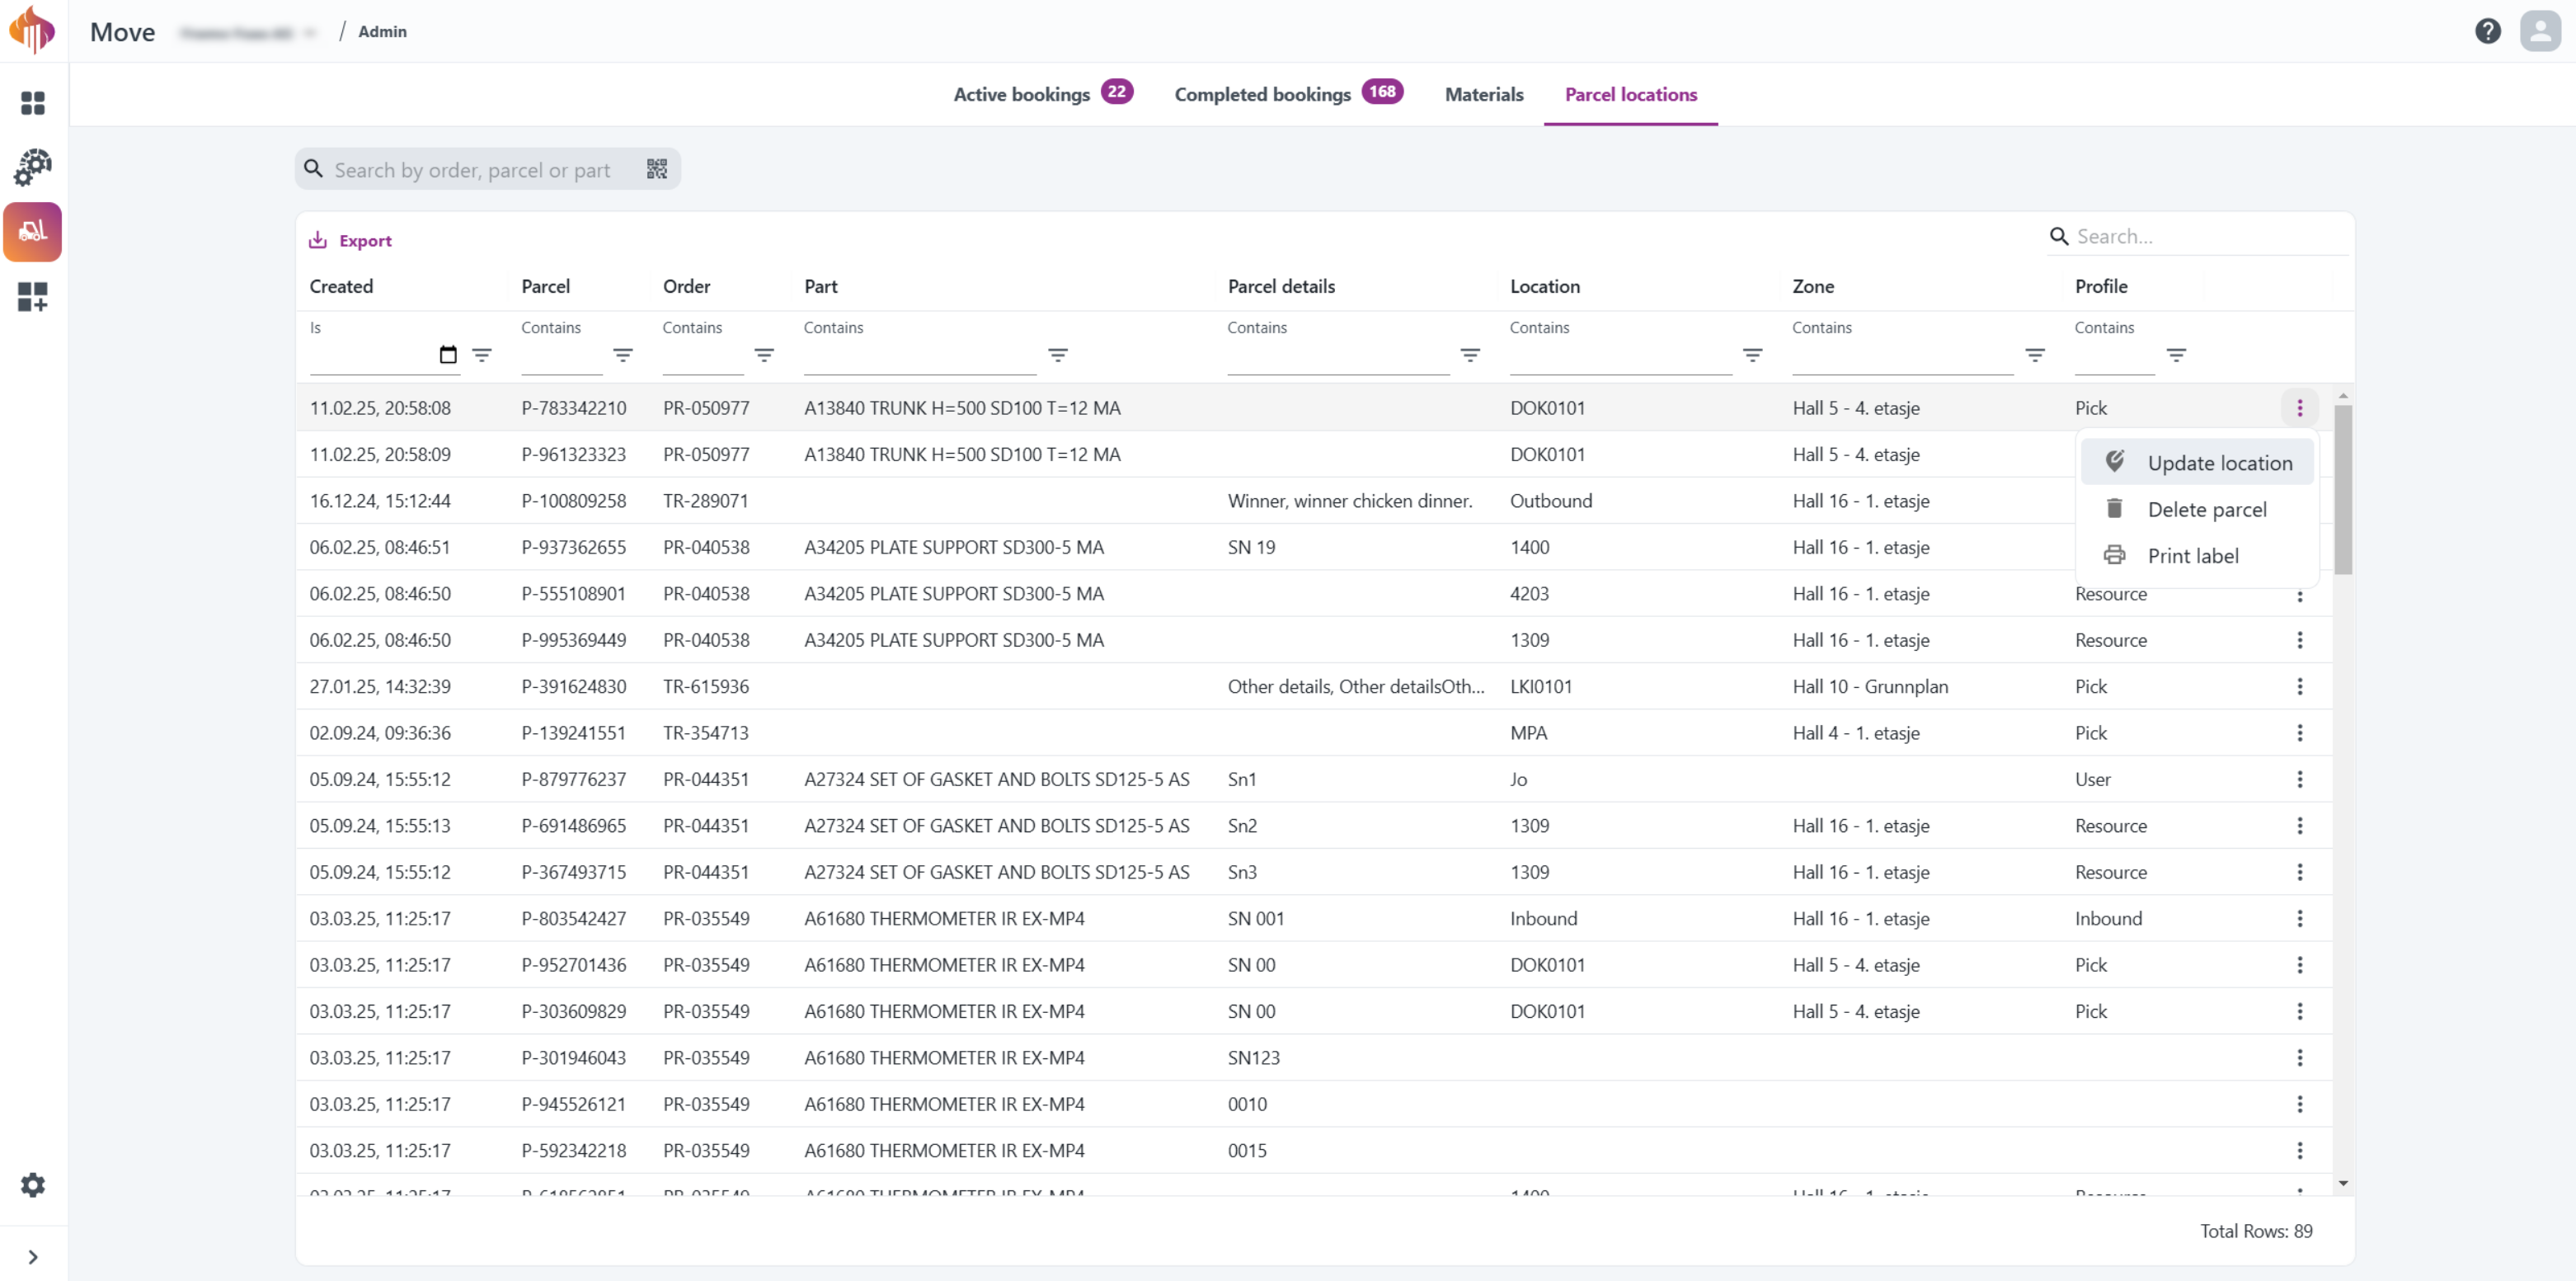
Instructions:
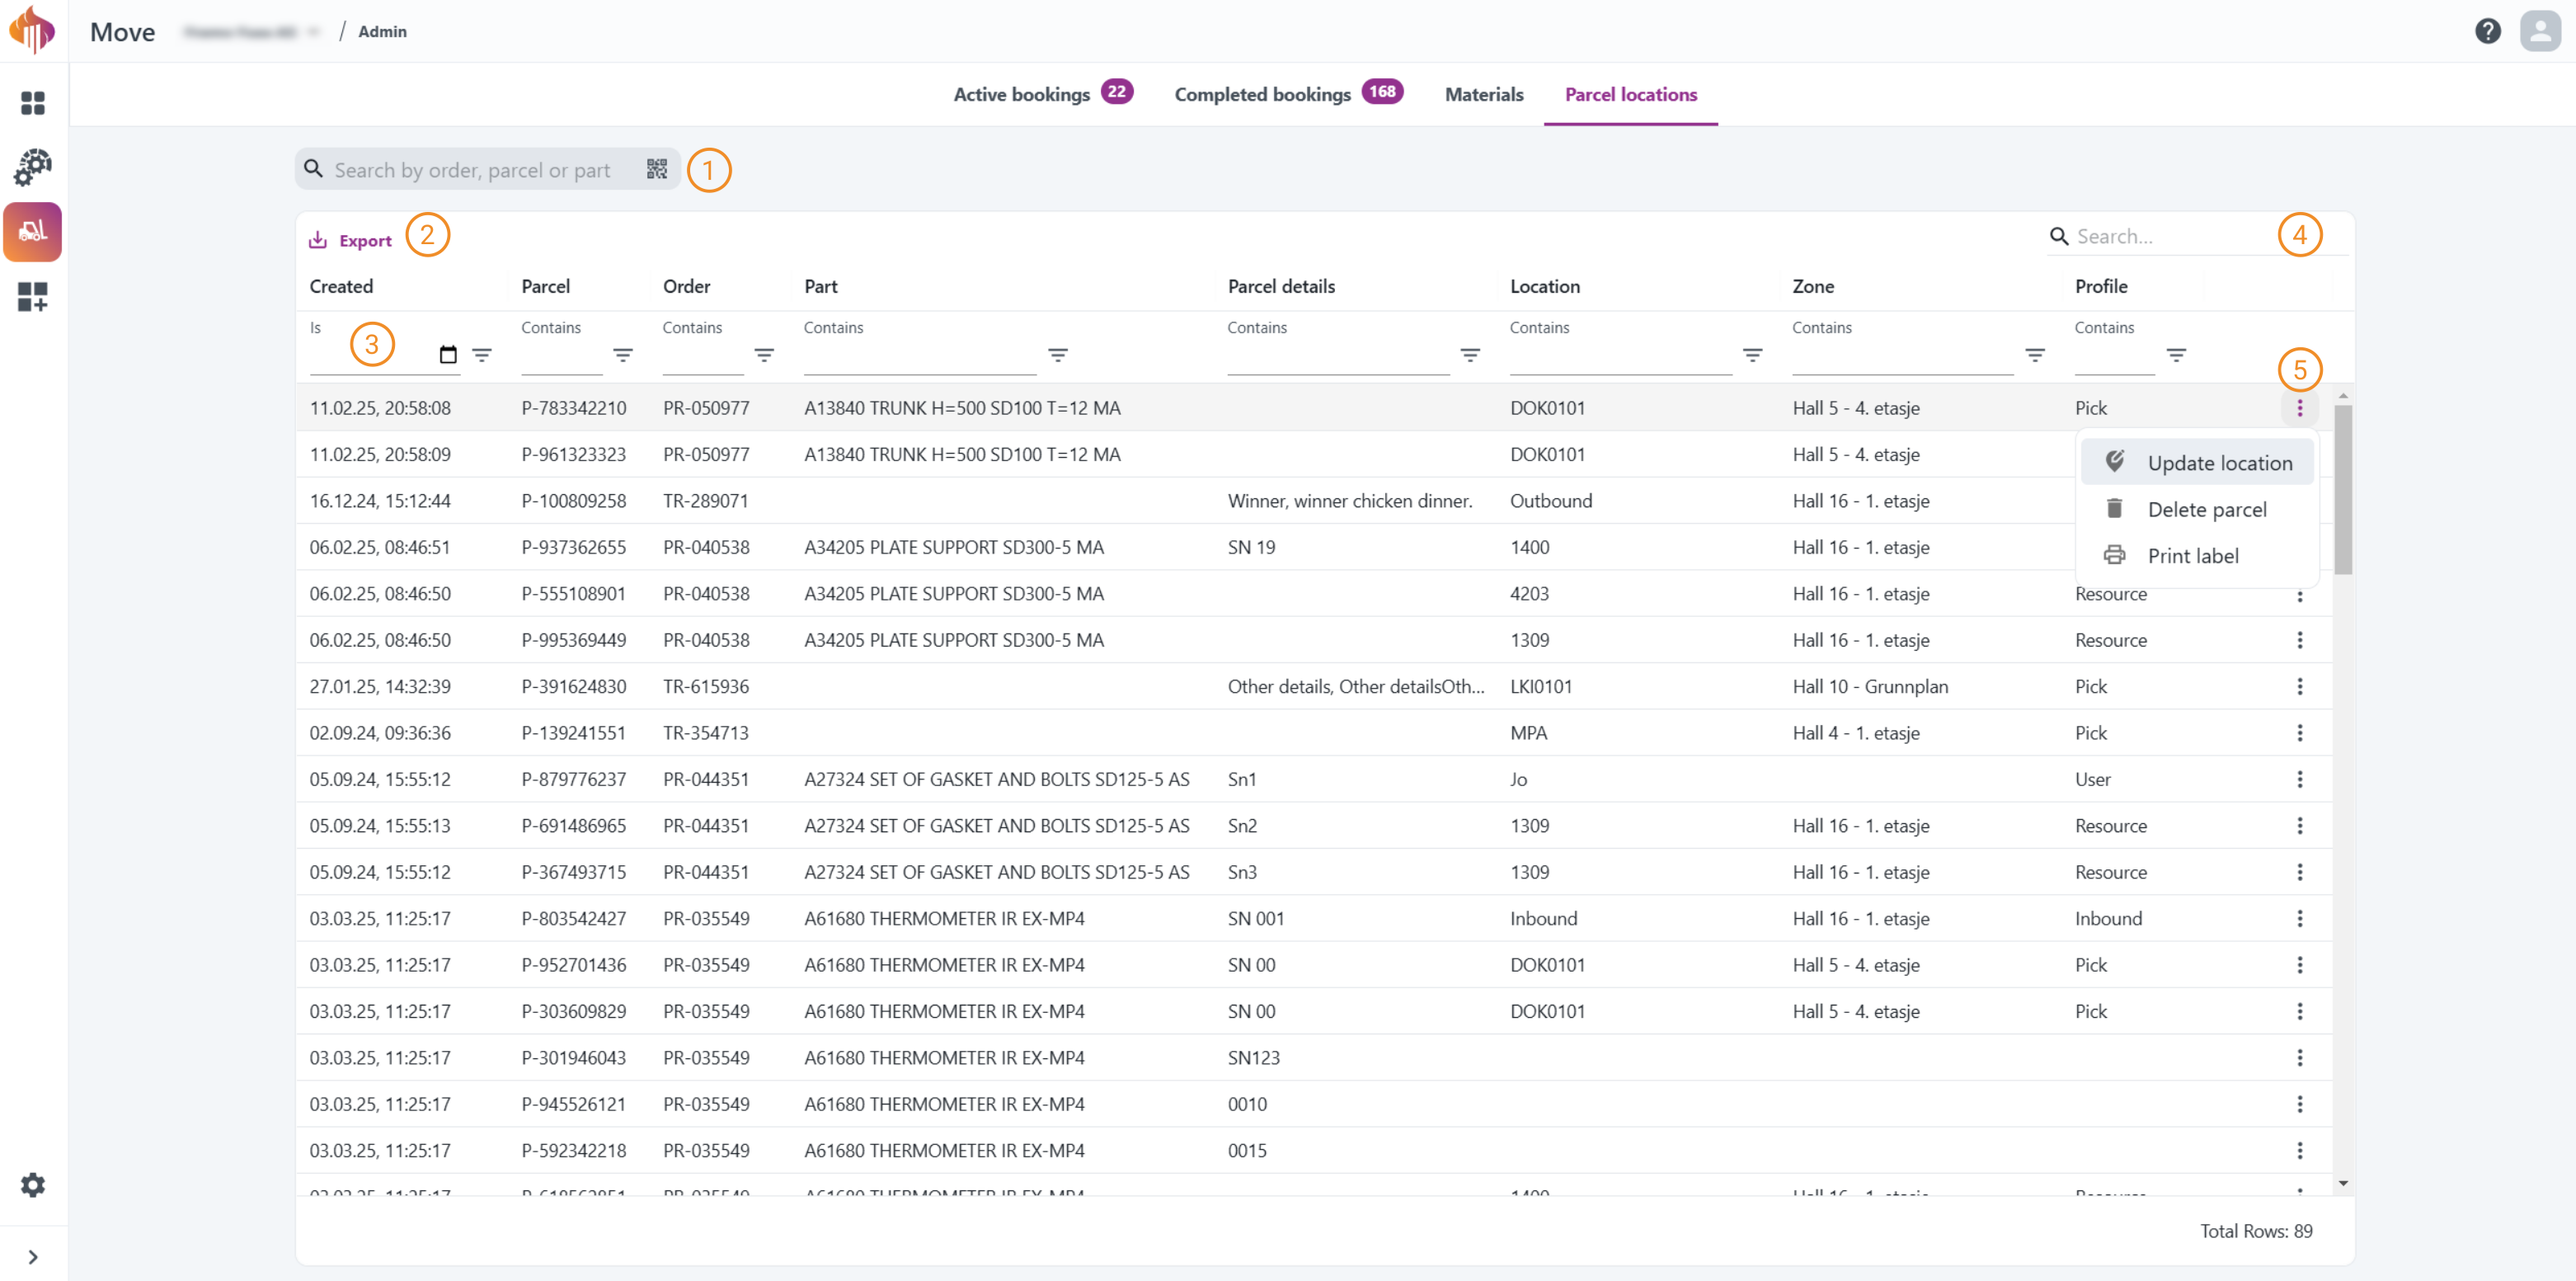
-
Search: Search by ERP order, Move order (TR) number or Part information.
-
Export: Export the table as either a CSV or an Excel file.
-
Filter: Built-in filters located directly at the top of each column.
-
Additional search box: This search box allows users to search for properties across all columns in the table instead of using the filters located at the top of each column.
-
More options: Gives you the options to Update booking, Delete parcel or Print label.
Labels

You will find everything regarding printing a label in this chapter. There's several ways you can print a label.
1. From the Booking interface
-
Global print button: Use this button to print label for all parcels.
-
Specific print button: Use this button to print label for the specific parcel.
2. From the Update location interface
-
Global print button: Use this button to print label for all parcels.
-
Specific print button: Use this button to print label for the specific parcel.
3. From the Driver interface
You can print labels from the detailed view of a booking in the Driver interface regardless of status (Pending, In Progress or Complete):
4. From the Admin interface
From the Admin interface it's possible to print labels from the tabs Active bookings, Completed bookings and Parcel locations.
The print label option can be found by clicking the more options (triple dot) button located on the right side of the row:

5. From Engage
Print label from Engage work order
Print label from Engage schedule
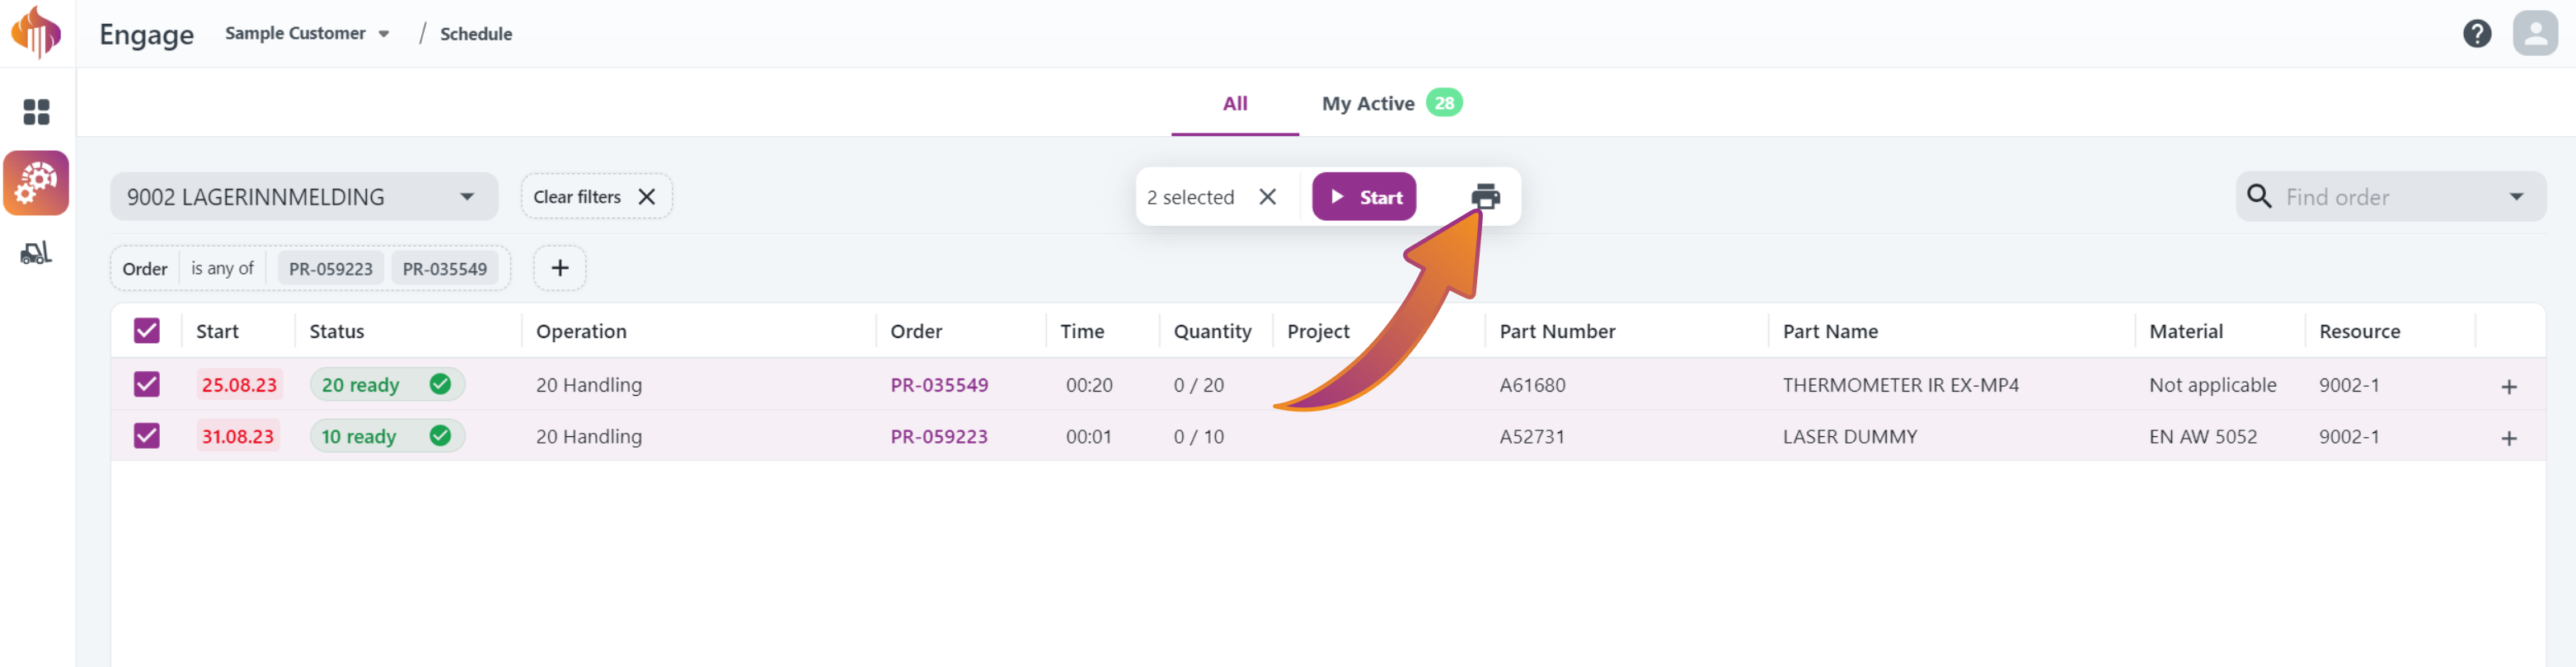
Notice that you can check multiple orders, and print label for all of them at once!
6. Label settings
You can change label-type from the User Preferences settings.
Here's a quick demo showing how:
Label types you can choose from:
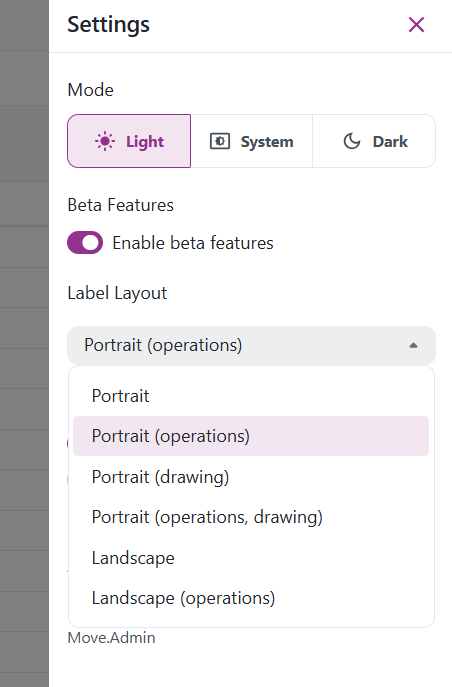
Preview of all label types:
Portrait
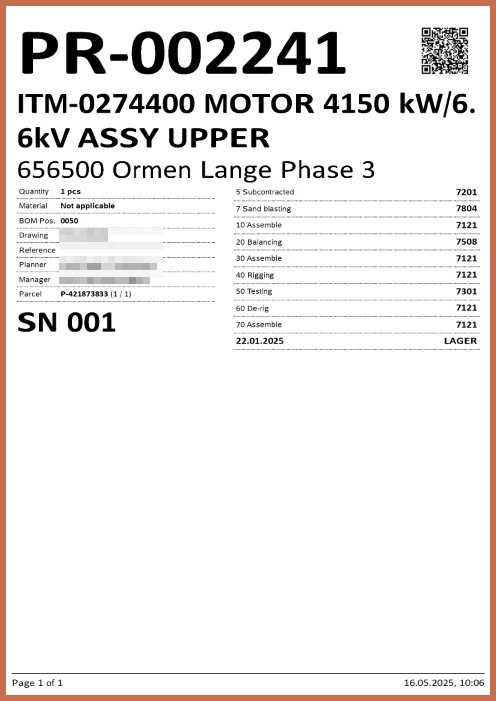
Portrait (operations)
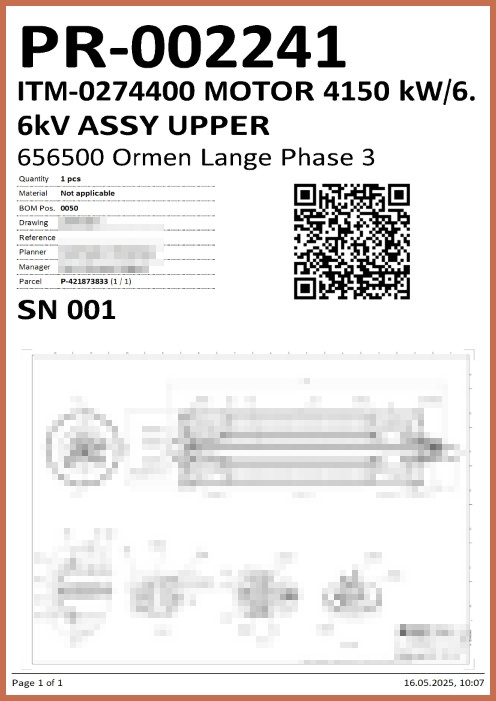
Portrait (drawing)
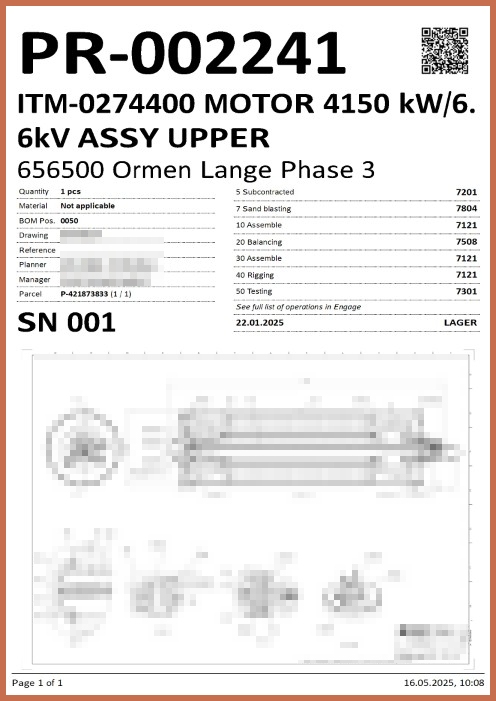
Portrait (operations, drawing)
Landscape
Landscape (operations)
Application flow diagrams & role permissions
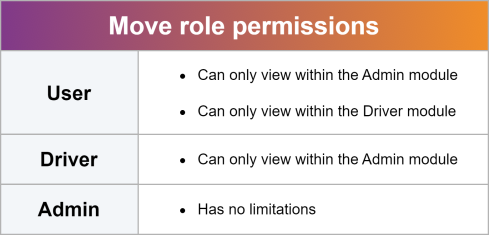
Role permissions chart
Tracking flow chart
![]()
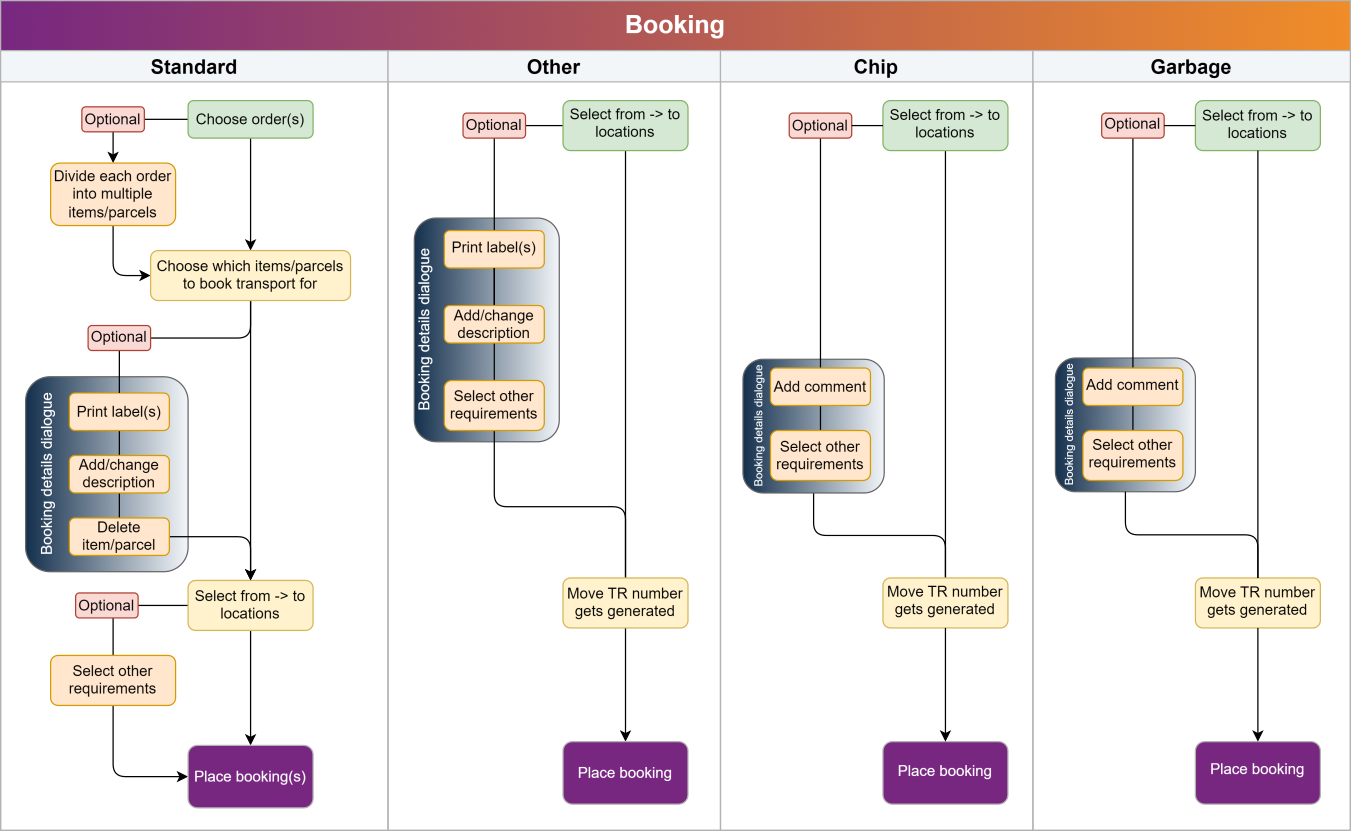
Booking flow chart
Driver flow chart
Admin flow chart
Move Widgets for Workspace
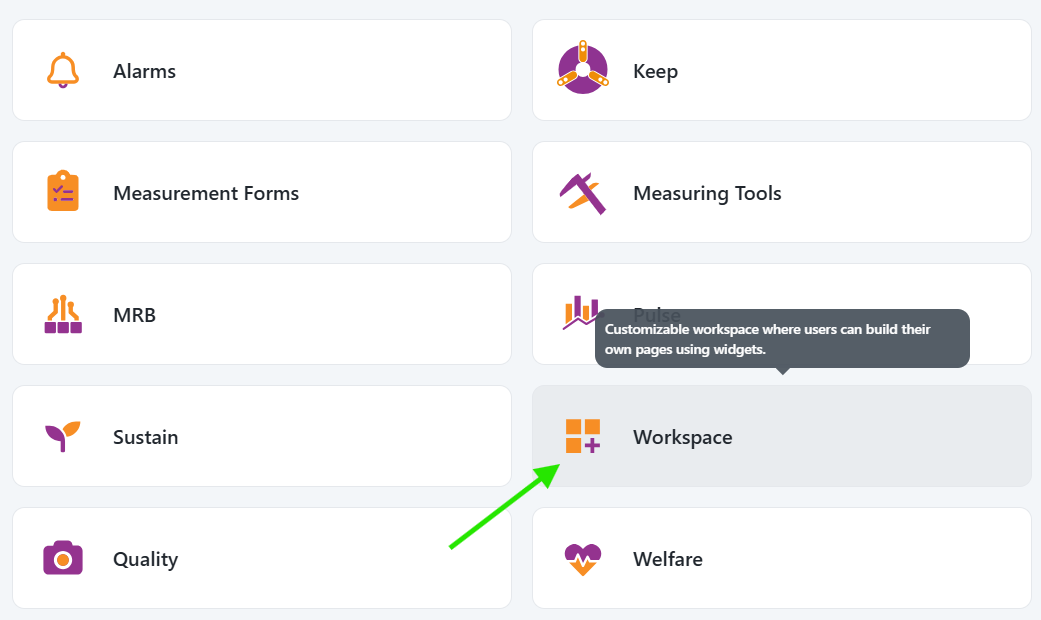
You will find everything Move-related regarding the Workspace module in this chapter.
Bookings widget
The Bookings widget displays the My bookings list and includes a built-in tracking function.
This widget presents both active and completed bookings. Users can cancel active bookings and print labels for both active and completed bookings. Clicking the order number allows users to track the order, and manual tracking is also possible by entering details in the tracking box.
Here's a quick demo:
Notifications
Get notified in Teams whenever there is a new booking that matches your selected filters.
Setup and configuration
First you must make sure the Teamsbot are installed for your organization and configured as described here
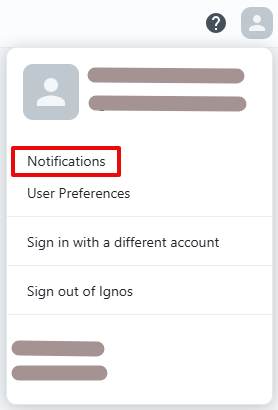
To set up your notifications, click your user icon in the top right, then notifications:
The current Booking Notifications view includes From, Others, and the activate/deactivate switch:
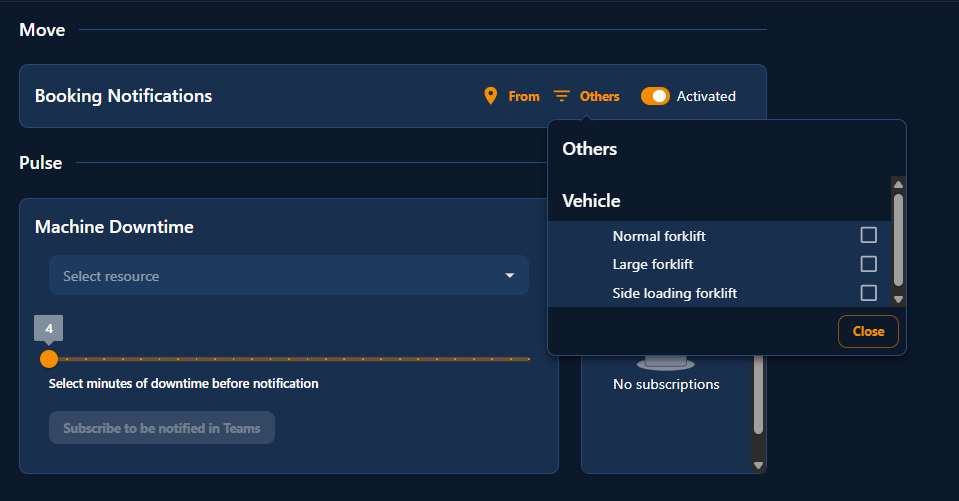
Booking Notifications support two filters:
- From lets you filter by zones and locations.
- Others contains the Vehicle filter.
The From filter now supports search, and the search matches both locations and zones.

The Vehicle filter includes these transport kinds:
Normal forkliftLarge forkliftSide loading forklift
If no zones or locations are selected in From, notifications apply to all bookings.
If no vehicle types are selected in Others > Vehicle, notifications apply to all vehicle types.
Use the activate/deactivate switch to turn Booking Notifications on or off. Your selected filters, including Vehicle, are saved in Booking Notifications.
Teams notification
When a new booking matches your selected filters, you will get a notification in Teams like this (look for the Ignos chat in Teams):

Click the link to open the booking in Move Driver.